CLIENTS
NCheck Bio Attendance Client is used as a client application for NCheck Bio Attendance server. It is mainly used to record attendance. It also can be used as a standalone attendance device. NCheck Bio Attendance client has two applications
NCheck Bio Attendance Lite client
NCheck Bio Attendance Lite client is a simple client application with minimal required functionality for Windows, Android and IOS.
NCheck Bio Attendance Standard client
NCheck Bio Attendance Standard client for Windows and Android includes client-side biometric extraction and matching which provides advanced functions like automatic face recognition, face capturing and offline operation. The Standard client requires a NCheck Bio Attendance license
NCheck Bio Attendance Surveillance client for Windows
NCheck Bio Attendance Surveillance client for Windows support all the features in NCheck Bio Attendance Standard client for Windows with guard functionality in which an authorized person can manually identify the person and record the event in the attendance system
NCheck Bio Attendance Guard client for Android
NCheck Bio Attendance Guard for Android application provide functionality which an authorized person can manually identify person and record event in the attendance system.
System requirement
Lite |
Standard |
Surveillance/Guard |
|
Windows |
|
|
|
Android |
|
|
|
IOS Client |
Apple device running IOS 10.2 OS or later |
Not available |
Not available |
Peripherals
NCheck Bio Attendance client applications support following peripherals.
Note
NCheck Bio Attendance installer for Windows is installing all necessary drivers in order to enable face, fingerprint and iris scanners. But in case if you need additional drivers, you may need to install compatible drivers in the computer. You can download drivers for supportable camera, fingerprint and iris scanners from scanner driver package <https://www.ncheck.net/scanner-drivers>`_. <https://www.ncheck.net/scanner-drivers/>`_
Face
NCheck Bio Attendance Android and IOS clients are using cameras available with the device. NCheck Bio Attendance Windows clients support following camera types.
USB cameras
IP cameras
USB cameras
In general, USB cameras working in Windows OS are supported.
IP cameras
Refer Neurotechnology guide for supported cameras section for all supported IP cameras. Refer Preferences section for add IP cameras for NCheck Bio Attendance Standard for Windows.
Fingerprint
NCheck Bio Attendance clients support external or internal USB fingerprint scanners. Refer Neurotechnology guide for supported fingerprint scanners and sensors for Windows standard client.
Iris
NCheck Bio Attendance clients support external or internal USB iris scanners. Refer Neurotechnology guide for supported iris scanners for Windows standard client`. <https://www.ncheck.net/supported-scanners-for-ncheck-standalone-version/iris-scanners>`_
Note
By default, iris scanners are disabled for Windows standard client. To enable, unzip necessary iris scanners from the IrisScanners folder in NCheck Bio Attendance installation folder (By default the installation folder is “C:Program FilesNeurotechnologyNCheck Bio Attendance”)
Other
NCheck Bio Attendance supports capturing other authentication data. Data capture is performed by using the following hardware.
Lite |
Standard |
|
RFID |
|
NFC Support |
Barcode |
External HID |
Using built-in camera |
Access control
NCheck Bio Attendance Standard clients can trigger external executables with given parameters as mentioned in External executables section.
Supporting Locations
NCheck Bio Attendance uses operating system provided location services to capture the location of attendance events.
Note
For enabling location service from the operating system, please refer location service configuration for the relevant operating system.
Install Client
Download client
NCheck Bio Attendance clients application download from download page.
Install clients for Windows
Windows install includes all components of NCheck Bio Attendance. You need to select the required client (Lite or Standard) to install the client. Refer Install client For Windows section for more details.
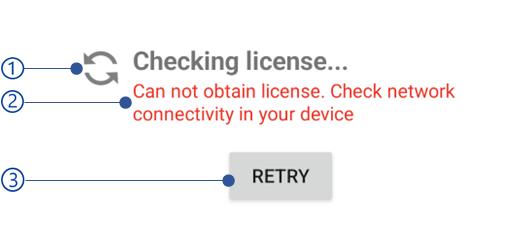
Figure 337 Select components of Windows installation
After successful installation you will be asked to activate license in NCheck Bio Attendance Standard clients, Surveillance client for Windows and Guard client for Android as mentioned in License Activation section. For NCheck Bio Attendance Lite client you will be asked to register the device as mentioned in Register clients section.
Open clients
The clients perform the following tasks before starting the application.
Task |
Sub task |
Description |
Initialize app |
Check permissions |
Refer Check permissions section. |
Prepare directories |
Refer Prepare directories section. |
|
Initialize device settings |
Initialize device details if exists. |
|
Check registration status |
Check whether the application has registered or not. If not, registered application will show registration view as shown in Register clients section. |
|
Check encryption |
Check encryption password |
Check client database can be open from the saved password. If the database cannot open from the existing password, client is asking the current database encryption password. Refer Check database encryption password section for more details. |
Check database encryption default password |
If the client database encrypted with the default password used in NCheck Bio Attendance client, the client is asking for a strong password when the first-time app opens. Refer Check default encryption password section for more details. |
|
Initialize data service |
The data service used for communicating with NCheck Bio Attendance server is starting |
|
Validate license |
Check network |
Refer Check network section for more details. |
Check license |
Check whether a valid NCheck Bio Attendance license has activated or not. Refer License Activation section for more details. |
|
Obtain license |
Validate the license. If the license validation failed, a valid license should be activated as mentioned in License Activation section. |
|
Initialize matching |
Enroll all biometric templated to the biometric engine. |
After completing all tasks, the application main view will be started as mentioned in Main view section.
Check permissions
Note
Permissions are required for Android clients only.
In Android applications, permissions need to be granted to ensure privacy and security of the device data. NCheck Bio Attendance Android clients requires following permissions.
Google play licensing check
Google Play offers a licensing service that lets you enforce licensing policies for applications that you publish on Google Play. With Google Play Licensing, your application can query Google Play at run time to obtain the licensing status for the current user, then allow or disallow further use as appropriate. Android permission “com.android.vending.CHECK_LICENSE: is using
Access location
NCheck Bio Attendance Android client is using device location details such as GPS coordinates and address when recording attendance. This requires “android.permission.ACCESS_FINE_LOCATION” permission.
Network information
This requires “android.permission.ACCESS_NETWORK_STATE” permission. NCheck Bio Attendance Android clients are using network information to check the network available in the device for communication.
Access interment
This requires “android.permission.INTERNET” permission. Android clients requires Internet to
Communicate with remote NCheck Bio Attendance server.
To either activate a license as mentioned in License activation/deactivation section or obtain License when application start based on the activated License types .
To log application and device data in remote logging service(Firebase)
Access Wi-Fi information
In mobile services Wi-Fi is frequently used to access internet. Android client uses device Wi-Fi information to check the network connectivity and indicate to user. “android.permission.ACCESS_WIFI_STATE” and “android.permission.CHANGE_WIFI_STATE” permissions are required
Access camera
“android.permission.CAMERA” permission is required. NCheck Bio Attendance Android client is using camera for
Face capture
Record users capturing face biometrics, Enroll face(s) to users.
Barcode capture
Capture User ids, device token,
Access storage
“android.permission.WRITE_EXTERNAL_STORAGE” permission is required below Android 11 application specific external storage to keep following data.
Diagnostic data
App generated log files to check application working status.
Downloaded files
License files
To browse the license files during activation for NCheck Bio Attendance Standard and Guard Android clients.
Capture RFID
NCheck Bio Attendance Android client is capturing RFID to record attendance and appointment creation. “android.permission.NFC” permission is required. This is used for NCheck Bio Attendance Standard client only.
Access device power management tools
To wake up device when record attendance and create appointments. “android.permission.WAKE_LOCK” permission is required.
Receive application boot completed
Start the client automatically when device has restarted. This requires “ndroid.permission.RECEIVE_BOOT_COMPLETED” permission.
Prepare directories
Following directories are using:
Log directory
Keep application specific logs to keep information about application status while using. If any problem happens, we are requesting these logs to investigate the problem.
License directory
Keep license specific data such as license mode, license text.
Database directory
For NCheck Bio Attendance Standard clients and Windows surveillance clients only.
Check network
When the application starts the client application is checking for the valid license availability. This requires a network connection based on the activated license types . If the network is unavailable, client will show network connectivity failure view and hold until the network available checking the network connectivity periodically as shown below.
Client |
Network connectivity failure view |
Android client |
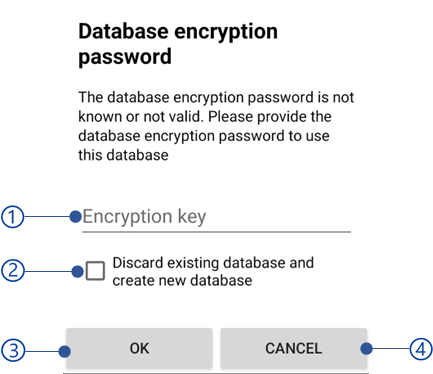
Figure 338 Android client network check¶ |
Note
NCheck Bio Attendance Lite clients is not checking network while opening because it does not use licensing.
Check encryption
Following NCheck Bio Attendance uses databases to keep attendances data when Offline operation mode setting is enabled.
NCheck Bio Attendance Standard clients
NCheck Bio Attendance Surveillance Windows clients
Clients are checking the following over the database when the application starts.
Check database encryption password
NCheck Bio Attendance Standard clients and Windows surveillance clients are storing database encryption password in the application context. If the client database cannot be decrypted from the encryption password, database encryption password dialog will be shown asking current password of the database as below.
Client |
Encryption dialog view |
Android client |
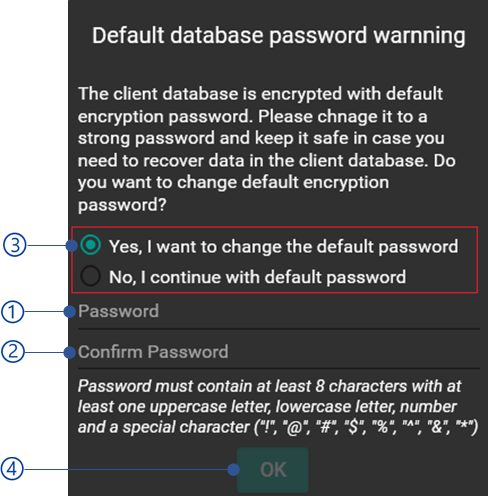
Figure 339 Database encryption password dialog for Android Standard client¶ |
Encryption key
Database encryption key.
Discard existing database and create new database option
Check this option to discard existing database and create new client database. You will lost all the data in the existing database if you continue selecting this option.
OK button
Cancel button.
Check default encryption password
NCheck Bio Attendance Standard clients and Windows Surveillance clients databases should be encrypted to secure the database. In the first open default database password dialog will be shown asking the encryption password. If custom password is not required, user can continue using default encryption password.
Client |
Default database encryption password dialog |
Windows client |
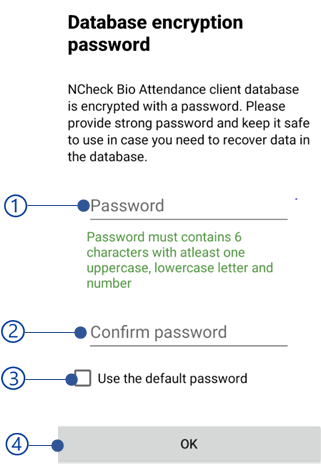
Figure 340 Default database password warning dialog for Windows Standard and surveillance clients¶ |
Android client |
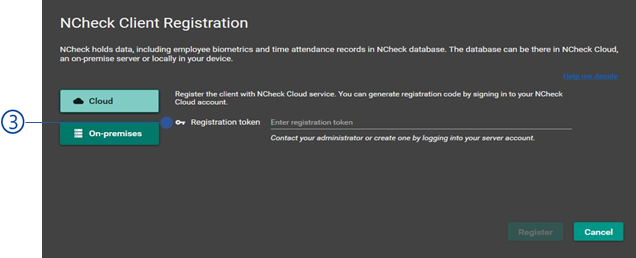
Figure 341 Default database password warning dialog for Android Standard client¶ |
Password
The password to encrypt the database. This password must contain at least 6 characters with once uppercase, lowercase letter, and number.
Confirm password
Encryption password options
Use the default password
Use custom passowrd
OK button
Note
The default encryption password of the clients is 123456.
License Activation
License activation is required for following clients.
NCheck Bio Attendance Standard clients
NCheck Bio Attendance Android Guard client
NCheck Bio Attendance Windows Surveillance client
Refer Activation section for more details.
Note
NCheck Bio Attendance Lite clients are free and not required to activate licenses.
After successful license activation, you will be asked to register the client application as mentioned in Register clients section.
Register clients
NCheck Bio Attendance Clients can be used with following modes.
NCheck Bio Attendance Cloud
NCheck Bio Attendance server installed on-premises.
Standalone (Standard clients and Surveillance clients only)
The registration process configures the application to work with one of the above three modes. Accessing registration can be done in the following ways.
The client application will prompt you the registration dialogue in case it is not registered.
The client application is unregistered as mentioned in Unregister section.
Registration screen
Mode of registration
Server URL
Search server button
Select this option to detect server URL. This option works if the server and client work in the same network.
Scan barcode button
Instead of entering registration token, users can scan barcode in Android client.
Cloud mode
Version |
Cloud mode |
|
Windows |
Lite |
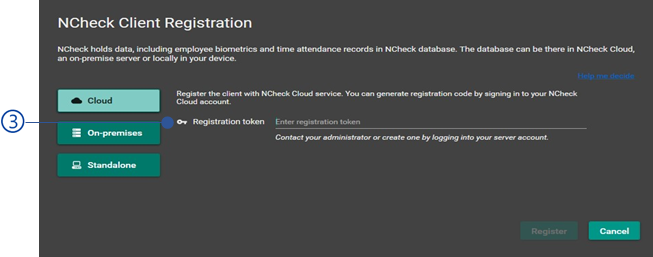
Figure 342 Windows lite client registration view on cloud mode¶ |
Standard/Surveillance |
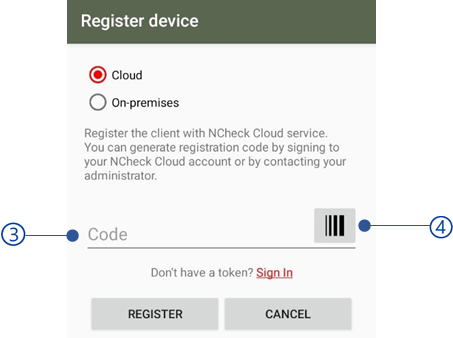
Figure 343 Windows standard client registration view on cloud mode¶ |
|
Android |
Lite/Guad |
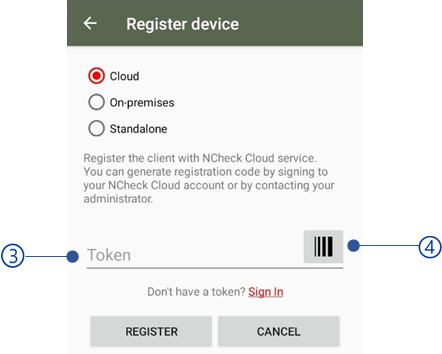
Figure 344 Android lite client registration view on cloud mode¶ |
Standard |
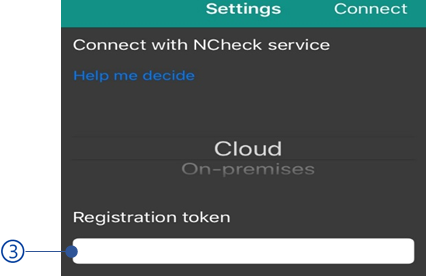
Figure 345 Android standard client registration view on cloud mode¶ |
|
IOS |
Lite |
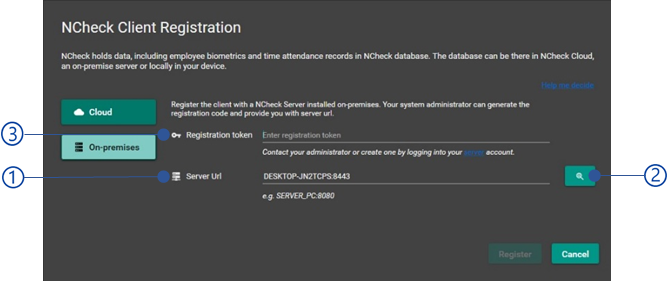
Figure 346 IOS lite client registration view on cloud mode¶ |
On-premises mode
Version |
On-premises mode |
|
Windows |
Lite |
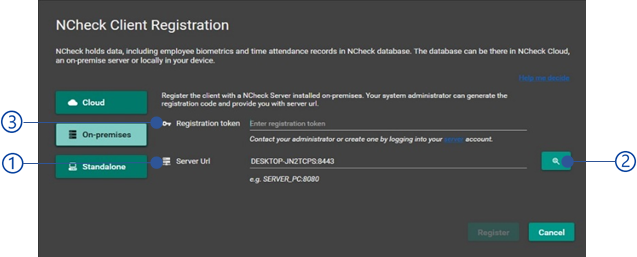
Figure 347 Windows lite client registration view on on-premises mode¶ |
Standard/ Surveillance |
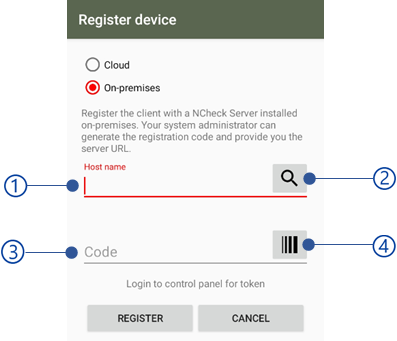
Figure 348 Windows standard client registration view on cloud mode¶ |
|
Android |
Lite/Guard |
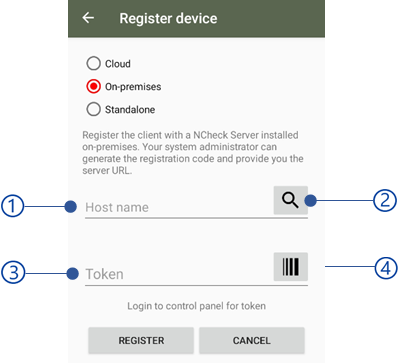
Figure 349 Android lite client registration view on on-premises mode¶ |
Standard |

Figure 350 Android standard client registration view on on-premises mode¶ |
|
IOS |
Lite |
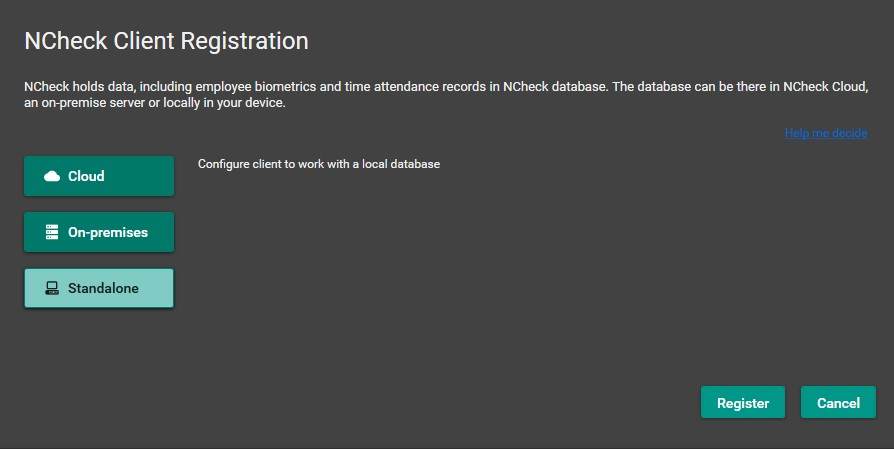
Figure 351 IOS lite client registration view on on-premises mode¶ |
Standalone mode
Version |
Standalone mode |
|
Windows |
Standard |
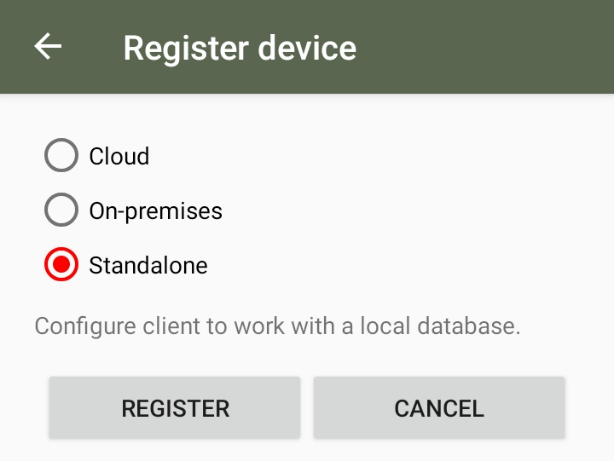
Figure 352 Windows standard client registration view on standalone mode¶ |
Android |
Standard |
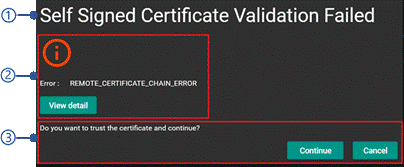
Figure 353 Android standard client registration view on standalone mode¶ |
Registration Token
To register the client application with cloud or on-premises server, a registration code is required. Registration code can be generated by an administrator. Depending on the registration code generation, the client application can be registered in the following two modes.
Group
Please refer User group quick view section for more details about registering device for group of users. Once the device is registered, the selected group of people can use the attendance terminal to check-in and check-out.
Personal
Please refer User quick view section for more details about registering device for person. Once the device is registered as a personal device, the selected user can only perform check-in and check-out from the terminal.
Registration
Select the Connect button to proceed with registration. If the server has signed with the untrusted certificate, you will be asked to accept self-signed certificate as mentioned in SSL Certificate validation section. Successful registration will take you to Main view . Register button will be disabled if the mandatory fields are empty or Validation errors exist. The following error messages could appear in the registration screen.
Error code |
Error message |
2051 |
Failed to register with the NCheck Bio Attendance server {server URL} |
2052 |
Failed to register with the registration code |
2053 |
The registration token has already been used. Please generate new registration code or contact administrator |
2054 |
Could not discover the NCheck Bio Attendance server URL |
SSL Certificate validation
To start the NCheck Bio Attendance server, a valid SSL certificate must be added as mentioned in Server section. If any SSL certificate validation error occurred while registering or using the application, you will be prompted the validation error as below.
Client |
Self-signed certificate prompt |
Windows |
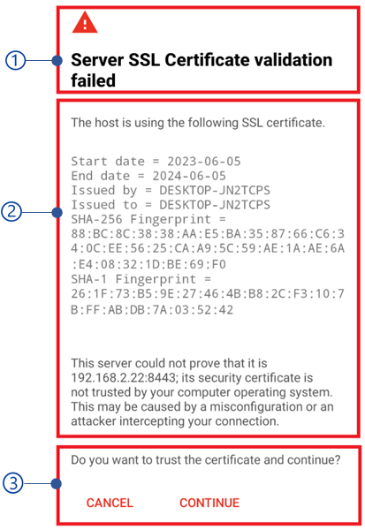
Figure 354 Certificate validation error dialog for Windows client¶ |
Android |

Figure 355 Certificate validation error dialog for Android client¶ |
IOS |

Figure 356 Certificate validation error dialog for IOS Lite client¶ |
Title of the SSL certificate validation error dialogue
Error message
The dialog shows the following SSL certificate information associate with the registration URL to get verify before registering with the server
Start date
End date
Issuer
User
Certificate hashing
Actions
Cancel
Terminate the application.
Continue
accept and continue the current registration.
Main view
NCheck Bio Attendance client’s main views as follows,
Main view for biometrics capture
Version |
Windows |
|
Windows |
Lite |

Figure 357 Main view of Windows lite client¶ |
Standard |
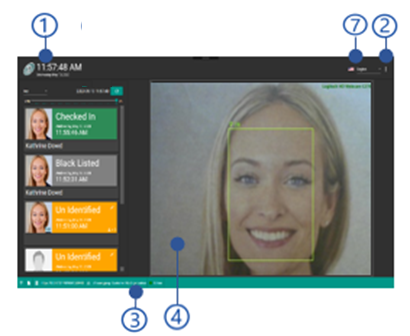
Figure 358 Main view of Windows standard client¶ |
|
Surveillence |
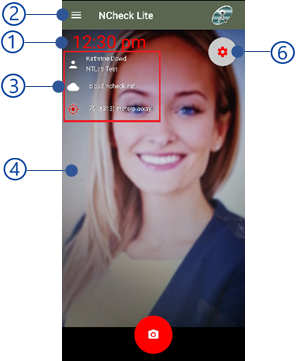
Figure 359 Main view of Windows Surveillance client¶ |
|
Android |
Lite |
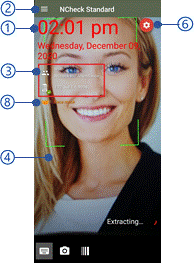
Figure 360 Main view of Android lite client¶ |
Standard |
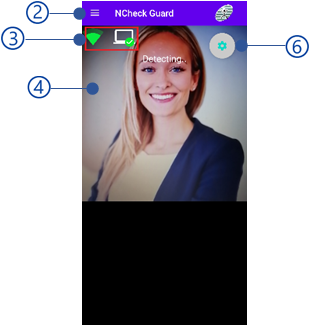
Figure 361 Main view of Android standard client¶ |
|
Guard |
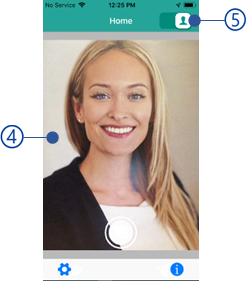
Figure 362 Main view of Android Guard client¶ |
|
IOS |
Lite |
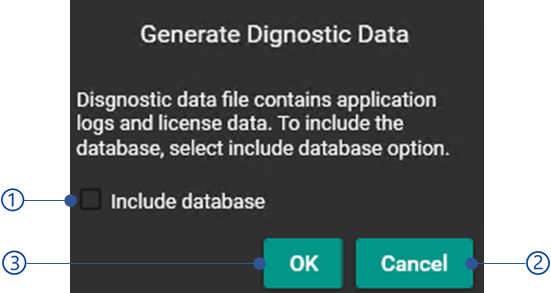
Figure 363 Main view of IOS lite client¶ |
Date and time
Show the Time and date.
Menu button
Refer Main menu section for more details.
Status bar
Refer connection status section for more details.
Single/multi face mode button
Settings collapse button of Android clients
Language menu of Windows clients
Selected luggage will be applied to the application.
Mask detection indicator
Mask detection indicator is showing in the view according to the Mask detection setting and Mask detection threshold can be applied from either web control panel Client settings view or Client settings for device .
Main menu
Client |
Windows |
Android |
IOS |
Lite |
Not available |
||
Standard – Cloud/On-premises |
Not available |
||
Standard - Standalone |
|
Not available |
|
Surveillance |
Not available |
Not available |
|
Guard |
Not available |
|
Not available |
Diagnostic data
Generate diagnostic data for NCheck Bio Attendance standard android client to troubleshoot application issues. Diagnostic data contains the following details.
Log folder
Application logs.
License folder
License activation details
Database folder
SQL lite database files for Android Standard, Windows Standard and Windows Surveillance clients.
User can select whether the database should include in the diagnostic data or not as below.
Include database checkbox
Check to include database in the diagnostic data.
Cancel button
OK button
Once select OK button, the diagnostic data will be downloaded to the downloads folder as a zip file and name of the file equivalent to the current timestamp.
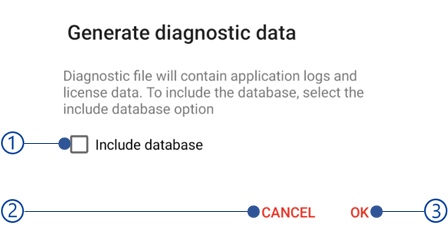
Figure 364 Generate diagnostic data dialog for Windows clients

Figure 365 Generate diagnostic data dialog for Android clients
Control panel
This option allows to access NCheck Bio Attendance control panel from the client as follows.
NCheck Bio Attendanceweb control panel
Control panel allows to access NCheck Bio Attendance web control panel if the client is registered to the Cloud/On-premises modes.
NCheck Bio Attendance Client control panel
Control panel allows to access NCheck Bio Attendance Client control panel if the NCheck Bio Attendance client is registered to the standalone mode.
Login
Login to the NCheck Bio Attendance Client control panel from NCheck Bio Attendance standard clients.
Compact DB
NCheck Bio Attendance standard Android client uses SQLite database to store application data. But one of the major problems in SQLite database is the database size is not decreasing even if the data has deleted from the database. To clear the cache, you must run VACUUM SQLite query in the database. Compact DB option triggers VACUUM query.
Note
Use Compact DB option at least once a month to release cache in the SQLite database for NCheck Bio Attendance standard Android client.
Register
Re-register the client application as mentioned in Register section.
Unregister
The unregister option is removing NCheck Bio Attendance client registration details from the NCheck Bio Attendance server as well as the NCheck Bio Attendance client and allow to register the client application again. This requires network connectivity to connect with the server. If server connectivity fails, User can cancel the un registration or proceed un registration without removing registration details from the server.
Synchronize
NCheck Bio Attendance Standard clients synchronize server-side data with the devices in the time intervals define in Offline data synchronize interval setting. If instant synchronize is required, user can select Synchronize option.
License manager
Show the License activation window as mentioned in Activation section.
Upgrade now
Show benefits of Standard clients over Lite client and URLS to update to the Standard client.
Check for update
Open NCheck Bio Attendance Standard client from the Google play store to update to the newest version.
About
Client |
About view |
Windows client |
Figure 366 About view of Windows clients¶ |
Android client |
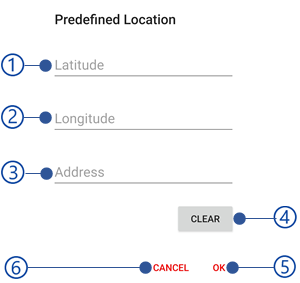
Figure 367 About view of Android clients¶ |
Product name
Copyrights
Neurotechnology logo
Application type and version
NCheck Bio Attendance support email
NCheck Bio Attendance website
Open NCheck Bio Attendance log folder
Generate NCheck Bio Attendance diagnostic info.
Open NCheck Bio Attendance privacy policy
Close button
Preferences
Windows |
Android |
IOS |
|
Lite |
|||
Standard |
|
Not available |
|
Surveillance |
Not available |
Not available |
|
Guard |
Not available |
|
Not available |
Capture sound
Enable to play the capturing sound when the image is capturing.
Crop face
Enable to crop face to increase the matching accuracy.
Predefined location
This allows to set a default location for Android and IOS clients. This predefined location will be used for the recording event according to the selected option in Allow predefined location client setting in the server. The predefined location dialog is as follows.
Client |
View |
Android |
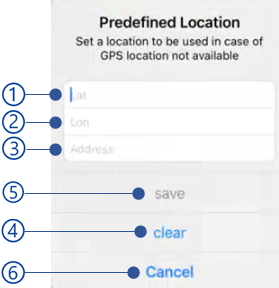
Figure 368 Predefined location dialog in Android client¶ |
IOS |
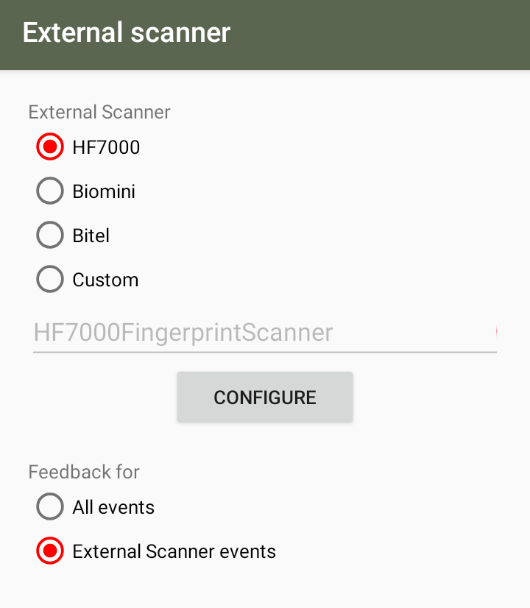
Figure 369 Predefined location dialog in IOS Lite client¶ |
Latitude
Latitude coordinate of the location
Longitude
Longitude coordinate of the location
Address
Clear button
Remove all location parameters.
Ok button
Save location coordinates.
Cancel button
Checkout notification
Check-out notifications are used to make user to check-out before the check-out time. Checkout notifications are available in Android and IOS Lite clients registered as a personal device.
Extract on server
In NCheck Bio Attendance Standard clients, face details are extracted to identify the faces when capturing faces. Enable this setting to minimize the extraction delay on low performance devices by doing the extraction in the server..
Low CPU support
This setting has been introduced for low CPU devices to lower the CPU usage when application in use. Enable this setting to preview captured face instead of showing the face rectangle (as mentioned in Face capture view section) with lower resolution preview.
Startup application
Enable this setting to start application on restart the device.
Preview position
Align camera preview to the top, center, or bottom of the view port.
External scanner
NCheck Bio Attendance Standard can be used with external scanners to record attendances with extended user experiences. Currently NCheck Bio Attendance Standard supports below type of devices/scanners.
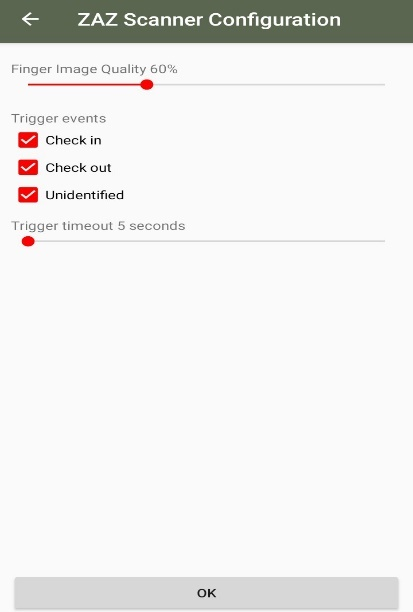
Figure 370 External scanners view of Android standard client
TPS980
TPS980 is an Android Biometric Face recognition Terminal with infrared sensor and face recognition camera and fingerprint scanner. NCheck Bio Attendance Standard client can be installed to use with available sensors.
HF-7000
HF-7000 from HFSecurity is a fingerprint reader based on capacitive fingerprint sensor. The fingerprint scanner uses USB for communications with host PC or device. Refer this link for more information. To configure the NCheck Bio Attendance Standard
Select External scanner from the scanner list
Select configure button to configure the selected scanner.
Select the feedback type from the list
All events
Select this option to apply scanner configuration across all scanners.
External scanner events
Select this option to apply scanner configuration to external scanner events. 3. Select the Configure button to customize the selected scanner configuration above.

Figure 371 TPS scanner configuration view
Mirror preview
Enable this to fix the mirror effect of the camera preview.
Enable app orientation
Enable this to fix the application ore as 0, 90, 180, 270 degrees.
Note
This setting may not be compatible with the devices, designed for a fix orientation Accelerometer and gyroscope sensors are not available.
Rotation settings
Custom rotation settings need to be configured in case of camera orientation and device rotation settings return from the Android API are not same as standard Android devices. This applicable for the devices,
Designed for a specific orientation.
Accelerometer and gyroscope sensors are not available.
Camera orientation and device rotation can be set as follows, Camera orientation for a normal android device can be identified as follows.
Camera |
Orientation |
Front camera |
270 degrees |
Back camera |
90 degrees |
When the camera orientation has differences as mentioned above, this value can be set manually using these settings. Device rotation for a normal device can be identified as follows,
Device orientation |
Device rotation |

|
0 |

|
1 |

|
2 |

|
3 |
Users can set matching value for device rotation in special devices depending on the device orientation as above table.
Enable power saving mode
Reduce the CPU usage when application is idle.
Power saving mode timeout
The timeout can be select to set the device idle when no attendance recording. Available timeouts are
10 minutes
20 minutes
30 minutes
1 hour
Encrypt the database
Encrypt the database of NCheck Bio Attendance Standard client by giving a password.
Enable logs
Log all events to a file for debugging.
Diagnostic report
Generate Diagnostic report and send to developers for debugging.
Capture quality
Select face capture quality to reduce the time when recording events.
Low
Medium
High
very high
Configuration
Show camera guidance message when the of NCheck Bio Attendance Windows client is idle. The configuration view is shown below.
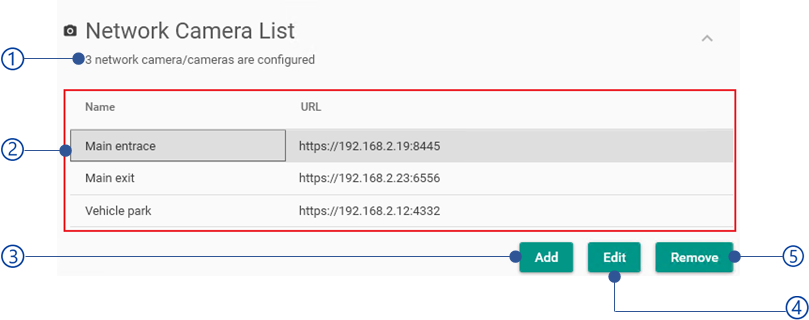
Figure 372 Configuration view of Windows client
Checkbox to enable/disable camera guidance message.
Camera guidance message, if camera guidance message setting is enabled,
Message should have less than 25 characters.
Network camera list
This option allows to configure IP cameras with NCheck Bio Attendance Windows Standard and survilance client application.

Figure 373 Camera list preference of Windows standard client
Number of network cameras configured.
Camera list table
Camera name and URL are shown.
Add button
Refer Add/edit network camera section for more details about add network camera.
Edit button
Refer Add/edit network camera section for more details about edit network camera.
Remove button
Remove selected camera.
Add/edit network camera
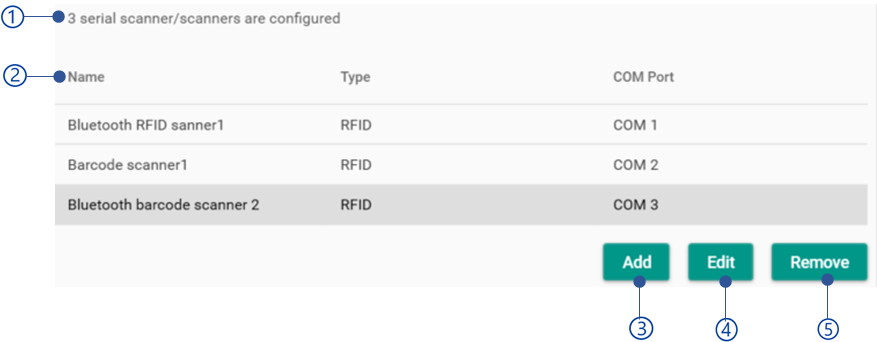
Figure 374 Add/edit network camera
Name
Name of the camera
URL
URL of the network camera
Key
Camera identification key generated by the client. This cannot be changed
Serial scanners
Serial scanner configuration in client preferences is used to configure barcode and RFID scanners which can be connected using physical serial port or Bluetooth serial port. The serial scanner view has shown below.

Figure 375 Serial scanners view
Number of serial scanners available
Serial scanners table
Add button
Refer Add/edit serial scanner section for more details about add serial scanner.
Edit button
Refer Add/edit serial scanner section for more details about edit serial scanner.
Remove button
Remove selected serial scanner.
Add/edit serial scanner
Add/edit serial scanner view has shown below.

Figure 376 Add/edit serial scanner dialog
Back button
Name
Type
Type of the serial scanner as RFID or Barcode
COM port
COM port is serial communication in the client device. COM port can be COM 1, COM 2, COM 3, COM 4
Baud rate
Baud rate is, data rate used. Standard data rates supported are listed in selection. Baud rate can be:
4800
9600
19200
38400
57600
115200
230400
Parity
The Parity is used to error correction (usually none) eld odd parity and even parity. The available values are:
None
Odd
Even
Mark
Space
Data bits
Data bits are number of data bits in a communication character. Data bits can be
5
6
7
8
Stop bite
Serial port stop bits are number of bits sending after one letter/byte to mark finish. Select value from
None
1
1.5
2
Key
A unique ID that cannot be changed.
Apply button.
External scanners
External scanner configuration is used to configure the any third-party peripheral device integrated with Ncheck Peripheral API. NCheck Peripheral API can be used to develop peripheral integration package (dll in windows and APK in Android). Integration package is configured with the client using external scanner configuration. External scanner configuration view is shown below.

Figure 377 External scanner configuration view
Browse button
Browse peripheral integration package.
Configure button
Configure button provide external scanner specific configurations which have provided by the peripheral integration package.
Surveillance engine properties


Figure 378 Surveillance engine properties of Surveillance client
Use NVDIA GPU
Enable/disable running surveillance engine on GPU
Determine Age
This enable/disable showing the age on top of the face rectangle in the attendance view.
Determine gender
This enable/disable showing the gender on top of the face rectangle in the attendance view.
Determine Glasses
This enable/disable showing the availability of glasses (whether the user is wearing spectacles) on top of the face rectangle in the attendance view.
Apply button
Cancel button
Enable auto capture
The capture mode of the Guard client can be changed as following.
Manual capture
The fault capture mode of the Guard client. When this mode has enabled, the Guard must capture the face manually pressing the capture button. To enable this mode, disable enable auto capture mode setting from the preference menu.
Auto capture
To enable this feature, enable “Enable auto capture mode” from the Preference menu. When the auto capture mode has enabled, the Guard client will be automatically detect the face and then extract once faced to the camera.
Connection status
Connection status view |
||
Windows |
Lite |

Figure 379 Status bar view of Windows lite client¶ |
Standard/ Surveillance |
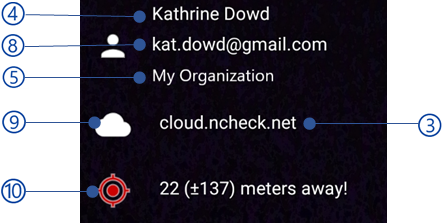
Figure 380 Status bar view of Windows standard client¶ |
|
Android |
Lite |
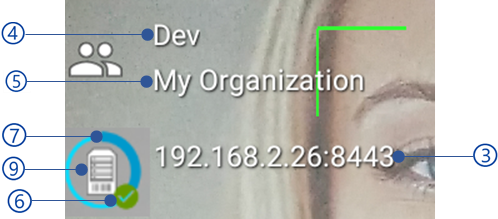
Figure 381 Registration details of Android Lite client¶ |
Standard |
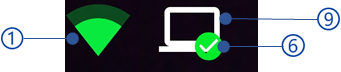
Figure 382 Registration details of the Android standard client¶ |
|
Guard |

Figure 383 tus bar of Guard client¶ |
Network availability
License status indicator
Shows the current license obtaining status as licensed, trial or expired.
Server and port
URL and port of the connected server in cloud, on-premises or standalone mode
Registered user/user group name
Registered user/user group name is showing in cloud or on-premises mode. In standalone mode, “All users” will be shown.
Organization name in the cloud or on-premises mode
Connectivity status with the server indicator in cloud and on-premises mode as shown in below.
Table 80 Online/Offline statuses of Standard clients¶ Status
Description
Android standard client
Windows standard client
Online
Connected with the server


Offline
Cannot connected with the server


Synchronizing progress of the standard clients if the Offline operation mode is enabled.
Email address if the Lite client registered to the user and Allow without biometrics setting has enabled.
Server indicator for cloud, on-premises, and standalone mode.
Mode |
Indicator |
Cloud |

|
On-premises |
|
Standalone |

|
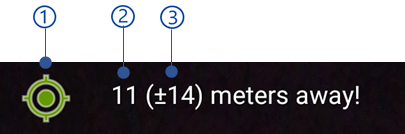
Location restriction status
Location restriction status indicates how far from the location coordinates where the location restriction applied as mentioned in Location restrictions section. Android Lite client uses Google location services to find the device location. Location restriction status indicated following details.
Status |
View |
Location is restricted. But user is inside the permitted radius |
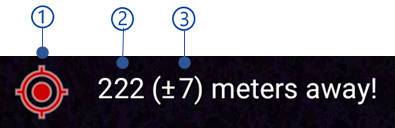
Figure 384 User inside the permitted area¶ |
Location is restricted. User is not inside the permitted radius. |

Figure 385 User is not inside the permitted area¶ |
Location services are not available. Location services of the device has disabled or not available in the area. |

Figure 386 Location coordinates are not available¶ |
Location has not restricted. |
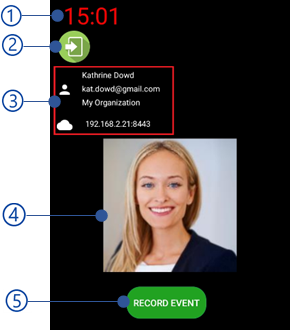
Figure 387 Location has not restricted
|
The distance and location accuracy may not be accurate depending on the Google location service availability. Please refer this Google maps help for more details.
Main view for non-biometrics capture
Note
This feature is currently available with NCheck Bio Attendance Lite for Android only.
In NCheck Bio Attendance Lite for Android, users are allowed to record the events without presenting face biometrics. In order to enable this feature, Users must enabled the Allow without biometrics setting as mentioned in NCheck Bio Attendance control panel Client settings view or Device settings sections. The view is changing according to the enable/disable status of the Manual capture start setting in the NCheck Bio Attendance Client settings view or Block/unblock device/API as shown in Table 82 . When the Manual capture start is enabled, user can select the event as check-in or check-out before record.
Manual capture start is disabled |
Android Lite |
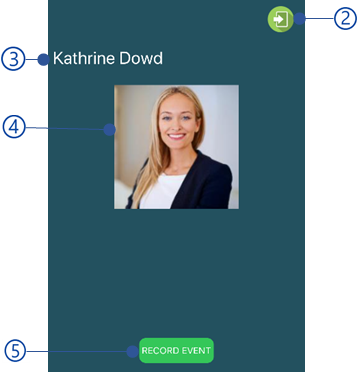
Figure 388 Capture without biometric view of Android lite client¶ |
IOS Lite |
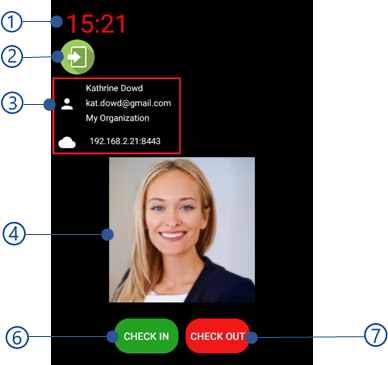
Figure 389 Capture without biometric view for IOS Lite client¶ |
|
Manual capture start is enabled |
Android Lite |
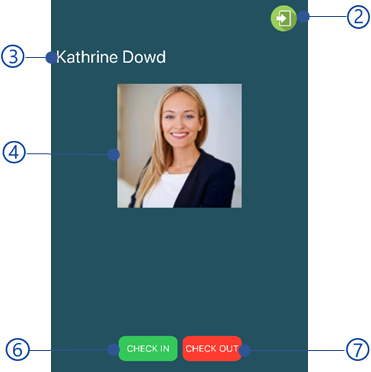
Figure 390 Capture without biometric view of Android lite client when manual capture start setting is enabled¶ |
IOS Lite |
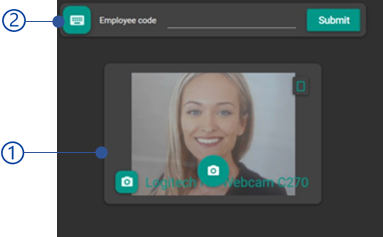
Figure 391 Capture without biometric view of IOS Lite¶ |
Time
Check-in/check-out icons
User thumbnail
Record event button
Record the events
Check-in button
Record the check-in events
Check-out button
Record the check-out events
Attendance view
Attendance view shows attendance view screen. Attendance view Screen has the following components.
Following error could be occurred during capture.
Error code |
Error message |
2002 |
License cannot be obtained |
2055 |
Device has not registered. Please register the device first. |
2056 |
The location is restricted. You are not allowed record attendance from this location |
2042 |
Could not record events. The user has been blocked |
2037 |
Could not record events. The device has been blocked |
2043 |
Could not record event. Check-in time has restricted |
2044 |
Could not record event. Check-out time has restricted |
2057 |
You have already checked-in/checked-out. Please try again in {number of seconds} seconds. |
2058 |
Attendances time has restricted. Please contact administrator for more details. |
2059 |
No match found. Please make sure that face/fingerprint/iris templates have been enrolled before record attendance. |
2060 |
Failed to identify the face/fingerprint/iris. Please try again. |
2064 |
Could not record attendances. Invalid user id input. |
2065 |
Could not record attendances. Peripherals are not ready. Please try again. |
2067 |
User not allowed to Check-in while on Restricted Leave! |
Capture view
The default capture view of the NCheck Bio Attendance Standard and Lite clients. Capture view can have a one or more capture device views. Those are
Capture view supportability in Lite and Standard can be identified as follows.
Lite |
Standard |
Surveillance |
Guard |
|
Face capture |

|
|
|
|
User id input |

|
|
|
|
Fingerprint capture view |
|
|
|
|
Iris capture view |
|
|
|
|
RFID capture view |
|
|
|
|
Barcodecapture view |
|
|
|
|
Version |
Lite |
|
Windows |
Lite |
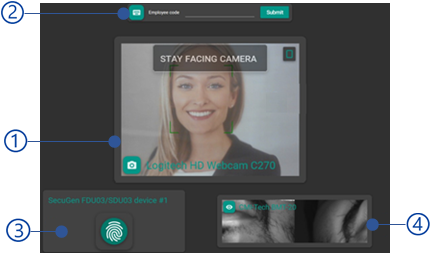
Figure 392 Capture view of Windows lite client¶ |
Standard |
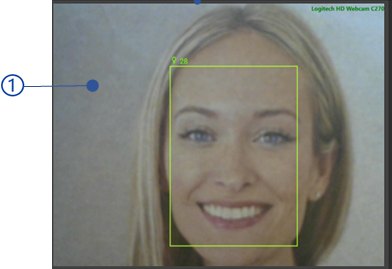
Figure 393 Capture view of Windows standard client¶ |
|
Surveillance |
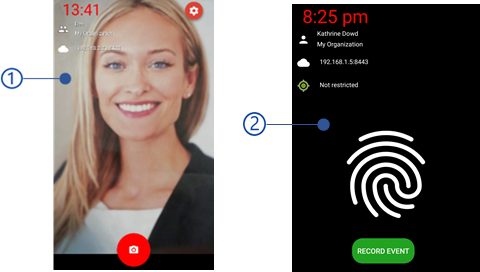
Figure 394 Capture view of Surveillance client¶ |
|
Android |
Lite |
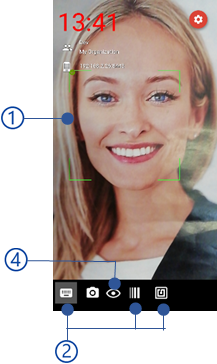
Figure 395 Capture views of Android Lite client¶ |
Standard |
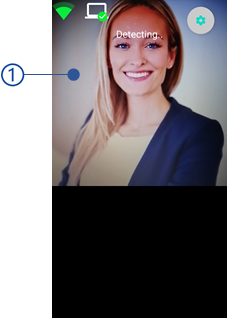
Figure 396 Capture view of Android lite client¶ |
|
Guard |
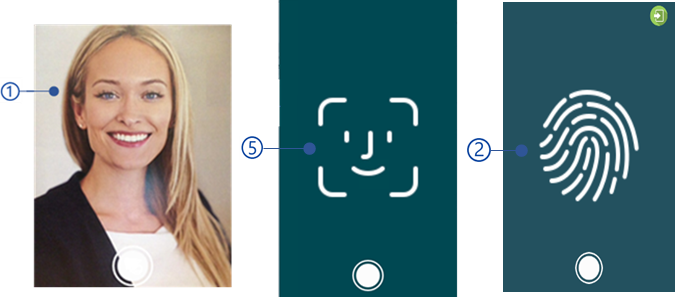
Figure 397 Capture view of Guard client¶ |
|
IOS |
Lite |
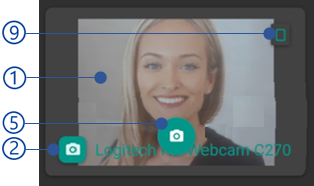
Figure 398 Capture view of IOS Lite client¶ |
Face capture view
Version |
||
Windows |
Lite |
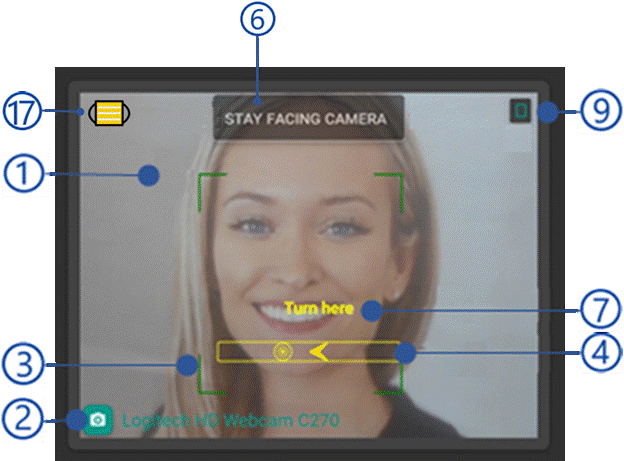
Figure 399 Face capture view of Window lite client¶ |
Standard |

Figure 400 Face capture view of Window standard client¶ |
|
Surveillence |

|
|
Android |
Lite |
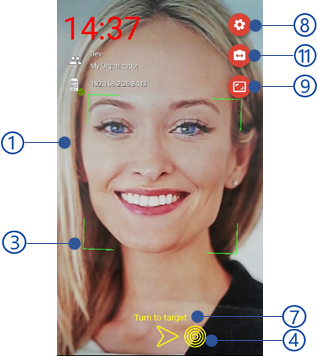
Figure 401 Face capture view of Android lite client¶ |
Standard – Low CPU support is disabled. |
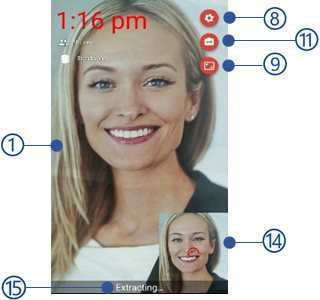
Figure 402 Face capture view of Android standard client¶ |
|
Standard – Low CPU support is enabled |
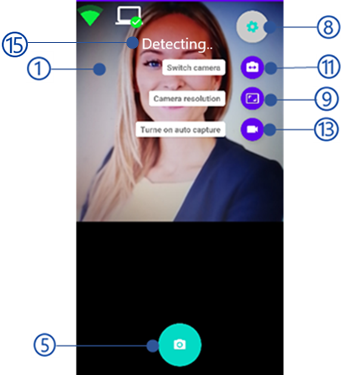
Figure 403 Face capture view when Low cpu mode enabled in Standard client¶ |
|
Guard |
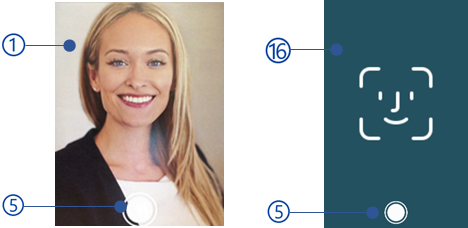
Figure 404 Face capture view of Guard client¶ |
|
IOS |
Lite |
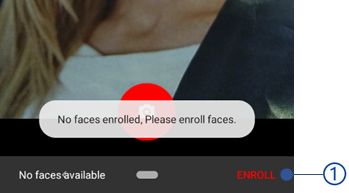
Figure 405 Face capture views of IOS lite client¶ |
Image preview
Camera name
Face rectangle
Face liveness guidance
Face liveness guidance in Standard clients if the Liveness setting has enabled.
Capture button
In Android Guard client, capture button will appear if Manual capture mode is turned on. Refer Capturing faces section for more details.
Instruction for face capture
Liveness Instruction
Settings of the face capture view
Resolution
Flashlight
Switch camera
Multi face button
Available in Lite clients. Refer Multi face mode in Lite client section for more details.
Turn on auto capture/manual capture modes
Extracting image of the Android Standard client when Low CPU support has enabled.
Status text
Status texts are available in NCheck Bio Attendance Standard client for Android when Low CPU support has enabled and Guard client
Face ID view of IOS Lite client
Table 87 Status texts of Android Standard and Guard clients¶ Description
Standard client - Low CPU support has enabled
Guard client
Face capturing in progress
Detecting..
Detecting..
Face extraction in progress
Extracting..
Extracting..
Face matching in progress in guard client
Performing matching..
Mask detection indicator
Mask detection indicator is showing in the view according to the Mask detection setting and Mask detection threshold can be applied from either web control panel Client settings view or Client settings for device
Proceed to Capturing faces section for more detail about capturing face in client applications.
Capturing faces
Face capturing in Standard client
Face capture for attendance recording is performed in the following steps.
Face capture instruction “Stay facing camera” is shown.
The user faces to the camera
If the face liveness setting is enabled, users can see the liveness guidance in the screen as mentioned in Face liveness mode section. Otherwise, Standard client shows face rectangle and captures face automatically.
The client performs attendance recording.
The Client will validate the user according the Authentication mode
Note
To enable face liveness, select face liveness mode from the Biometric setting list of NCheck Bio Attendance control panel.
Face capturing in lite client
o record attendance in the single face mode,
Face capture instruction “Stay facing camera” is shown.
The user faces to the camera
Select Capture button.
The client performs attendance recording.
If no template enrolled for the user, NCheck Bio Attendance lite client registered to a user will be asked to enroll face if the Self-enroll templates is enabled in the server as shown in Figure 406
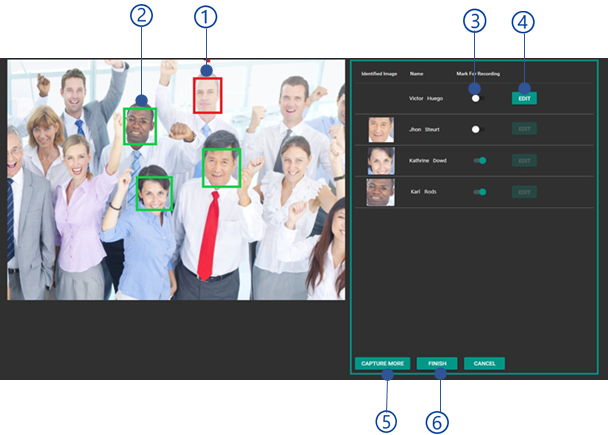
Figure 406 Self enrollment in Android lite client
Enroll button
Enroll the captured image as face template.
If templates exist, in successful event record, the Client will validate the user according the Authentication mode .
Face capturing using Face ID in Lite client
For NCheck Bio Attendance Lite client for IOS, face ID authentication mode can be enabled from Use in-built biometric verification on personal clients setting. The Client will validate the user according the Authentication mode once the capture the face.
Multi face mode in Lite client
Multi face mode can be used to record attendances of the group of users from single capturing. This mode is available on NCheck Bio Attendance Lite clients registered with a user group and switched to the multi face mode.
Note
Enable Multi face mode from Biometric settings view or Device settings to enable multi-face mode in Lite clients.
To record attendance in the multi face mode,
Enable multi face mode in the Face capture view
Capture the face image of the users the multi-face view will be shown as Table 88
Lite |
|
Windows Client |
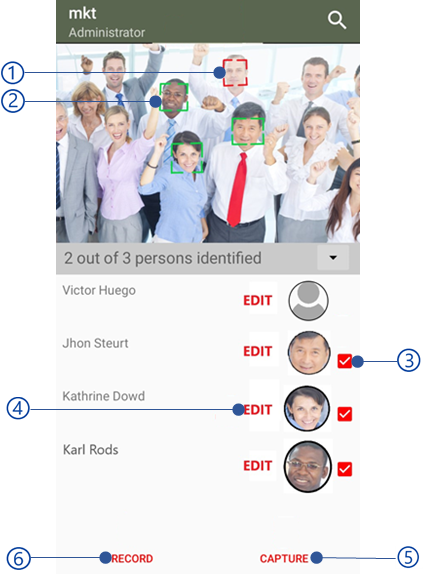
Figure 407 Multi face captured view of Windows lite client¶ |
Android Client |
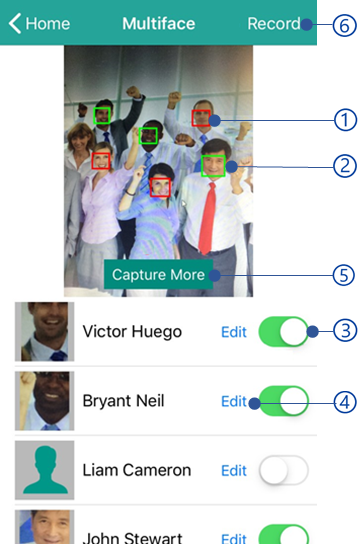
Figure 408 Multi face captured view of Android lite client¶ |
IOS client |
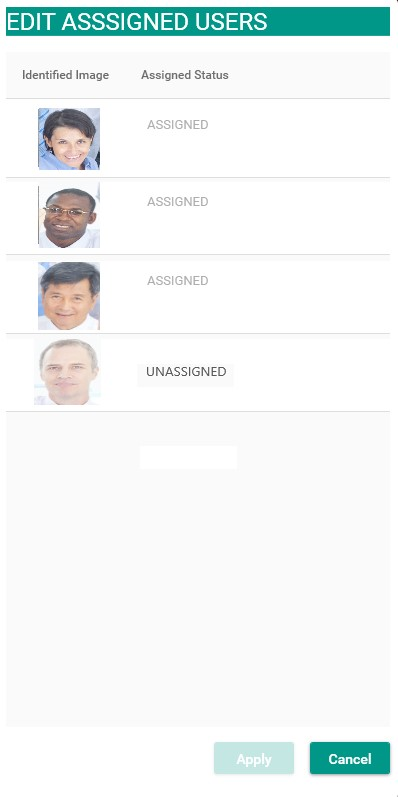
Figure 409 Multi face captured view of IOS lite client¶ |
Unidentified users
Unidentified users represent.
Users unable to identify when capturing (Ex: Not enough lighting condition, lower quality of the capturing images)
Users are not available in the registered user group
Identified users
Record enable/disable button
Select this button to record attendance of the identified/assigned user.
Edit button
This allows to assign unidentified face for selected user. To enable this settings Manual face selection should enabled from the Device settings or Biometric settings view of NCheck Bio Attendance control panel. The face assign view is shown in Table 89 . In the face assign view select the user from the list to assign the face.
Lite client |
|
Windows Client |
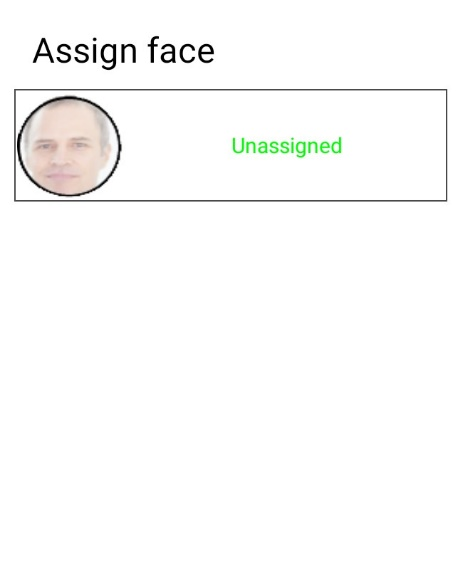
Figure 410 face assign view of Windows lite client¶ |
Android Client |
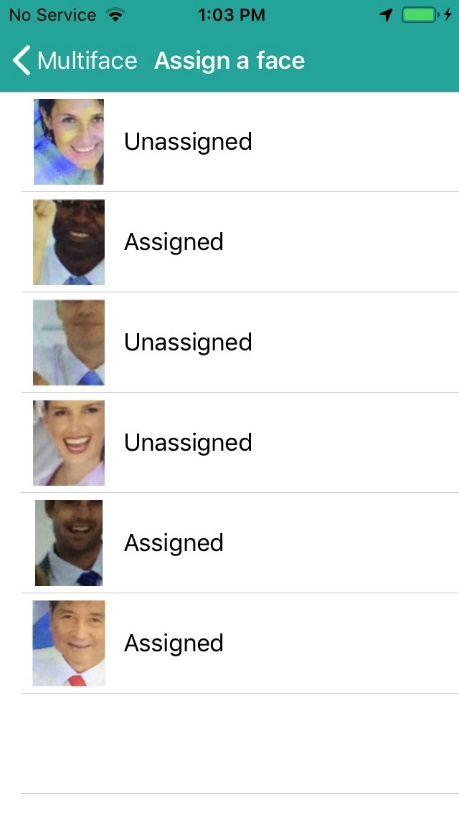
Figure 411 face assign view of Android lite client¶ |
IOS client |

Figure 412 face assign view of IOS lite client¶ |
Capture more button
User can capture a new image to re-capture unidentified users.
Record button
The Client will validate the user according the Authentication mode
Face capturing in Surveillance client of Windows and Guard client of Android
Follow the capturing mode
Manual capture
If the manual capturing is enabled, select the capture button.
Auto capture
If the auto capture is enabled, stay facing to the camera until the client capture the image.
The client performs matching with the NCheck Bio Attendance server to select the matching event type as follows.
Surveillance client
In Surveillance client, the event will be recorded and updated in the result view. Refer Result view for Surveillance client for Windows and Guard client for Android section for more details.
Guard client
In Guard client, once the face is captured, a record view will be prompted in order to compare the captured face and matching person face. Refer Record event view section for more details.
Fingerprint Capture view
For NCheck Bio Attendance standard clients, Capture view indicates fingerprint scanner is available. Once the fingerprint is available, put the finger on fingerprint scanner to record the attendances. For NCheck Bio Attendance Lite clients for Android and IOS, fingerprint authentication mode can be enabled using Use in-built biometric verification on personal clients setting.
Android Lite |
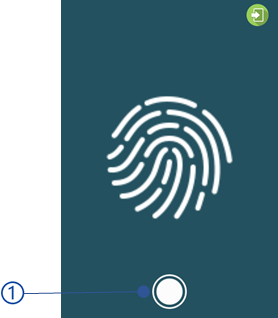
Figure 413 Fingerprint capture view of Android Lite client¶ |
IOS Lite |
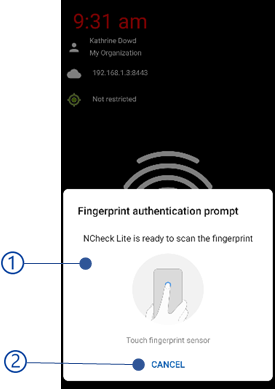
Figure 414 Fingerprint capture view of IOS Lite client¶ |
Record Event button
The Client will validate the user according the Authentication mode
Fingerprint authentication prompt for Android Lite
Fingerprint authentication prompt is shown in Figure 415
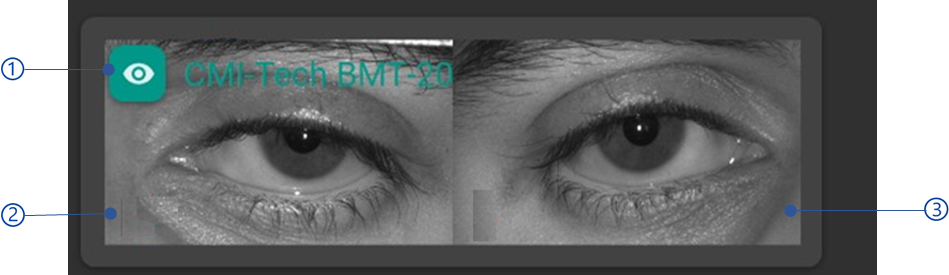
Figure 415 Fingerprint authentication prompt
Fingerprint authentication prompt
Once the fingerprint authentication prompt is appeared, Put the finger on the fingerprint scanner. After successful authentication, The Client will validate the user according the Authentication mode
Cancel button
Cancel the fingerprint authentication prompt.
Iris Capture view
Note
This view is available on NCheck Bio Attendance Standard clients for Windows only.
As shown in Capture view , NCheck Bio Attendance Standard client will indicates if the iris scanner is available.

Figure 416 Iris capture view
Name of the iris scanner
Left eye
Right eye
Note
NCheck Bio Attendance Standard client support single and double side iris scanners.
After scan the iris, client will validate the user according the Authentication mode
User ID input
The following inputs are allowing in NCheck Bio Attendance Standard clients to record attendances
Note
To record attendances, each user must have user Employee code, RFID and Barcode id as mentioned in Add/Edit users section
Employee code input
User ID input has the following controls
ID Field
Submit button
Standard client |
|
Windows Client |
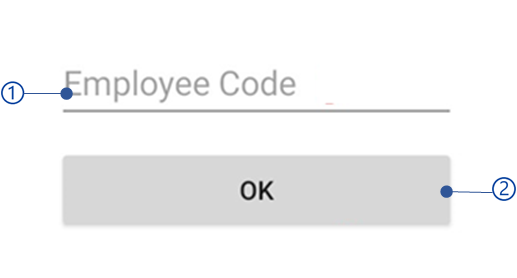
Figure 417 User ID view of Windows standard client¶ |
Android Client |
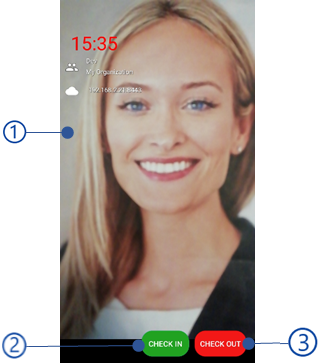
Figure 418 User ID view of Android client¶ |
Once the employee code is given, client will validate the user according the Authentication mode
RFID Input
User allows to use RFID scanner available with Android devices or external RFID scanners with the devices to scan RFID. Capturing RFID
Put the RFID card/tab on the RFID scanner/Android device
The Client will validate the user according the Authentication mode
Barcode Input
NCheck Bio Attendance Standard for Android client allows to scan the barcode using front or back camera or external barcode reader with your device. Capturing Barcode
Scan barcode using the Barcode scanner
The Client will validate the user according the Authentication mode .
Authentication mode
The authentication mode can be set to the selected device from the NCheck Bio Attendance web control panel as mentioned in Edit device section or Client control panel (Standalone mode) as mentioned in Client peripheral configuration section. Following table shows authentication types availability for the NCheck Bio Attendance clients.
Authentication mode |
Lite |
Standard |
Surveillance |
Guard |
Identification |
|
|
|
|
Verification |
|
|
|
|
None |
|
|
|
|
Identification
The default authentication mode for NCheck Bio Attendance clients. Following table shows how the identification mode is working in clients.
Client |
Identification |
Lite and Standard client |
Once the user identified using either form biometic or user id input, the client shows the Result view . |
Surveillance and Guard client |
Once the user is identifed using face biometric, the surveillance client will show the Result view for Surveillance client for Windows and Guard client for Android . The Guard client shows the Record event view appears. |
Verification mode
In NCheck Bio Attendance standard clients, user can be verified using a biometric input and user id input. The verification UI flow can be changed from the NCheck Bio Attendance web control panel as mentioned in Edit device section or Client control panel (Standalone mode) as mentioned in Client peripheral configuration section as follows.
User id first
The client will be asked for a biometric input once a user id input is given first.
Biometric first
The client will be asked for a user id input once a biometric input is given first
When the user is verified, client show the Result view .
Manual event selection view
Note
Manual event selection is available for NCheck Bio Attendance Lite for Android and IOS and Standard client for Android only
Manual event selection view allows to user to select the event type as check-in or check-out before record the attendance. To enable this feature Manual capture start setting from NCheck Bio Attendance Control panel Client settings view or Device settings should be enabled first. Manual event selection is available for
Manual event selection of Lite clients
Manual event selection view for NCheck Bio Attendance Lite for Android and IOS appears according to the authentication mode using the Use in-built biometric verification on personal clients setting.
Lite client |
Biometric authentication mode |
View |
Android |
Face |
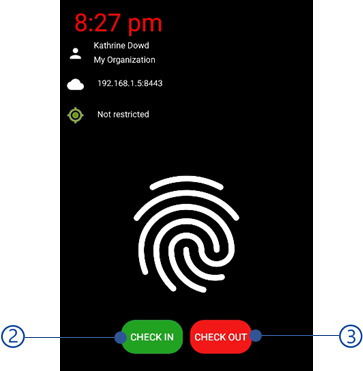
Figure 419 Manual event selection view of Android lite client¶ |
Finger ID |
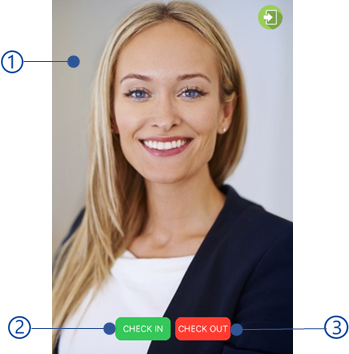
Figure 420 Manual capture start of finger ID view in Android Lite¶ |
|
IOS |
Face |
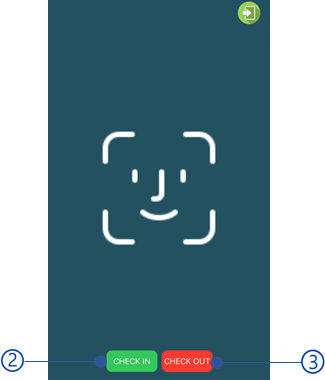
Figure 421 Manual capture start view of IOS lite client¶ |
Finger ID |
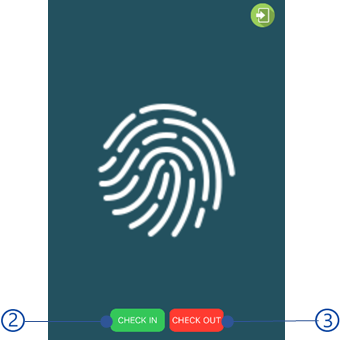
Figure 422 Manual capture start of face ID view in IOS Lite¶ 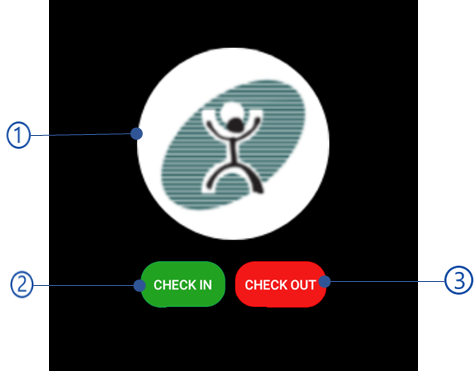
Figure 423 Manual capture start of finger ID view in IOS Lite¶ |
|
Face ID |
Check-in button
Face
Attendance will be recorded as Check-in event once the user face is identified by the NCheck Bio Attendance server.
Finger ID
Attendance will be recorded as Check-in event once the finger is authenticated successfully as mentioned in Fingerprint authentication prompt for Android Lite section.
Face ID
Check-out button
Face
Attendance will be recorded as Check-in event once the user face is identified by the NCheck Bio Attendance server.
Finger ID
Attendance will be recorded as Check-out event once the finger is authenticated successfully as mentioned in Fingerprint authentication prompt for Android Lite section.
Face ID
Manual event selection of Standard clients
Manual event selection views of the NCheck Bio Attendance Standard clients are shown in Table 95 .
Android Lite |
|
Android Standard |
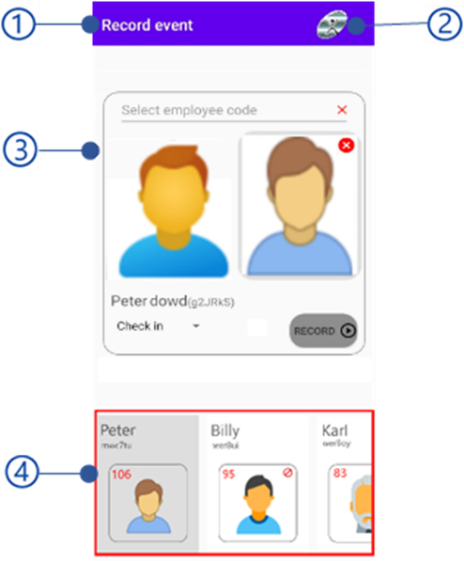
Figure 424 Manual event selection view of Android standard client¶ |
Organization logo
Check-in button
In Standard client, select check-in button to proceed to Capture view to record attendance as Check-in event.
Check-out button
In Standard client, select check-out button to proceed to Capture view to record attendance as Check-out event.
Record event view
Note
This view available in NCheck Bio Attendance Guard client only
Once the face captured as mentioned in Face capturing in Surveillance client of Windows and Guard client of Android section, record view appears to side by side comparison of captured face image and matching face image of the user with the details such as user name and employee code as below.
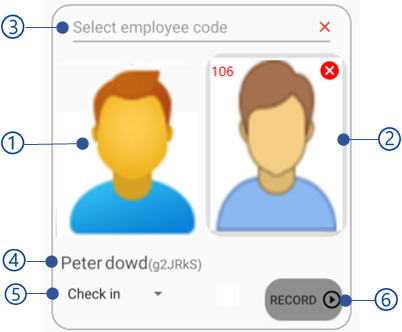
Figure 425 Record event view
Name of the view
Application logo
Side by side comparison view
Side by side comparison view represents both captured face image and matching user details to compare and proceed to record the event.
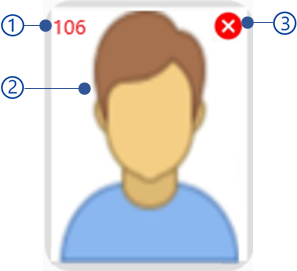
Figure 426 Side by side comparison view of Guard client
Captured face image
Captured face image of the user
Selected person view
Employee code selection
If the person is not identified successfully by the server Guard can select the user manually by entering the employee code here
Name and employee code of the selected person
Event type as check-in or check-out
Even type is not available for black list events
Record button
Record the event. The result will be appeared in the result view as mentioned in Result view for Guard client for Android section.
Selected person view
The person appeared in this view can be recorded by the Guard. The selected person can be,
Whitelist person
If the selected person is not blocked it is known as whitelist person
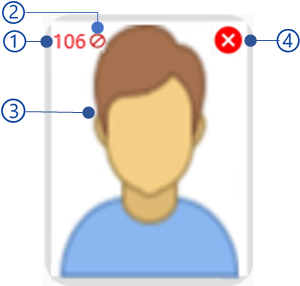
Figure 427 Whitelist event view of Guard client
Matching score
The score when matching user face biometric with the captured image.
Matching face image
Face image from the biometric face image of the matching users which has the highest matching score.
Remove button
Removed the selected person
The Guard allows to record the person as check-in or check-out.
Blacklist person
If the selected person is blocked, it is known as blacklist
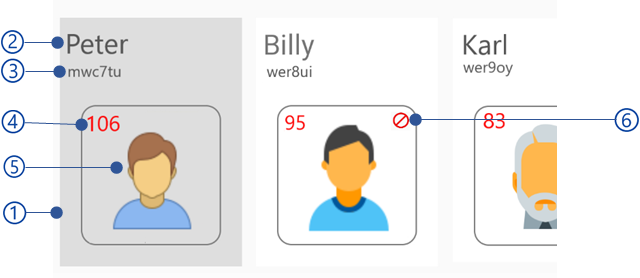
Figure 428 Blacklist event view of Guard client
Matching score
The score when matching user face biometric with the captured image.
Block indicator
Block indicator appears if the user has blocked.
Matching face image
Face image from the biometric face image of the matching users which has the highest matching score.
Remove button
Removed the selected person
The Guard can record the event as blacklist.
False match
The captured person may not be existed in the database. In such cases, Guard can keep the selected person as empty (false match) and record the event.
Matching list view
This view is showing all identified person details. Once Guard selected a person from the list, selected user will be shown in Side by side comparison view either a Whitelist person or Blacklist person .
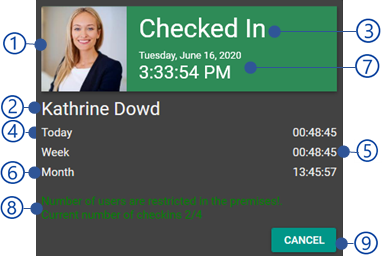
Figure 429 Close match list view of Guard client
Selected user
First name
Employee code
Matching score
The score when matching user face biometric with the captured image.
Biometric face image
Face image from the biometric face image of the matching users which has the highest matching score
Blocked indicator
Result view
Result view shows the recorded event details. Result view as follows,
Result view for Standard and Lite clients
Result view for Single face mode
In the single face mode, the result view appears for the successful check-in or check-out events as follows.
Lite |
Standard |
|
Windows |
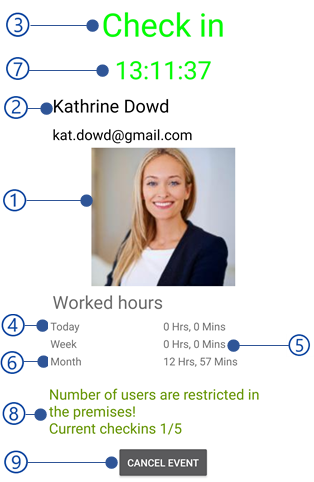
Figure 430 Result view of Windows lite client¶ |
Figure 431 Result view of Windows standard client¶ |
Android |
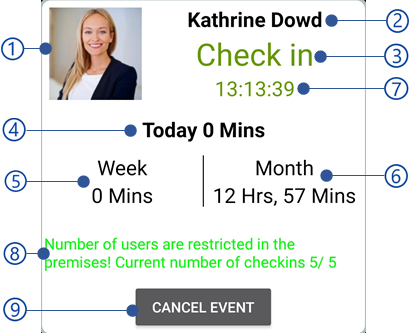
Figure 432 Result view of Android lite client¶ |
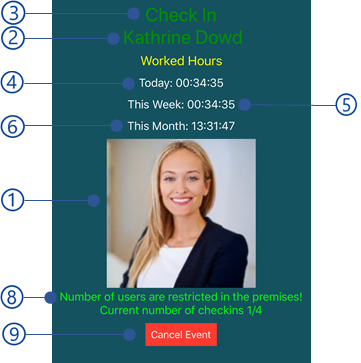
Figure 433 Result view of Android standard client¶ |
IOS |
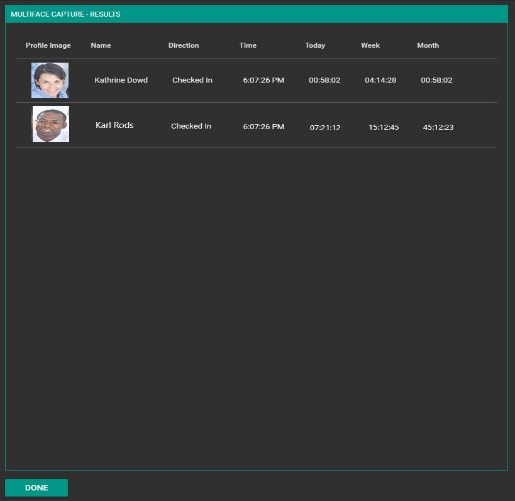
Figure 434 Result view of IOS lite client¶ |
Not Available |
User profile image
Username
Event type
Total work hours of the day
Total work hours of the week
Total work hours of the month
Event recorded time
Check-in limitation message
If the number of check-in are lower than the maximum occupancy for group premises, check-in will be recorded successfully. Otherwise check-in will be restricted. Refer Maximum occupancy for group premises setting in the server for more details.
Cancel button
Cancel the event recorded. This button will disappear in few seconds after the event result view appeared.
Result view for multi face mode
Note
This view is available in NCheck Bio Attendance Lite clients only.
In multi face mode, result view appears with all users for all check-in check-out details as follows.
Lite |
|
Windows Client |
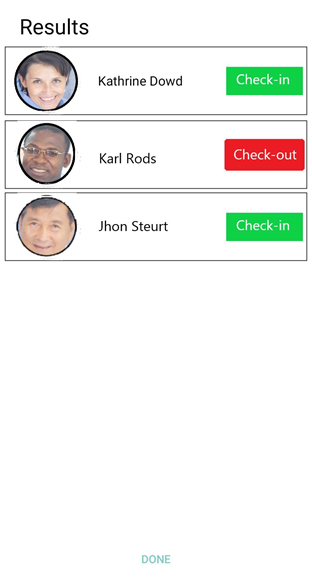
Figure 435 Result view of multi face mode in Windows lite client¶ |
Android Client |
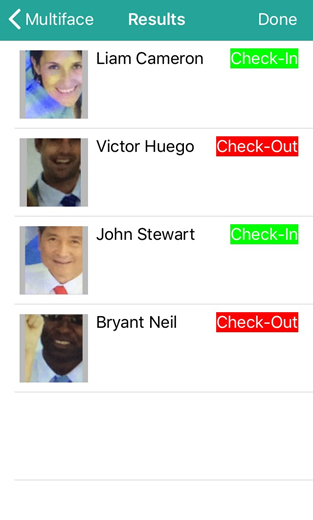
Figure 436 Result view of multi face mode in Android lite client¶ |
IOS client |
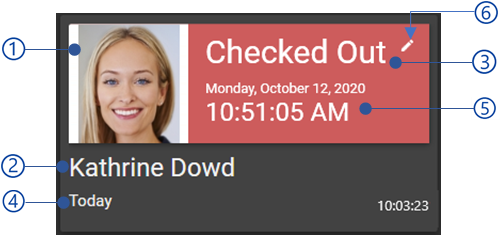
Figure 437 Result view of multi face mode in IOS lite client¶ |
Result view for Surveillance client for Windows and Guard client for Android
As mentioned in Record event view section, NCheck Bio Attendance Guard client records following events.
Whitelist event
If the selected person by the Guard is not blocked and the event type as check-in or check-out
Blacklist event
If the selected person by the Guard is blocked, event will be recorded as blacklist
False match event
If the Guard select no person, the event will be recorded as false match.
As mentioned in Face capturing in Surveillance client of Windows and Guard client of Android section, following events can be recorded in NCheck Bio Attendance Surveillance client for Windows.
Whitelist event
Event type as check-in or check-out.
Blacklist event
If the user is blocked, event will be recorded as blacklist
Unidentified event
Unidentified event will be recorded if
No match available for the captured face image
In this case user can select any user from the registered user group and record the event as whitelist or blacklist event.
Close matches available for the captures face image
In this case user can select the user from the close match list and record the event as whitelist or blacklist event.
Following table is showing the views for all available events in Surveillance and Guard client.
Matching event type |
Surveillance client |
Guard client |
Whitelist event |

Figure 438 whitelist event of Surveillance client¶ |
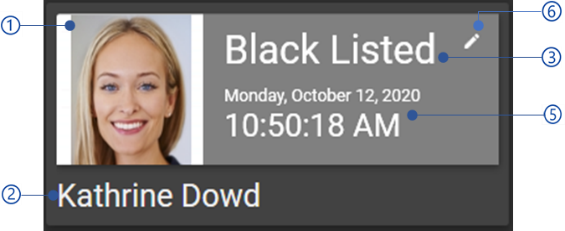
Figure 439 Whitelist event of Guard client¶ |
Blacklist event |
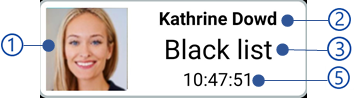
Figure 440 Blacklisted event in Surveillance client¶ |
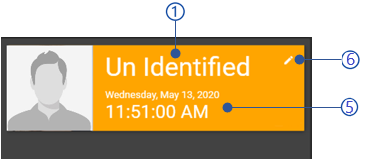
Figure 441 Blacklist event of Guard client¶ |
Unidentified event (No match found) |

Figure 442 Unidentified event of Surveillance client¶ |
Not available |
Unidentified event (Close match found) |
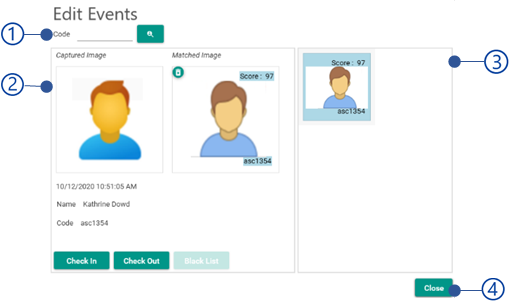
Figure 443 Close match event of Surveillance client¶ |
Not available |
User profile image
Username
Event type
Total work hours of the day
Event time
Edit button
Edit the selected evet as mentioned in section
Number of matches in the close match list
This view appears for the unidentified events if multiple matched found.
Edit event
Note
This view is available NCheck Bio Attendance Surveillance client only.
The recorded event can be edited in following case
The captured face has matched with the different person(s)
In this case, the captured face is matched with different person and the event will be recorded as Check-in, Check-out or blacklist. If the person is matched with multiple persons, the event will be recorded as unidentified event.
The captured face has no match
The captured face has matched with no person and the event will be recorded as unidentified.
In such cases Guard allows to edit the event as follows.
Event |
Edit event View |
Person has matched with different person(s) |
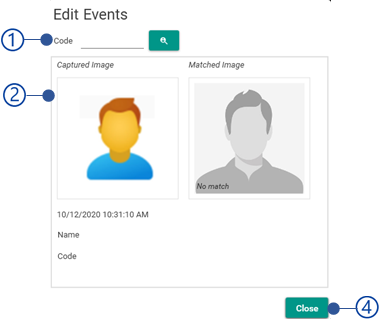
Figure 444 Edit event view when matching with different person(s)¶ |
Person has no match |
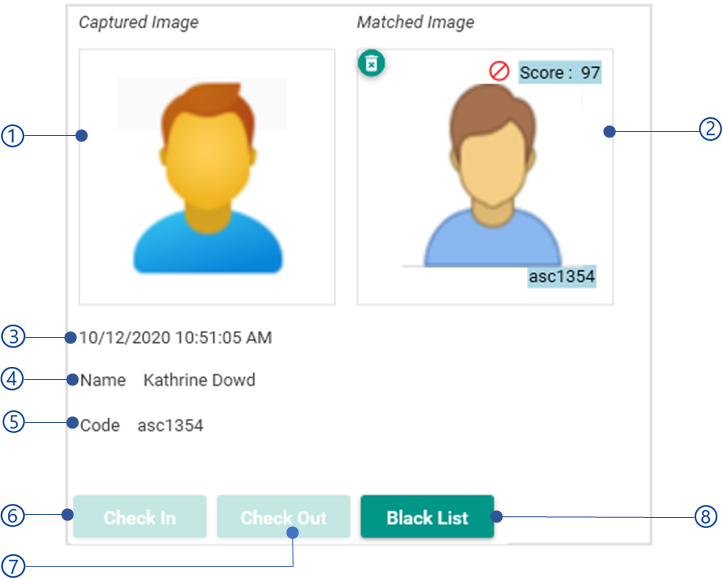
Figure 445 Edit event view when person has no match¶ |
Employee code
Guard allows to select the correct person using the employee code. The selected person will be updated in the Side by side comparison view .
Close button
Close Edit event dialogue.
Side by side comparison view
The side by side comparison view allows to compare the captured face of the person with matching parson(s) and record the event in following cases.
The captured face has a match
The captured face can be matched with either the server result or person selected by the Guard. In such cases event can be recorded as Check-in, Check-out or Blacklist if the person has been blocked.
The face has not a match
The Guard allows to record the event as false match if the captured person is not existing in the system.
Case |
View |
Person has matched with person(s) |
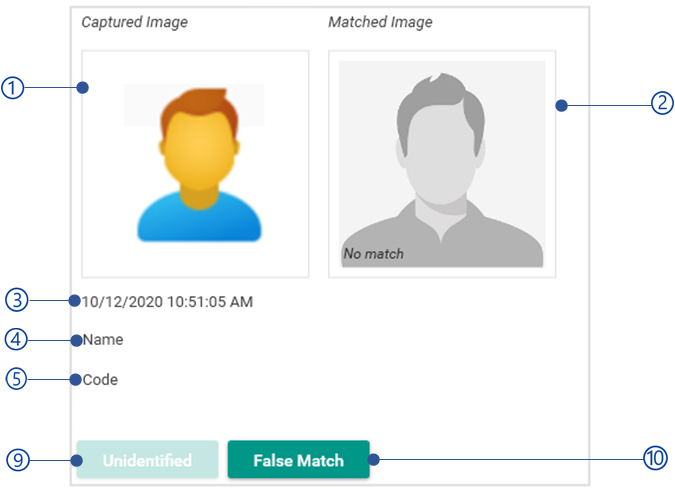
Figure 446 Side by side comparison view when captured face has a match¶ |
Person has no match |
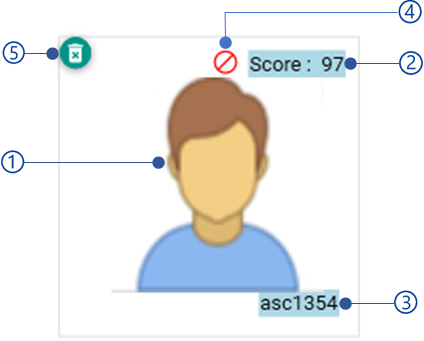
Figure 447 Side by side comparison view when captured face has no match¶ |
Captured face image of the user
Matched/selected person view
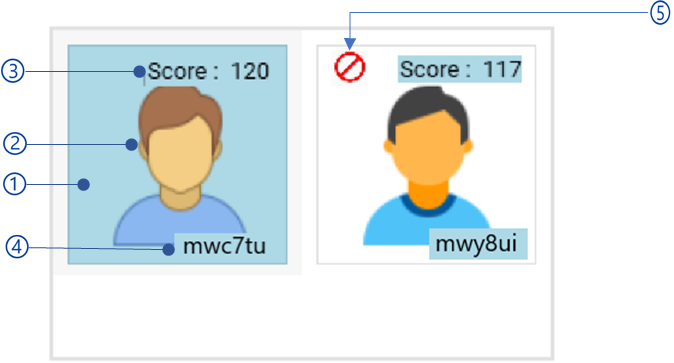
Figure 448 Matched/selected person view
Image
Wither the face biometric image of the matched person or thumbnail image of the selected person.
Matching score
Employee code of the matched/selected user
Blocked status
This status is shown if the matched/selected person is blocked.
Delete button
Removed the matched/selected person. If the captured face image has no match, Guard can remove the matched/selected person using this button and record as false match.
Event date and time
Name of the matched user
Employee code selection view
User able to find the user entering employee code if no match found for the captured face image. Otherwise this will be disabled.
Check-in button
Record the event as Check-in if the matched/selected user is not blocked.
Check-out button
Record the event as Check-out if the matched/selected user is not blocked.
Blacklist button
Record the event as blacklist if the matched/selected user is blocked.
Unidentified button
False match button
Record the event as false match, if the captured face image has no match.
Matching list view

Figure 449 Close match list view of Surveillance client
Selected user
Face biometric image
Matching score
Employee code of the user
Blocked indicator
This indicator appears if the user is blocked.
Recent events list
Note
This view is available in NCheck Bio Attendance clients for Windows only.
Recently recorded attendances are showing in the recent events list. Recent event list view follows
Resent event list views of Windows client
Recent event list view |
|
Standard and Lite clients |
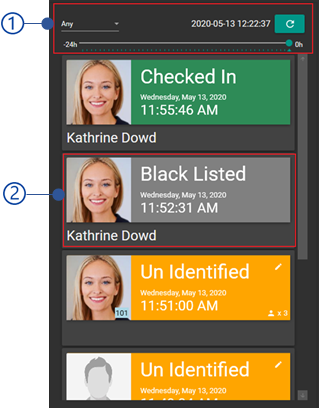
Figure 450 Recent event list view of clients for Windows¶ |
Surveillance client |
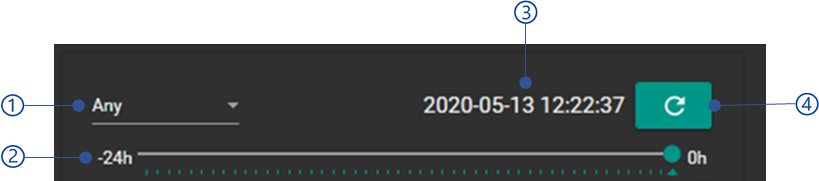
Figure 451 Recent event list view of Surveillance client¶ |
Event filter view

Event type
Whitelist
Blacklist
Unidentified
Close match
Timeline selector
Using the timeline selector, the timeline can be changed, and it will support 24 hours of period to backward. It will filter the events according to the timeline selected
Timeline of the event
By default, this shows the current timeline and timeline can be changed using the Time line selector.
Client control panel
NCheck Bio Attendance Client Control panel available in clients if the Offline operation mode has enabled in Attendance Standard cloud/on-premises server as shown below.
Offline mode enabled |
||
Network available |
Network disabled |
|
Cloud |
|
|
On-premises |
|
|
Standalone |
|
|
Following options are available in NCheck Bio Attendance Standard Client control panel for Android and Windows,
Cloud |
On-premises |
Standalone |
|
|
|
|
|
|
|
|
|
|
|
|
|
|
|
|
|
|
|
|
|
|
|
|
|
|
|
|
|
|
Login view
Windows client |

Figure 452 Login view of Windows standard client¶ |
Android client |
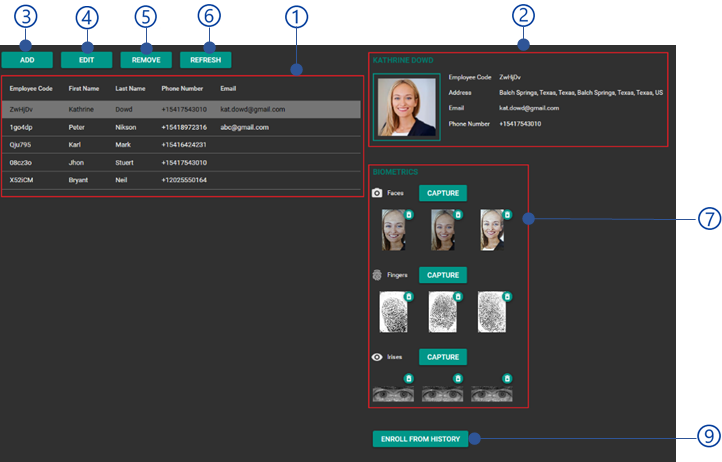
Figure 453 Login view of Android standard client¶ |
Username
Password
The default control panel login password of the Android client is Admin. Windows client does not have a default password. The password can be changed as mentioned in Standalone password view section.
Login button
Table 104 could be appeared when logging to the control panel.
Cancel button
Error code |
Error message |
2066 |
Invalid password. Check the password again. |
User management
Windows Client |
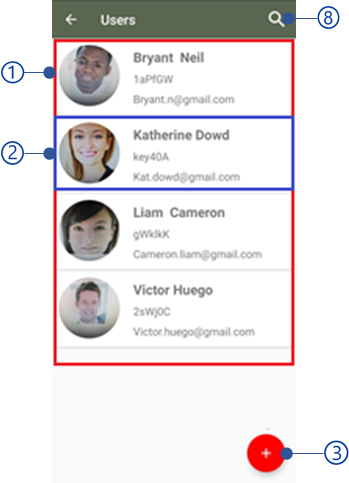
Figure 454 User management view of Windows standard client¶ |
Android Client |

Figure 455 User management view of Android standard client¶ |
Users list view
User quick view
In android Stannard client, select user quick view for User view of Android Standard client .
Add button
Refer Add user section for more details.
Edit button
Refer Edit user section for more details.
Delete button
Delete selected user. Refer Edit user section for more details of delete user.
Refresh button
Refer the user management view.
Search user
Enroll from history button
Refer Enroll from Windows client history section for more details.
User view of Android Standard client
User view of the Android Standard client preset all user details as follows.
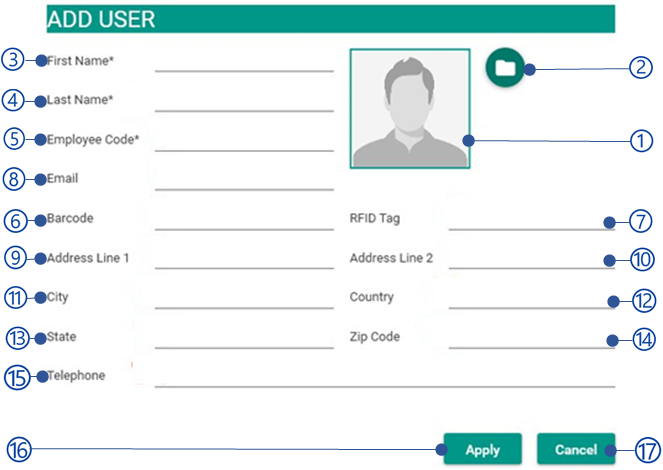
Figure 456 User view of Android Standard client
User first name and last name
User menu
Edit
Edit user
Remove
Remove user
Biometrics
Manage biometrics as mentioned in Manage biometrics section
User details view
Add user
Windows Client |

Figure 457 Add user view of Windows standard client¶ |
Android Client |

Figure 458 Add user view of Android standard client¶ |
User image thumbnail preview
In Android standard client select the image thumbnail to browse the image file from the file system.
Browse button
Browse image from the file system
First name
Last name
Employee code
Barcode ID
Refer Capture barcode from client section for more details.
RFID tag
Refer Capture RFID from client section for more details.
Email
Address line 1
Address line 2
City
Country
State
Zip code
Telephone
Apply button
Apply button will be disabled if the mandatory fields are empty or Validation errors exist. Refer Table 107 for all error messages.
Cancel button
Error code |
Description |
3001 |
Mobile/telephone number is not valid for the selected country/region. |
3002 |
Invalid email address. |
3005 |
Barcode scanner could not be found. |
3006 |
RFID scanner could not be found |
2020 |
Selected file is not a valid image file. |
2021 |
Employee code already exists. |
2022 |
Barcode ID is already available for different user |
2023 |
RFID is already available for different user |
2039 |
Could not capture barcode. The device has been blocked |
2040 |
Could not capture RFID. The device has been blocked |
Capture barcode from client
Windows client |

Figure 459 Barcode field view of Windows Standard client¶ |
Android client |

Figure 460 Barcode field view of Android standard client¶ |
Barcode text field
Barcode capture button
Select Capture button to scan the barcode from the client application as mentioned in Table 109 .
Android client |
Scan the barcode after the barcode scan view appeared as shown in Figure 461 .
|
Windows client |
|

Capture RFID from client
Windows client |

Figure 462 RFID field view of Windows Standard client¶ |
Android client |

Figure 463 RFID field view of Android standard client¶ |
RFID text field
RFID capture button
Select Capture button to scan the RFID from the client application as mentioned in Table 111 .
Table 111 Capturing barcode from Client applications¶ Android client
Scan the RFID after the RFID scan view appeared as Figure 464
After successful scan, RFID id will appear in the RFIDID field.
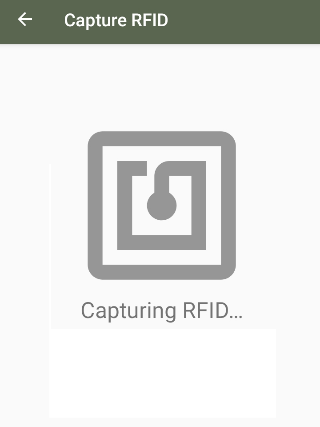
Figure 464 RFID capture view of Android client
Windows client
Select the RFID field
Scan the RFID from the connected RFIC scanner
After successful scan barcode id automatically
appeared in the RFID field.
Edit user
Windows client |
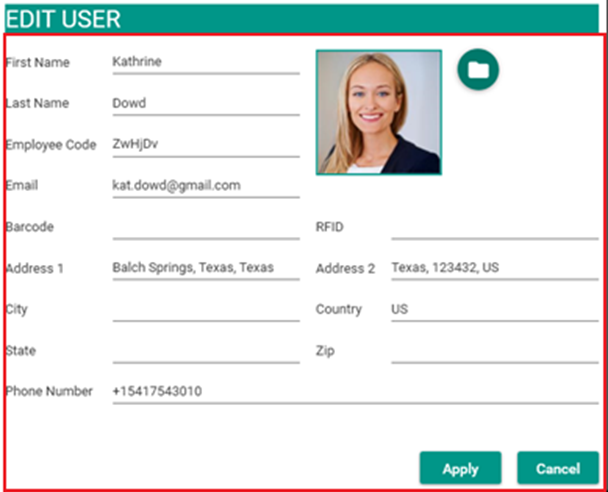
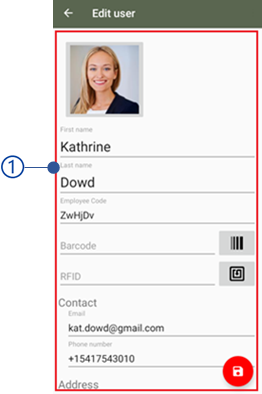
Figure 465 Edit user view of Windows standard client¶ |
Android client |
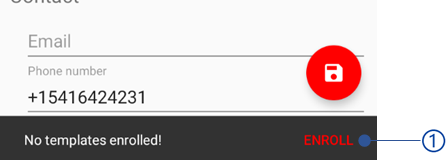
Figure 466 Edit user view of Android standard client¶ |
User details view as mentioned in Add user section.
Manage biometrics
To proceed to manage biometric view for particular user in NCheck Bio Attendance Android standard client, Select Biometric button of the User view of Android Standard client section. In the edit user view, if no biometric has been enrolled for user, NCheck Bio Attendance Android standard will show a notification to enroll biometric as shown in Figure 467 .
Enroll button
Select enroll button to select the biometric type as shown in Figure 469 to capture biometric.
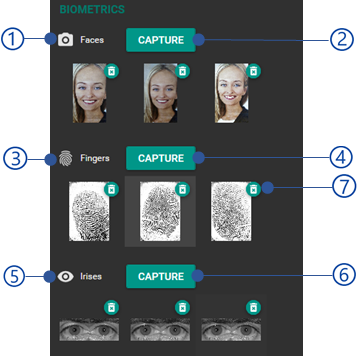
Figure 467 “No template enrolled” notification in Android standard client
Windows client |

Figure 468 Manage biometrics view of Windows standard client¶ |
Android client |
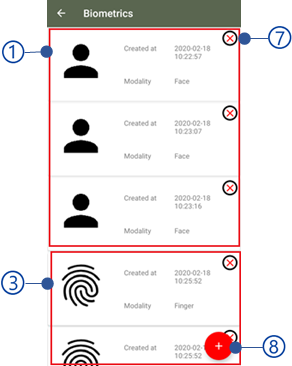
Figure 469 Biometric type selection view of Android standard client¶ 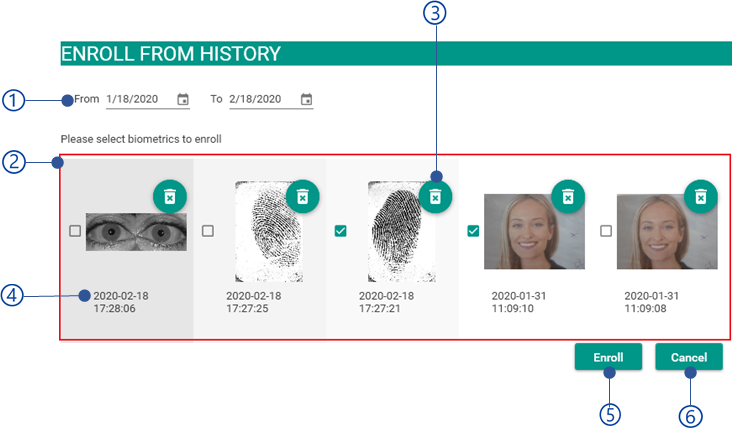
Figure 470 Manage biometrics view of Android standard client¶ |
Enrolled face images list
Capture face button
Refer Capture face from standard clients section for more details.
Enrolled fingerprint images list
Capture fingerprints button
Refer Capture fingerprint from Standard clients section for more details.
Enrolled iris images list
Capture iris button
Refer Capture iris from Windows standard client section for more details
Refer Capture from client applications section for the error message could be appeared while capturing biometrics.
Enroll from Windows client history
Note
This feature is not available for NCheck Bio Attendance Android client.
This option allows enroll biometrics from previous recorded events from users who are not enrolled with NCheck Bio Attendance server.
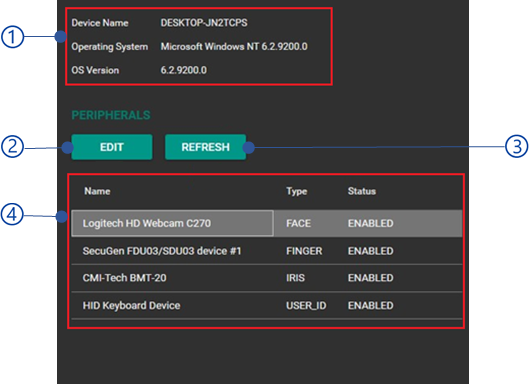
Figure 471 Enroll from history view
Date filter
Unidentified biometric lists
Delete button
Delete event from the list
Event date and time
Enroll button
Enroll selected biometrics from the list. Table 114 is shown the error messages could be appeared when enroll biometrics from history
Cancel button
Error code |
Error message |
2024 |
Could not enroll selected face/finger/iris image. |
Peripheral view of clients
All available peripherals are showing in this view. The peripheral view as follows,
Windows Client |
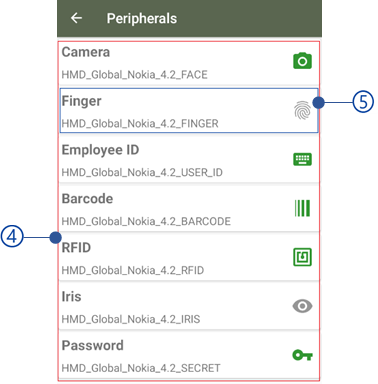
Figure 472 Peripherals view of Windows standard client¶ |
Android Client |

Figure 473 Peripherals view of Android standard client¶ |
Edit button
Refer Edit peripheral view section for more details. In Android client double click on peripheral quick view.
Refresh button
Device details view of Windows standard client
This view is showing device details as follows.
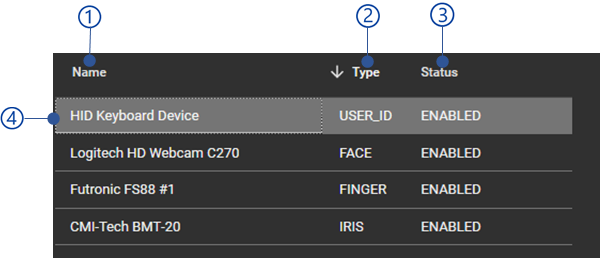
Figure 474 Device details view of Windows standard client
Device name
Name of the operating system
Version of the operating system
Peripheral list view of Windows standard client
This view shows all peripheral available with the device as follows.

Figure 475 Peripheral list view of Windows standard client
Peripheral name
Peripheral ID
Status
Peripheral is enabled or disabled.
Selected peripheral
Double click on the selected peripheral to get the Edit peripheral view .
Peripheral quick view of Android standard client
This view present details of the selected peripheral.
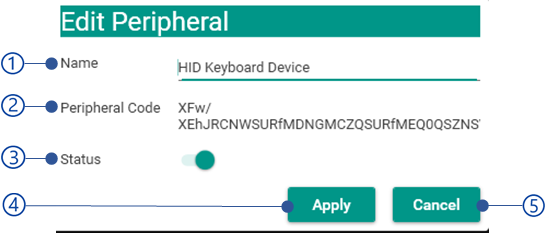
Figure 476 Peripheral quick view of Android standard client
Peripheral type
Peripheral ID
Peripheral image
This image become green when the peripheral is available with the device. Otherwise become grey color.
Select the peripheral quick view to get the Edit peripheral view .
Edit peripheral view
Windows client |
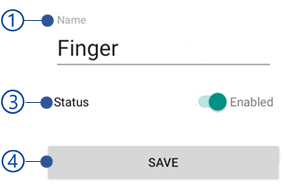
Figure 477 Peripheral edit view of Windows standard client¶ |
Android client |
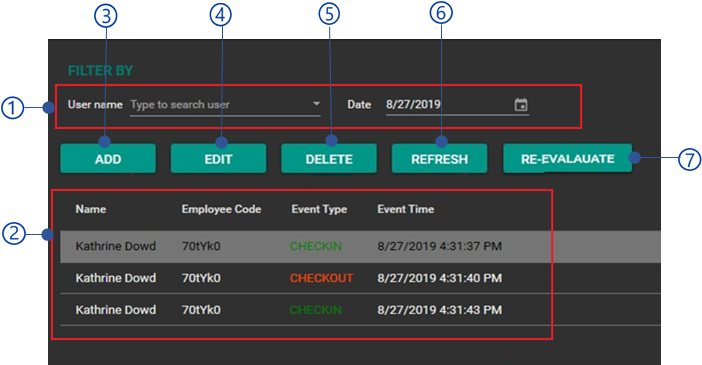
Figure 478 Peripheral edit view of Android standard client¶ |
Peripheral name
Peripheral code
A unique id for the peripheral. Peripheral code cannot be edited.
Peripheral status
Enable/disable the peripheral.
Save button
Cancel button
Event logs
Windows Client |
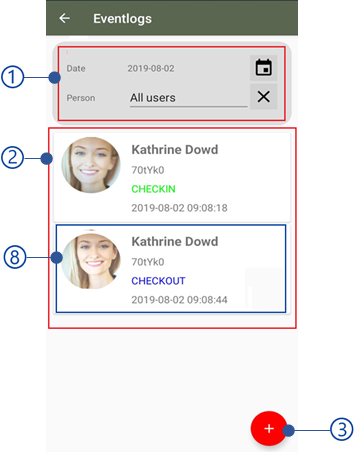
Figure 479 Event logs view of Windows standard client¶ |
Android Client |
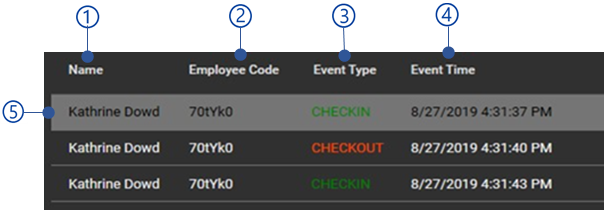
Figure 480 Event logs view of Android standard client¶ |
Event logs filter view
Date filter
Select the date to retrieve event logs. Default date is current date.
Username filter
Select the username to retrieve event logs.
Add button
Refer Add new event log section for more details
Edit button
In Android standard client select on event log quick view for edit event log. Refer Edit event log section for more details.
Delete button
Delete selected event log. In Android client refer Edit event menu of Android standard client section for delete event log.
Refresh button
Refresh event logs view
Re-evaluate button
Select this button to re-arrange events check-in/check-out sequence of users.
Event logs list view of Windows standard client
Event log list view of the Android standard client shows all event logs as follows.
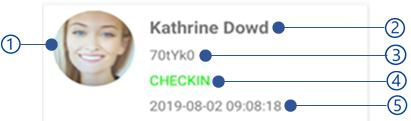
Figure 481 Event logs list view of Windows standard client
Username
Employee code
Event type as Check-in or Check-out
Event date and time
Selected event
Double click on selected event to Edit event log .
Event log quick view of Android standard client
Event log quick view of Android standard client shows details of the selected event log as follows
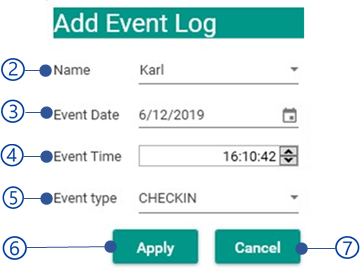
Figure 482 Event log quick view of Android standard client
User thumbnail
Username
Employee code
Event type as Check-in or Check-out
Event date and time
Select on event quick view to Edit event log .
Add new event log
Windows Client |
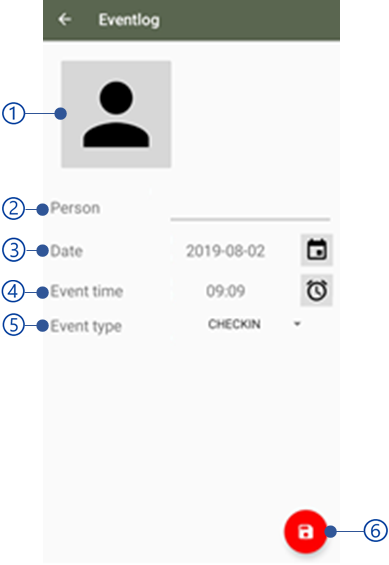
Figure 483 Add event log view of Windows standard client¶ |
Android Client |
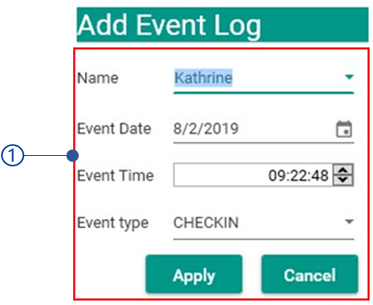
Figure 484 Add event log view of Android standard client¶ |
Event thumbnail
Person name
Date
Event time
Event type
Checkout
Unidentified
Not known
Add button
Cancel button
Edit event log
Windows Client |
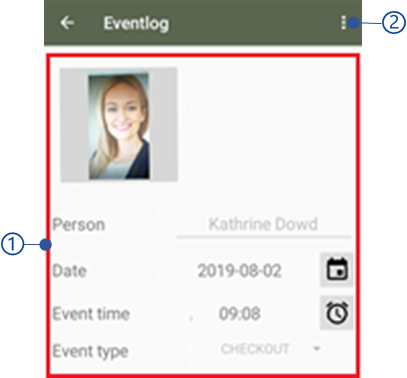
Figure 485 Edit event log view of Windows standard client¶ |
Android Client |
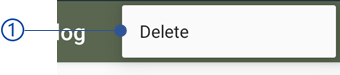
Figure 486 Add event log view of Android standard client¶ |
Event details view as shown in
Edit event menu of Android standard client
This menu available in the Android standard client to delete the selected the selected event log
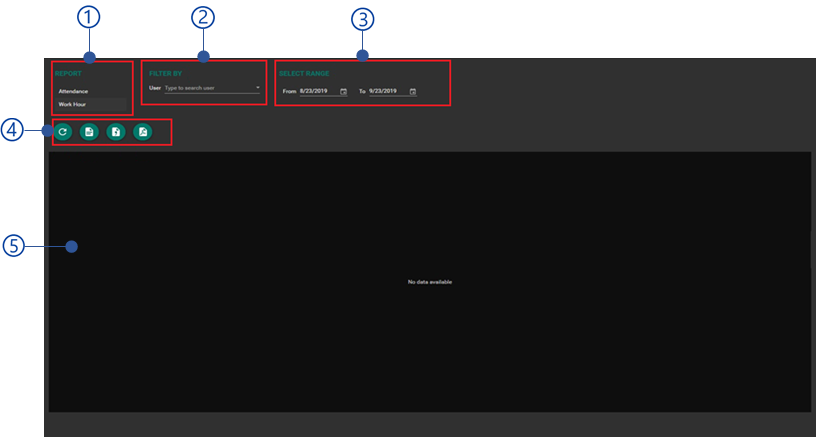
Figure 487 Edit event menu of Android standard client
Delete
The delete the selected event log
Reports view
Windows client |
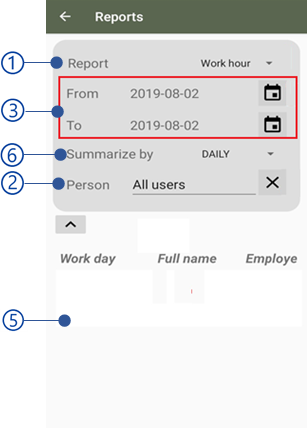
Figure 488 Report view of Windows standard client¶ |
Android client |
Figure 489 Report view of Android standard client¶ |
Report type
Filter report by username
Select report start date and end date to generate report
Report data view
Summarize report by daily, weekly, or monthly
Report options of Windows standard client
Report options of the Windows standard clients available shown as below.
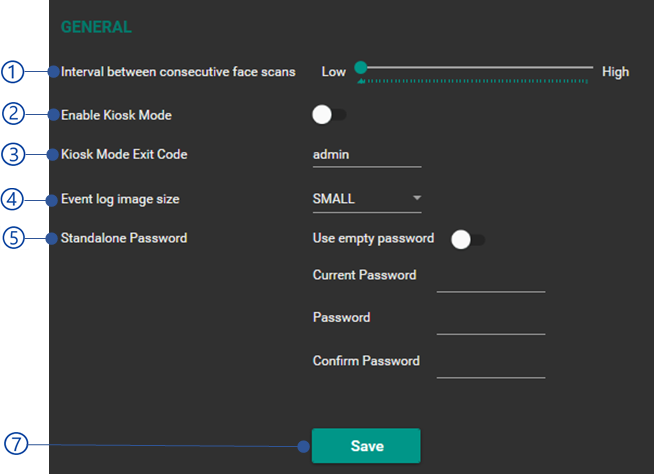
Figure 490 Report options view of Windows standard client
Refresh button
Refresh report view.
Print button
Print the report.
Save CSV button
Save report in CSV format.
Save PDF button
Save report in PDF format.
Workhour report
Windows client |
Report columns as follows
|
Android Client |
Report columns as follows
|
6.7.5.3 Event log report
Windows Client |
Report columns as follows
|
Android Client |
Report columns as follows
|
Settings view
General settings of clients
Windows client |

Figure 491 General setting view of Windows standard client¶ |
Android client |
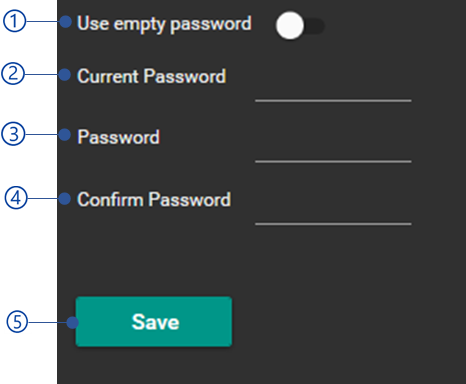
Figure 492 General setting view of Android standard client¶ |
The interval between consecutive face scans
Minimum time difference between two ancillary events to prevent event duplication for the user.
Enable/disable Manual capture start
Save button
Standalone password view
Windows client |
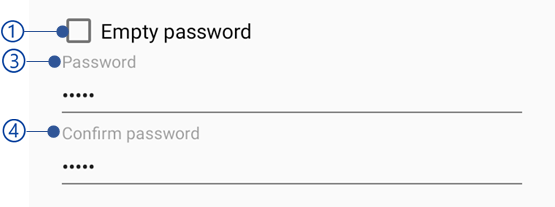
Figure 493 Standalone password view of Windows standard client¶ |
Android client |
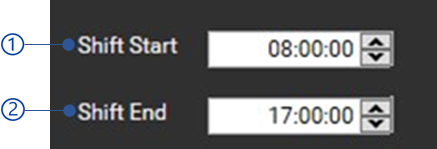
Figure 494 Standalone password view of Android standard client¶ |
Empty password
Select this option to login control panel with empty password.
Current password
Password
New password.
Confirm password
Save button
Save password details. Save button will be disabled if the mandatory fields are empty or Validation errors exist. Al errors message could be appeared as shown below.
Error code |
Error message |
3003 |
Password does not match. |
3004 |
Password must contain at least 6 characters with one number. |
3012 |
Current password is incorrect |
Shift settings of clients
Windows Client |
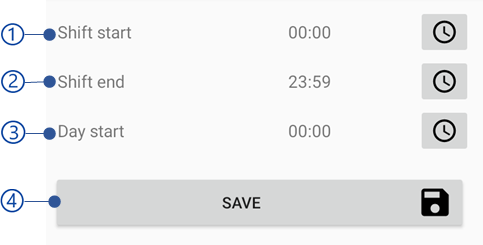
Figure 495 Shift settings view of Windows standard client¶ |
Android Client |
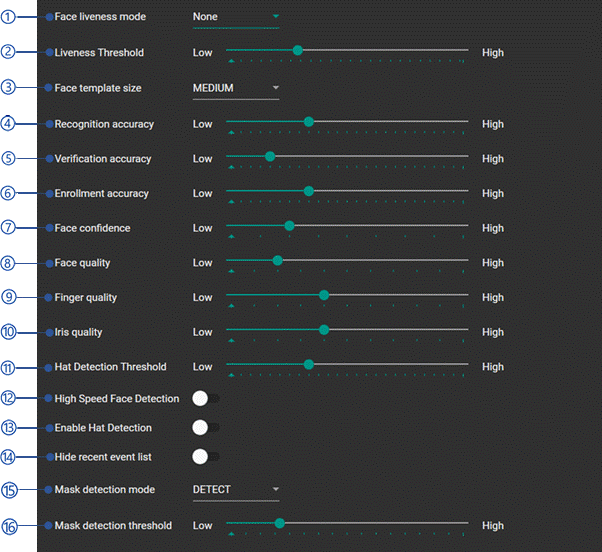
Figure 496 Shift settings view of Android standard client¶ |
Biometric settings of clients
Windows Client |
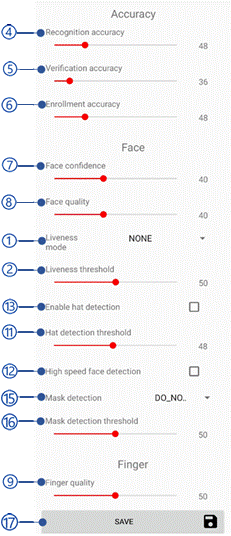
Figure 497 Biometric settings of Windows standard client¶ |
Android Client |
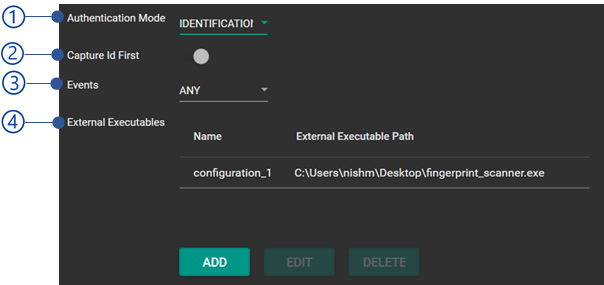
Figure 498 Biometric settings of Android standard client¶ |
Face template size
Size of each face enrolled template among medium or large. Large face template contains more details than medium.
Iris quality threshold
Increase the value if the same user identified differently from time to time. By increasing the value, the system is forced to ignore low quality iris scans.
Save button.
Client peripheral configuration
Windows client |
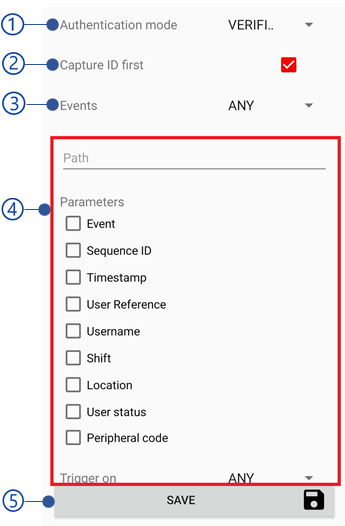
Figure 499 Peripheral configuration view of Windows standard client¶ |
Android client |
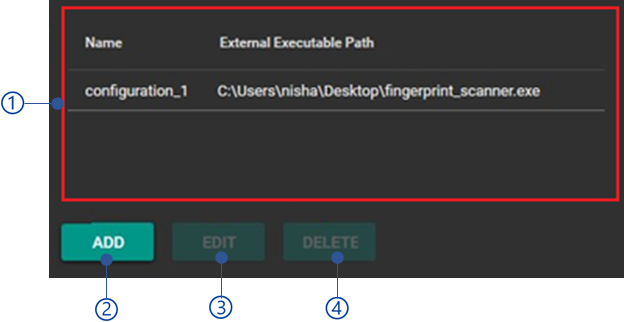
Figure 500 Peripheral configuration view of Android standard client¶ |
Authentication mode
Available authentication modes are,
Identification
Identification is the default authentication mode. Identification is performed on biometric and user id data. User biometric data such as face, finger print and iris are comparing against the database with previously collected biometric samples depending on the Recognition threshold . If the matching score is greater than the Recognition threshold , user is considered as identified. Therefore, this mode may demand large processing time. User id data such as user id, barcode and QR code are comparing against the database and giving the matching users.
Verification
The verification mode can be applied with a user id peripheral and a biometric peripheral in order to verify the user against the previously collected biometric sample. To get verified, matching score should be greater than Verification threshold .
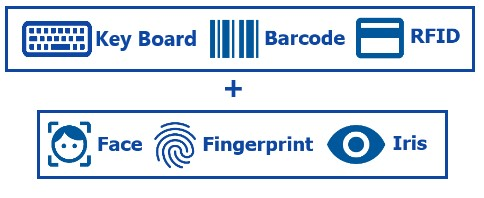
Figure 501 Combinations of user id peripheral with biometric peripheral in verification mode
None
Capture id first
The verification sequence when the verification is selected as the authentication mode. If the capture Id first has enabled, id input should be input before the biometric. Otherwise biometric should be given at first.
Events
Attendances will be recorded in the specific event type as selected from this option.
check-in
checkout
any
Both Check-in and Check-out events
Manage external executable
Refer Manage external executables section.
Save button
Manage external executables
NCheck Bio Attendance Standard clients can be configured to run external programs (Either from external executable or API) during user identification. For an example, an automatic door opening program can be executed upon successful user identification. Following setting should be specified to configure external programs.
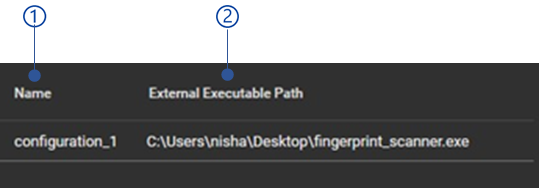
Figure 502 Manage external executables view
Edit external executable
Edit external executable in Windows standard client
Delete external executable
Delete selected external executable.
Note
NCheck Bio Attendance Android standard client doesn’t support on multiple external executable. It only allows to as single external executable to trigger APIs.
External executable lists
External executable list as follows.
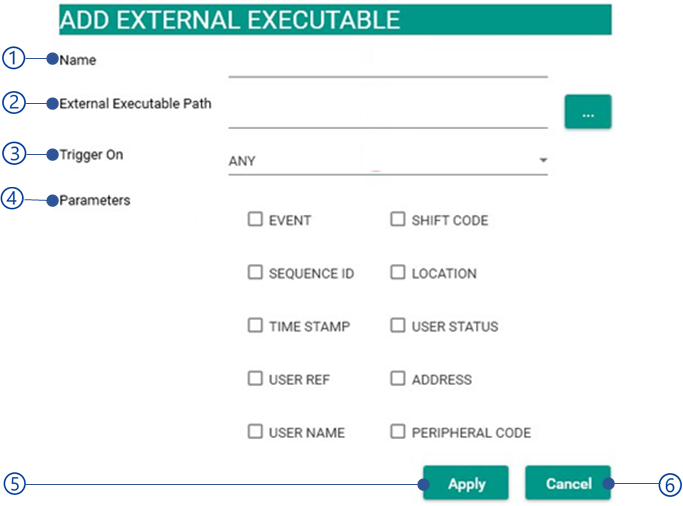
Figure 503 External executables list of Windows standard client
Name of the external executable
Path to the EXE/URL of the API
Add external executable
Windows client |
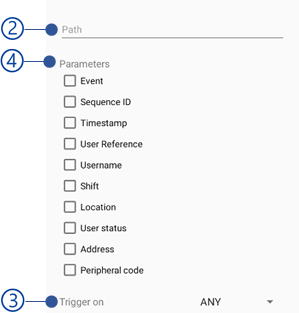
Figure 504 Add external executable view of Windows client¶ |
Android client |

Figure 505 Add external executable view of Android client¶ |
Name
Name of the external executable.
Path of the external executable
Path of the external executable or API URL to invoke.
Trigger on
Any
Trigger the executable when record check-in or checkout events.
Check-in
Trigger executable when record check-in event.
Check-out
Trigger executable when record checkout event.
Unidentified
Trigger executable when the record is not identified as check-in or checkout.
Parameter
Following parameter(s) can be passed to the external executable when triggering the executable.
Event (EVENT)
Event type as CHECKIN, CHECKOUT or UNIDENTIFIED.
Sequence id (SEQUENCE_ID )
Id of the event.
Time stamp (TIMESTAMP )
Date and time of the event.
User reference (USER_REF )
Employee code of the user.
User name (USER_NAME)
First name and last name of the user event recorded.
Shift code (SHIFT_CODE )
Shift code of the NCheck Bio Attendance Standard clients. In the standalone mode shfit code is DEFAULT.
Location (LOCATION )
Longitude and latitude of the event geo-location. Example: {Longitude,lattitude}
User status (USER_STATUS )
User is blocked or not. Pass 0 if the user has blocked otherwise 1.
Address (ADDRESS)
Address of the user.
Peripheral code (PERIPHERAL _CODE )
Unique identified number of the peripheral.
The applied parameters will be passed to the external executable as below when recording events.
Type |
Format |
External executable |
|
URL |
|
Note
NCheck Bio Attendance Standard client for Android is supported for URLS’s only.
Admin tasks of Clients
Windows client |
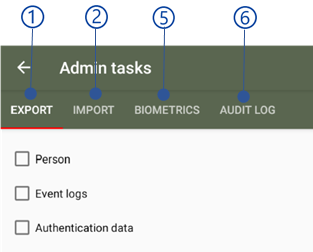
|
Android client |
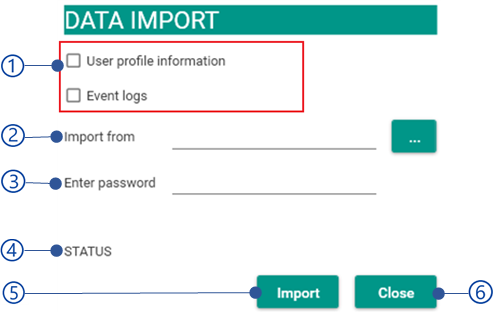
Figure 506 Admin tasks view of Android standard client¶ |
Data import/export
This allows to import/export below information.
User profile information
First name
Last name
Employee code
Email
Primary telephone number
Address1
Address2
State
Country
State province region
Zip or postal code
Barcode
RFID
Created date and time
System Id
Event log information
Check-in latitude
Check-in longitude
Check-in address
Check-in description
Check-out latitude
Check-out longitude
Check-out address
Check-out description
Employee code
Check-in time
Check-out time
Shift start time
OT start time
Shift span seconds
OT span seconds
OT enabled or not
OT limit in hours
Check-in timezone
Check-out timezone
Work hours
Maximum OT hours
Note
All date time should be MM/dd/yyyy h:mm:ss a format and date format should be MM/dd/yyyy format when export data.
To import/export data successfully following, following guidelines must be satisfied.
The file names of csv files (user profile information and event logs ) should be
User profile information : PersonData.csv event logs : EventLogData.csv
All date format must be MM/dd/yyyy.
All time format must be h:mm:ss.
The column names should be equal as above.
Country, state, provincial code, zip/postal code, email and telephone number should be in correct format.
Data import
Windows client |
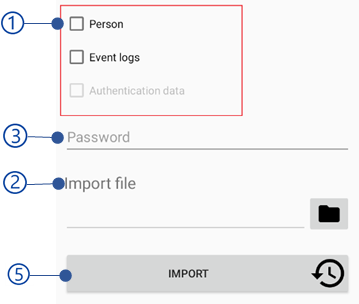
Figure 507 Data import view of Windows Standard client¶ |
Android client |
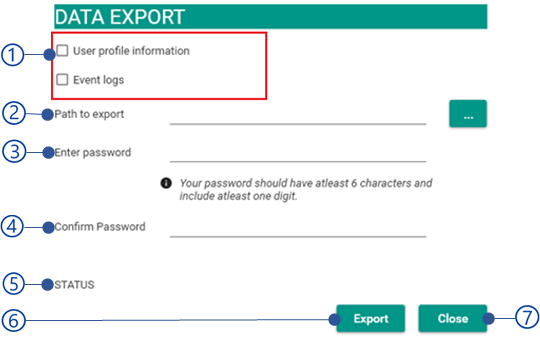
Figure 508 Data import view of Android standard client¶ |
Importing information
User profile information
Event logs information
Import location
Select the file path of the importing file.
Encrypted password of the importing file
Status
Importing status in successful or fail attempts.
Import button
Import button will be disabled if the mandatory fields are empty or Validation errors exist. Table 133 is showing error messages could be appeared.
Close button
Error code |
Error message |
2062 |
Data import failed. Invalid password. |
2063 |
Data import failed. The selected file could not be imported. |
4003 |
Unidentified error occurred during data import. Please contact administrator or NCheck Bio Attendance support for more details. |
Data export
Windows client |
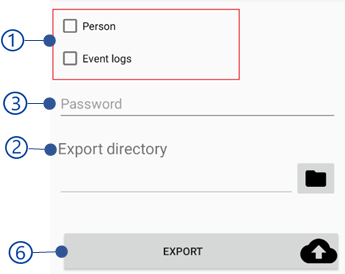
Figure 509 Data export view of Windows standard client¶ |
Android client |
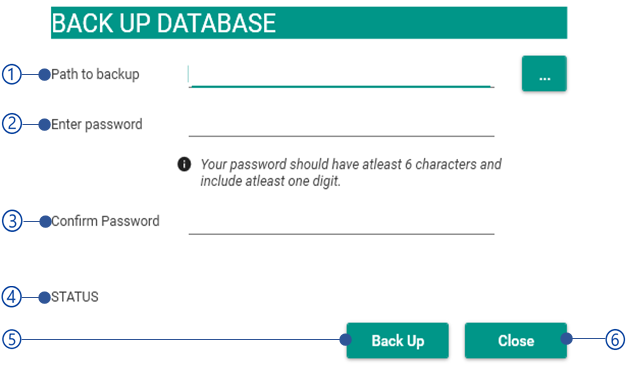
Figure 510 Data export view of Windows standard client¶ |
Exporting information
User profile information
Event log information
Select path to export location
Password to encrypt the exporting file
Confirm password
Status
Exporting status in successful or fail attempts.
Export button
Export button will be disabled if the mandatory fields are empty or Validation errors exist. Table 135 is showing error messages could be appeared.
Close button
Error code |
Error message |
3003 |
Password does not match. |
3004 |
Password must contain at least 6 characters with one number. |
4004 |
Unidentified error occurred during data export. Please contact administrator or NCheck Bio Attendance support for more details. |
Database backup and restore
Database backups and restore allows to back up the database as JSON files in a zip file securely and restore back in the application. The backup file contains,
Person.json
All user information added as mentioned in Add user section.
Authentication.json
All authentication information of users such as biometrics, RFID and barcode.
eventlogsPairViews.json
All check-in and check-out pairs are backup in this file.
settings.json
All settings as mentioned in Settings view section are kept in this file.
Note
We are recommending to keep backup files safe without alter any information to prevent backup restore failures. Backup and restore feature are not available for NCheck Bio Attendance Android standard client.
Database backup
This view allows to backup the database as follows.
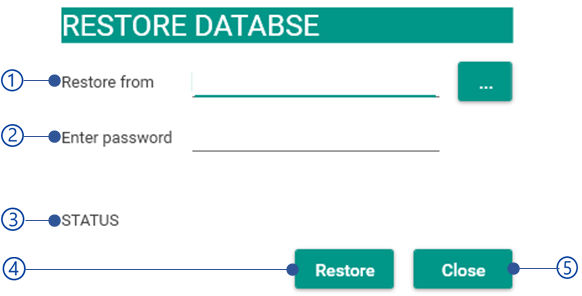
Figure 511 Backup database view of Windows standard client
Database backup location
The password to encrypt backup file
Password must have at least 6 characters with on digit.
Confirm password
Status
Database backup status in successful or fail attempts.
Back up button
Backup button will be disabled if the mandatory fields are empty or Validation errors exist. Table 136 Show all the error messages could be occurred.
Close button
Error code |
Error message |
3003 |
Password does not match. |
4001 |
Unidentified error occurred during data backup. Please contact administrator or NCheck Bio Attendance support for more details. |
Database restore
This view allows to restore backup databases as follows.
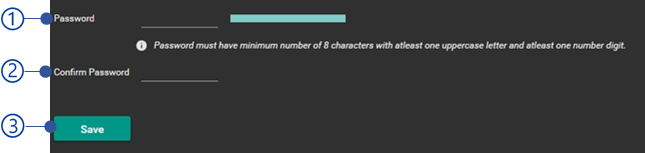
Figure 512 Restore database view of Windows client
Database location
Database encrypted password
Status
Database restore status in successful or fail attempts.
Restore button
Restore button will be disabled if the mandatory fields are empty or Validation errors exist. Table 137 Show all the error messages could be occurred.
Close button
Error code |
Description |
2015 |
Data restore has been failed. Could not decrypt the file with the given password |
2014 |
Data restore has been failed. Invalid backup file |
4002 |
Unidentified error occurred during data restore. Please contact administrator or NCheck Bio Attendance support for more details. |
Database encryption
Note
Database encryption feature is not available for NCheck Bio Attendance Android standard application.
Database encryption could be done as follows.
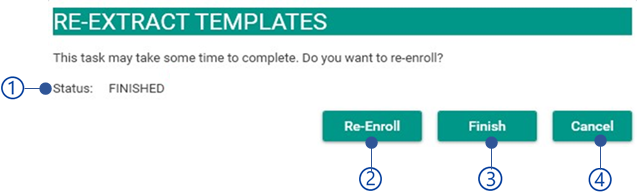
Figure 513 Encrypt database view of Windows standard client
Password
Password must have 8 characters with one uppercase character and one digit.
Confirm password
Save button will be disabled if the password and confirm password fields are empty or validation errors as shown in Table 138
Save button
Error code |
Error message |
3003 |
Password does not match. |
Biometrics
Re-extract users’ biometric templates from biometric engine and re-enroll.
Windows client |
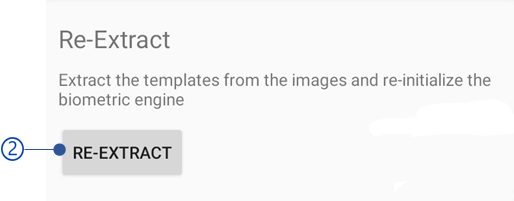
Figure 514 Re-extract template view of Windows standard client¶ |
Android client |
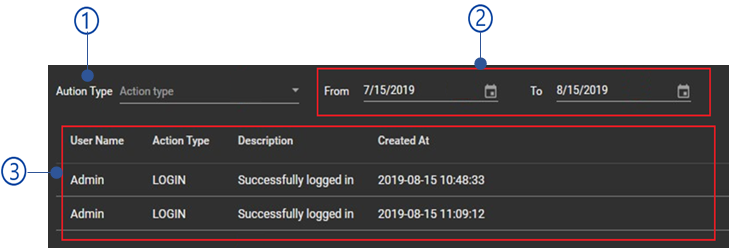
Figure 515 Re-extract template view of Android standard client¶ |
Status
Status of the template extraction as in-progress, Finished or failed.
Re-enroll button
Select re-enroll button to begin extraction. The extraction time will be depended on number of templates to re-enroll. Table 140 is showing the error messages during re-extraction.
Finish button
Select finish button to finish re-enroll task while in-progress or finish.
Cancel button
Error code |
Error messages |
2002 |
License cannot be obtained |
2048 |
Biometric re-extraction has failed on following images.
|
6.7.7.5 Audit logs
This view shows date and time with the actions history performed by the user in the control panel. The following actions types are logged by the application.
Windows client |
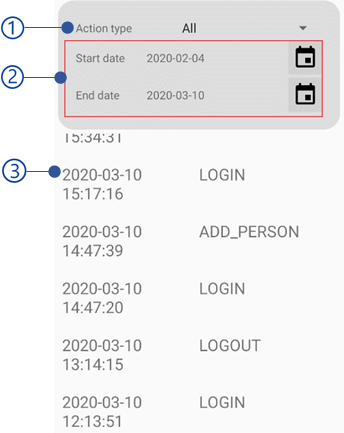
Figure 516 Manage audit log view of Windows standard client¶ |
Android client |
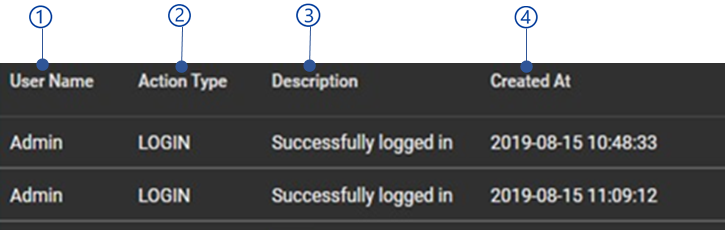
Figure 517 Manage audit log view of Android standard client¶ |
Action type
Filter audit logs by action type
Date filter with start and end date
The available action types are
LOGIN
Date and time for the admin logins.
LOGOUT
Date and time for the admin logouts.
ADDEVENTLOG
Date and time when event logs added.
MODIFYEVENTLOG
Date and time when event logs modified.
DELETEVENTLOG
Date and time when event logs deleted.
ADDPERSON
Date and time when persons added.
MODIFYPERSON
Date and time when persons modified.
DELETEPERSON
Date and time when persons deleted.
Audit logs list view
Windows client |
Figure 518 Audit logs list view of Windows standard client¶ |
Android client |

Figure 519 Audit logs list view of Android standard client¶ |
Username
Action type
Description
Created date and time