NCheck Clients are used as the client applications for NCheck server. It is mainly used to record attendance.
NCheck client has two applications
NCheck Attend client
NCheck Attend client is a simple client application with minimal required functionality for Windows, Android and IOS.
NCheck Admin client
NCheck Admin client for Windows and Android includes client-side biometric extraction and matching which provides advanced functions like automatic face recognition, face capturing and offline operation. The Admin client requires a NCheck license
NCheck Surveillance client for Windows
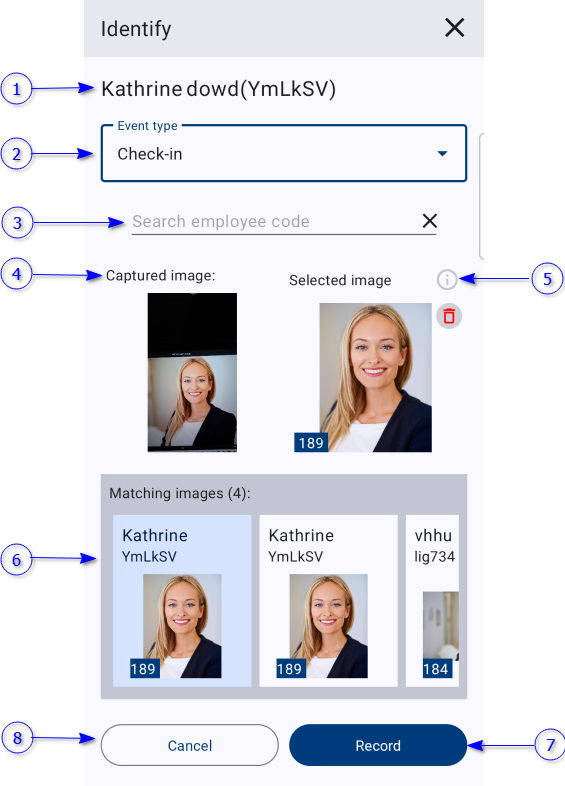
NCheck Surveillance client for Windows support all the features in NCheck Admin client for Windows with guard functionality in which an authorized person can manually identify the person and record the event in the attendance system
NCheck installer for Windows is installing all necessary drivers to enable face, fingerprint and iris scanners. But if you need additional drivers, you may need to install compatible drivers in the computer. You can download drivers for supportable camera, fingerprint and iris scanners from scanner driver package`. <https://www.ncheck.net/scanner-drivers/>`_
NCheck Admin clients support external or internal USB iris scanners. Refer supported iris scanners for admin client.
Note
By default, iris scanners are disabled for Windows Admin client. To enable, unzip necessary iris scanners from the Iris scanners folder in NCheck installation folder (By default the installation folder is “C:Program FilesNeurotechnologyNCheck”)
NCheck can be configured record the attendance event location with the attendance event. The location can be either device GPS location provided by the device operating system or predefined location coordinate.
If the client uses device GPS location, In Android, to get the accurate location of the attendance event, device should be supported Google play location services. If the google play location service is unavailable, the native location manager will be used. But this may not be accurate.
Refer Install client For Windows section for more details about installing windows clients.
After successful installation you will be asked to activate license in NCheck Admin clients and Surveillance clients for Windows as mentioned in License Manager section. For NCheck Attend client does not require a license. Once the license is activated for Windows clients, you can open the client.
NCheck Clients can be used with the following modes.
NCheck Cloud
Register with NCheck Cloud server. Refer Start web Control panel section for more details about cloud server.
NCheck server installed on-premises.
Register with NCheck on-premises server installed on premises. Refer Start web Control panel section for more details about on premises server.
The registration process configures the application to work with one of the above two modes. Accessing registration can be done in the following ways.
The client application will prompt the registration dialogue in case it is not registered.
The client application is unregistered as mentioned in Unregister section.
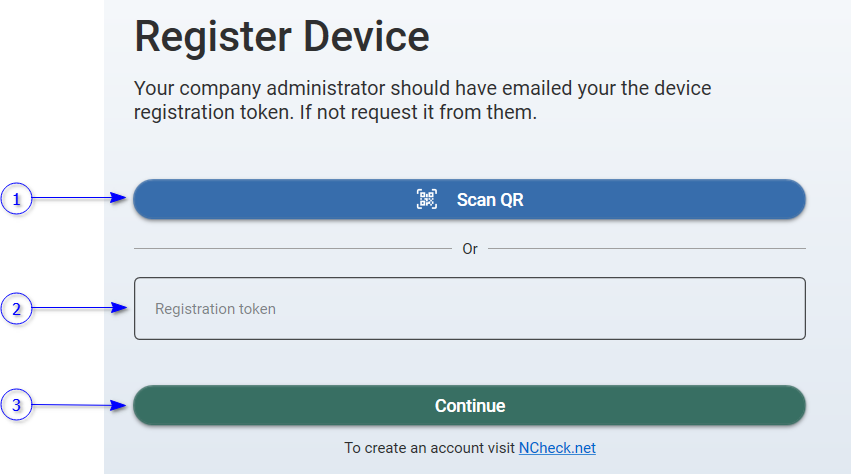
Once the registration view opens, it will ask for the registration token as below. Refer Register device section for more details about generating registration token.
Scan registration token QR code. The client will start to register if the scanned registration token is valid.
Token field
Enter registration token.
Continue button
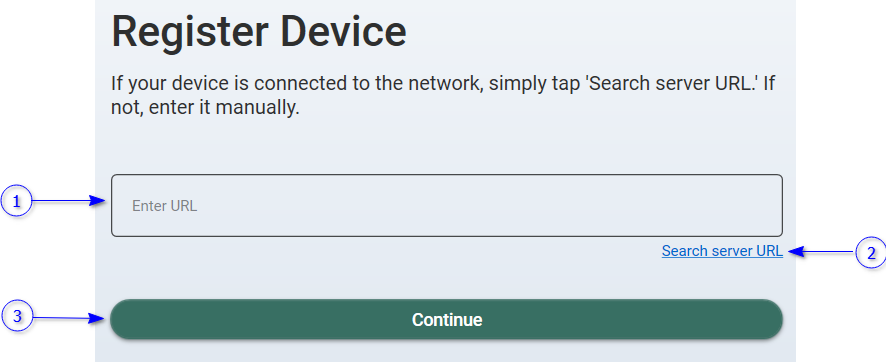
Once the registration token entered, select this button to continue registration. If the entered token is from cloud server, the registration will start. Otherwise, it will ask the on-premises server URL as follows.
Client automatically discovers the on-premises server URL when opening the view if the device and the on-premises server is connected to the same local area network. If it is not, enter the URL manually.
Search server URL button
To discover the server URL, make sure that the device and the on-premises server is connected to the same local area network.
Continue button
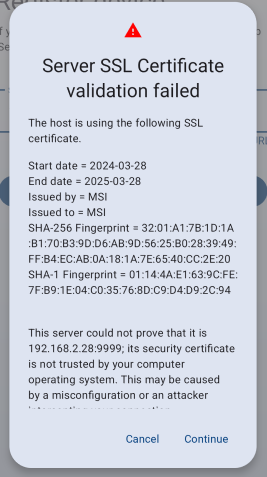
Start to register the client. If the on-premises server has no valid SSL certificate (Self sign certificate), the client will prompt SSL certificate validation error. Otherwise, the registration will be completed,
Figure 444 SSL validation error dialog for Android client
Once the self-sign certificate accepted pressing continue button, The client will be registered with the server.
The following table shows possible errors during the client registrations.
Failed to register with the NCheck server {server URL}
2052
Failed to register with the registration code
2053
The registration token has already been used. Please generate new registration code or contact administrator
2054
Could not discover the NCheck server URL
Once the registration is completed, clients will check the following in starting view before starting the capturing
Device permissions for Android clients
Device permissions require for attendance recording as mentioned in Check permissions section.
Encryption check for Admin clients
Android and Windows clients uses databases if the offline operation is enabled as mentioned in Offline operation mode setting. The database is encrypted and in any case the client failed to decrypt the database, it will request the database password as mentioned in this Check database encryption password section.
Check internet connectivity according to the activated license in Admin apps.
When the application starts first time, it will activate the Trial license (Refer License types section for more details about trial license). Once application starts, the license can be changed from the license manager as mentioned in License Manager section.
Initializing matching in Admin clients
Preparing all the biometric images of users to identification when recording attendance when Offline operation mode setting is enabled.
The Clients’ starting view is shown below.
Progress with status check text.
Once the checks are completed, clients will be ready to capture attendance as shown below.
Permissions are required for Android clients only.
In Android applications, permissions need to be granted to ensure privacy and security of the device data.
NCheck Android clients require the following permissions.
Google play licensing check
Google Play offers a licensing service that lets you enforce licensing policies for applications that you publish on Google Play. With Google Play Licensing, your application can query Google Play at run time to obtain the licensing status for the current user, then allow or disallow further use as appropriate. Android permission “com.android.vending.CHECK_LICENSE: is using
Access location
NCheck Android client is using device location details such as GPS coordinates and address when recording attendance. This requires “android.permission.ACCESS_FINE_LOCATION” permission.
Network information
This requires “android.permission.ACCESS_NETWORK_STATE” permission. NCheck Android clients are using network information to check the network available in the device for communication.
Access internet
This requires “android.permission.INTERNET” permission. Android clients require Internet to
To log application and device data in remote logging service(Firebase)
Access Wi-Fi information
In mobile services Wi-Fi is frequently used to access internet. Android clients use device Wi-Fi information to check the network connectivity and indicate to user. “android.permission.ACCESS_WIFI_STATE” and “android.permission.CHANGE_WIFI_STATE” permissions are required
Access camera
“android.permission.CAMERA” permission is required. NCheck Android client is using camera for
Face capture
Record users capturing face biometrics, Enroll face(s) to users.
Barcode capture
Capture User ids, device token,
Access storage
“android.permission.WRITE_EXTERNAL_STORAGE” permission is required below Android 11 application specific external storage to keep following data.
Diagnostic data
App generated log files to check application working status.
Downloaded files
License files
To browse the license files during activation for NCheck Admin and Guard Android clients.
Capture RFID
NCheck Android client is capturing RFID to record attendance and appointment creation. “android.permission.NFC” permission is required. This is used for NCheck Admin client only.
Access device power management tools
To wake up device when record attendance and create appointments. “android.permission.WAKE_LOCK” permission is required.
Receive application boot completed
Start the client automatically when device has restarted. This requires “ndroid.permission.RECEIVE_BOOT_COMPLETED” permission.
NCheck Admin clients and Windows surveillance clients are storing database encryption passwords in the application context. If the client database cannot be decrypted from the encryption password, database encryption password dialog will be shown asking current password of the database as below.
Figure 449 Database encryption password dialog for Android Admin client
Encryption key
Database encryption key.
Discard existing database and create new database option
Check this option to discard existing database and create new client database. You will lose all the data in the existing database if you continue selecting this option.
When the application starts the client application is checking for the valid license availability. This requires a network connection based on the activated license types .
If the network is unavailable, the client will show network connectivity failure view and hold until the network available checking the network connectivity periodically as shown below.
The location restrictions can be added restrict employee attendance events recording from outside of the allowed areas. The location restriction status is shown as mentioned Table 54 . The distance and location accuracy may not be accurate depending on the Google location service availability. Please refer this Google maps help for more details. Locations restrictions can be added from the web control panel in following ways
Location restrictions for employee
Location restrictions can be added for any employee as mentioned in Locations section of User Management .
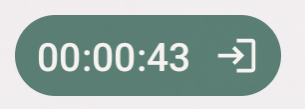
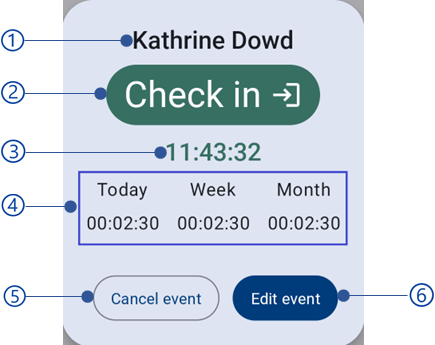
The Attend client registered to an employee is showing total work hour timer, on employee check-in and check-out. This helps employees to check the total work hours of the current shift. Once an employee is checked-in, the timer starts and keeps counting the work hours until checked-out. Refer Table 56 for more information.
License status (Admin clients only)
The status of the current license in admin clients. The available statuses are shown in Table 55 .
Location is restricted. But the user is inside the permitted radius. The view shows the distance between current location and the permitted area with precision. For example, as here, the correct location can be anywhere between 11+ 14 meters and 11 - 14 meters
Location is restricted. User is not inside the permitted radius. The view shows the distance between the current location and permitted area with precision. For an example as here, the correct location can be anywhere between 222+ 7 meters and 222 - 7 meters
The current license is failed to obtain. This may happen,
The current license (trial/no trial) is expired.
Currently trial/internet license cannot be used due to the no internet access to the device.
The device should be connected to internet if the current license is trial or internet license. In any case the internet is unavailable for more than 30 minutes, license will be failed, and identification will stop until the device connected with Internet.
License: failed
Trial license can be used for a month from the date its activated by the admin client. This status shows the available duration is the current license is trial.
NCheck Admin clients synchronize server-and client data every 5-minute time interval if the Offline data synchronize interval setting is enabled. If instant synchronize is required, select the synchronize option in the Attendance menu .
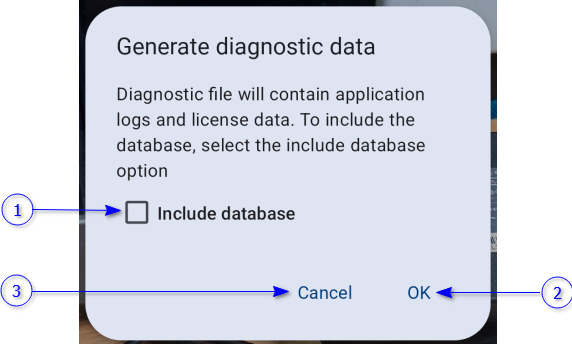
Check to include database in the diagnostic data for admin and Surveillance client.
OK button
Cancel button
Once select OK button, the diagnostic data will be downloaded to the downloads folder as a zip file and name of the file equivalent to the current timestamp.
Multi face feature is available in Attend clients only
Enable/disable multi face capture. Multi face capture is used to capture a group of employee faces from single capture. For more information refer Muli face section.
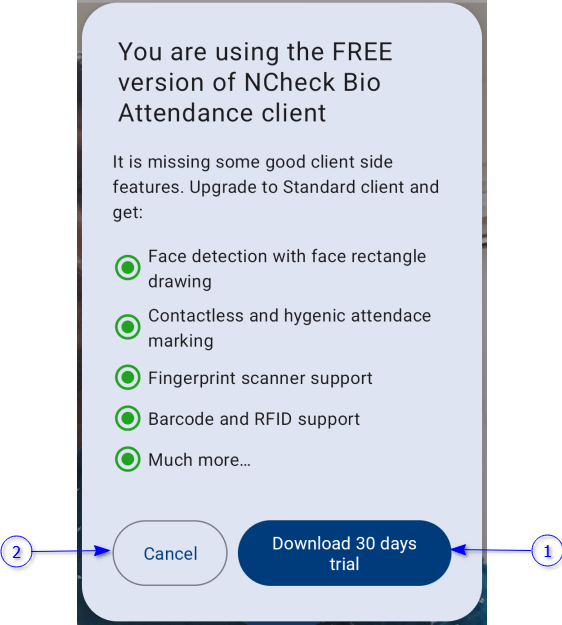
Buy now option is appearing in the Attendance menu of the admin clients if the client activated using Trial mode. This option will open the pricing page to purchase client license for admin app.
NCheck admin Android client uses SQLite database to store application data. But one of the major problems in SQLite database is the database size is not decreasing even if the data has been deleted from the database. To clear the cache, you must run VACUUM SQLite query in the database. Compact DB option triggers VACUUM query.
Note
Use Compact DB option at least once a month to release cache in the SQLite database for NCheck Admin Android client.
The unregister option is removing NCheck client registration details from the NCheck server as well as the NCheck client and allowing you to register the client application again.
This requires network connectivity to connect with the server. If server connectivity fails, User can cancel the un registration or proceed un registration without removing registration details from the server.
Check-out notifications are used to notify the check-out time to user before the check-out ends. Checkout notifications are available on Android and IOS Attend clients registered to an employee.
In NCheck Admin clients, face details are extracted to identify the faces when capturing faces. Enable this setting to minimize the extraction delay on low performance devices by doing the extraction in the server.
This setting has been introduced for low CPU devices to lower the CPU usage when application in use. Enable this setting to preview captured face instead of showing the face rectangle (as mentioned in Face capture view section) with lower resolution preview.
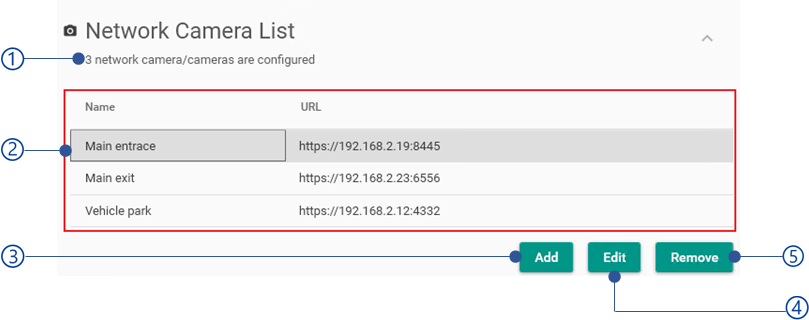
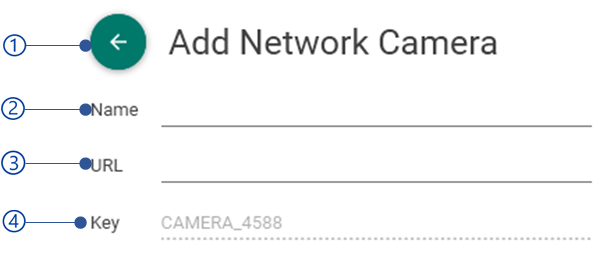
NCheck Admin clients can be used with third party peripheral devices such as biometric scanners, access controls etc. The peripheral devices can be integrated with NCheck Admin client using NCheck Peripheral API. Peripheral API can be used to develop peripheral integration packages (dll in windows and APK in Android)
External scanner view can be open from “External scanners” option in the Settings .
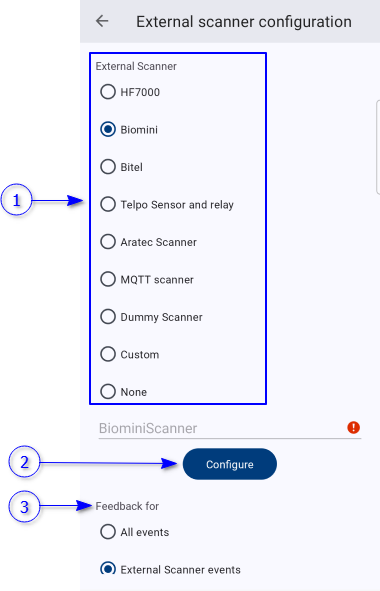
External scanner view of the Android admin client is shown below.
Figure 465 External scanner configuration view for Android Admin client
Available external scanner devices
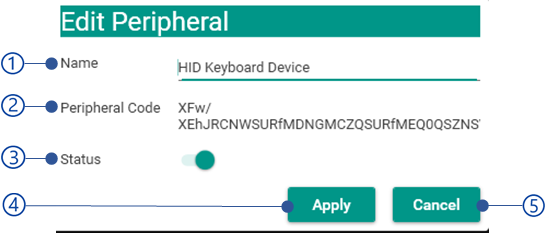
Configure button
This opens configuration view of the selected external scanner device to configure external parameters. These parameters depend on the selected external scanner device.
Feedback for
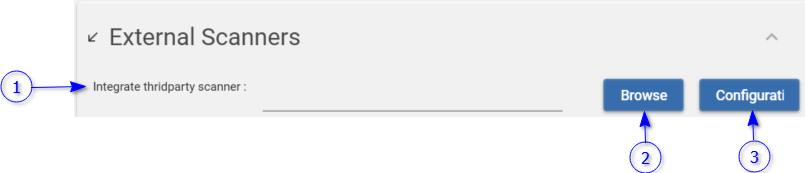
External scanner view for Windows Admin client is shown below.
Figure 466 External scanner configuration view for Windows Admin client
Path for the selected external scanner package(dll)
Browse button
Browse external scanner package from the file system
Configure button
Configure parameters of the selected external scanner.
Custom rotation settings need to be configured in case of camera orientation and device rotation settings return from the Android API are not same as Admin Android devices. This applicable for the devices,
Designed for a specific orientation.
Accelerometer and gyroscope sensors are not available.
Camera orientation and device rotation can be set as follows,
Camera orientation for a normal android device can be identified as follows.
When the camera orientation has differences as mentioned above, this value can be set manually using these settings.
Device rotation for a normal device can be identified as follows,
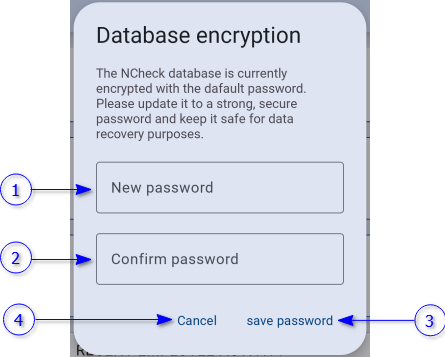
This feature can be used to change the default encryption key or current encryption key of the Admin client.
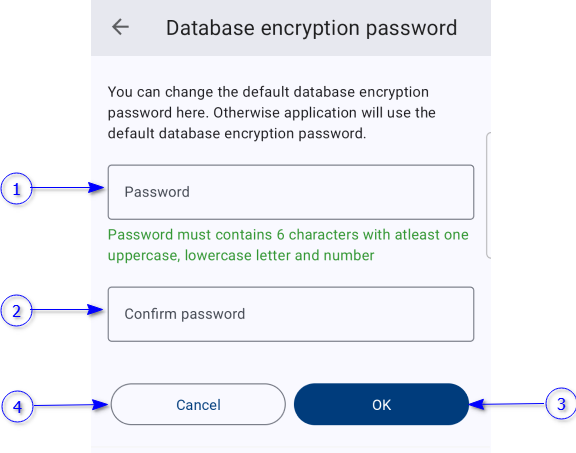
By default, the Admin client encrypts the database with default database password “123456”. To enhance the security, this password can be changed from database encryption password dialog open from “Encrypt the database” option in Settings .
Figure 467 Database encryption password dialog to change default password
New password field
The password must contains 6 characters with at least one uppercase, lowercase letter and number.,
Confirm password field
Ok button
Cancel button
To change the current password, database encryption password dialog appears as follows.
Figure 468 Database encryption password dialog to change existing password
Current password
New password field
The password must contain 6 characters with at least one uppercase, lowercase letter and number.,
Clients are logging application activities to troubleshooting problems in any case. Except the ordinary logs, there are additional logs which can be logged if the enhance logs setting is enabled. The reason for disabling these special logs by default, prevent consuming device memory and CPU. For example, to log application memory, for every minute.
NCheck Windows and Android admin clients can use to publish data to MQTT compatible device (Refer section for more details.) and receive data from MQTT compatible third-party peripheral device (Refer section for more details.). To perform such options a client can be connected with either a built-in MQTT broker or any third-party broker service.
By default, built in MQTT broker has no security. To enable the authentication when connect with the broker, enable “Enable MQTT authentication” setting from Settings . Once enabled, you can set username and password which should be used when connect with the built in MQTT broker.
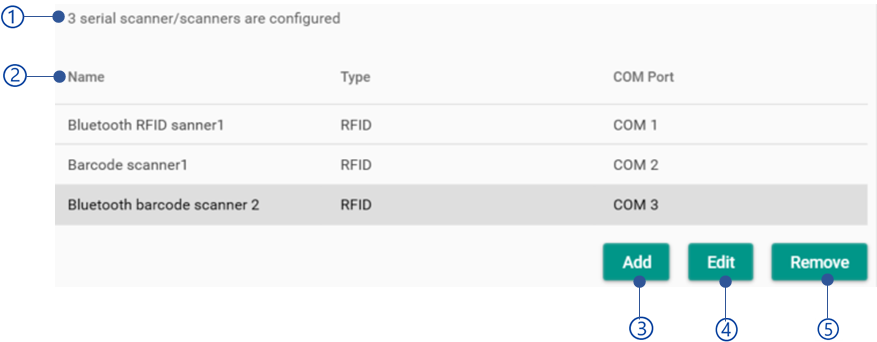
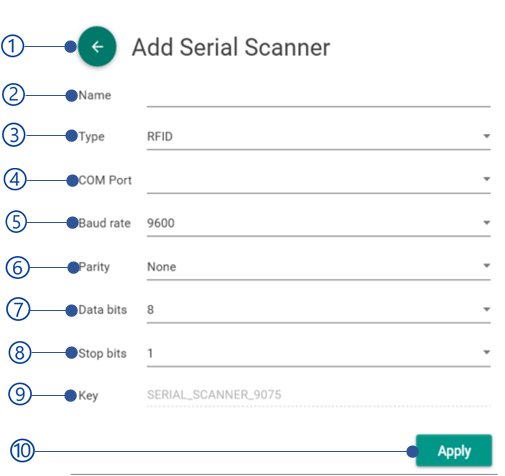
Serial scanner configuration in client preferences is used to configure barcode and RFID scanners which can be connected using physical serial port or Bluetooth serial port. The serial scanner view is shown below.
This feature is currently available with NCheck Attend for Android only.
In NCheck Attend for Android, users are allowed to record events without presenting face biometrics. In order to enable this feature, Users must enabled the Allow without biometrics setting as mentioned in NCheck control panel Client settings view or Device settings sections.
The view is changing according to the enable/disable status of the Manual capture start setting in the NCheck Client settings view or block/unblock device as mentioned in Device detail view as shown in Table 64 . When the Manual capture start is enabled, user can select the event as check-in or check-out before recording.
Attendance view is where capture employee and visitor events. It may consist of one or more peripherals based on the authentication mode. The authentication mode can be set for the device from the Authentication mode section in the Manage devices . The following table shows peripherals available in each authentication mode.
Table 65 Relationship between authentication mode and peripherals
Authentication mode
Peripherals
PASS
Only the ID peripherals such as QR code, RFID, number plate will capture the attendance using Id peripherals .
Biometric
Unavailable for Attend client. Face , Fingerprint and Iris peripherals can be used to record attendance.
Biometric and Pass
For Admin clients verify client using both biometric and id data. Once biometric data( Face , Fingerprint or Iris ) captured the ID data( Id peripherals ) can be given to verify. The sequence of the biometric and ID data capturing can be set from the Verification order section.
Biometric or pass
Record user attendances using either biometric or ID peripheral.
Attendance views of the clients are shown below.
OS
Client
Attendance view
Android/IOS
Attend
Figure 477 Attendance view of Android Attend client
Android
Admin
Figure 478 Attendance view of Android Admin client
Windows
Attend
Figure 479 Attendance view of Windows Attend client
Admin
Figure 480 Attendance view of Windows Admin client
Android clients are showing face and barcode peripherals previews. Windows Clients are showing all peripherals previews such as face, finger, iris, barcode etc.
Face peripheral is an important peripheral because it uses cameras available with the device. Nowadays, most of the devices such as Android, IOS, laptops come with built-in cameras so that the user doesn’t require any additional hardware to capture employee/visitor faces. But if anyone is supposed to use Finger, iris, you may have to buy relevant hardware.
Face peripheral view shows additional features and controls as shown below.
OS
Client
Face preview view
Android/IOS
Attend
Figure 481 Attendance view of Android attend client
Android
Admin
Figure 482 Attendance view of Android admin client
Windows
Attend
Figure 483 Attendance view of Windows Attend client
Admin
Surveillance
Face preview
Face rectangle
A rectangular boundary appears in the edge of the face preview. This does not appear in Attend clients.
Extracting status
Capture button
Capture face when the ready to capture attendance. The capture button appears for Attend clients only.
Before capture attendance, depending on the authentication mode, employee must have at least one biometric data enrolled to the employee/visitor or pass data. Refer Enroll biometrics section more details about enrolling biometrics.
Once an employee attendance event is recorded, the client will be shown the feedback view for successful event as follows.
Workhours summery view is showing employee workhours for the current date, current week and current month. To show the workhour details in the employee feedback view, enable
Only the Admin clients have this feature. The recorded employee event can be edited either from the feedback view as shown above or as mentioned in Recent events section. To edit employee event the Admin client should be in Admin mode . For more details about editing employee event refer Edit employee event section.
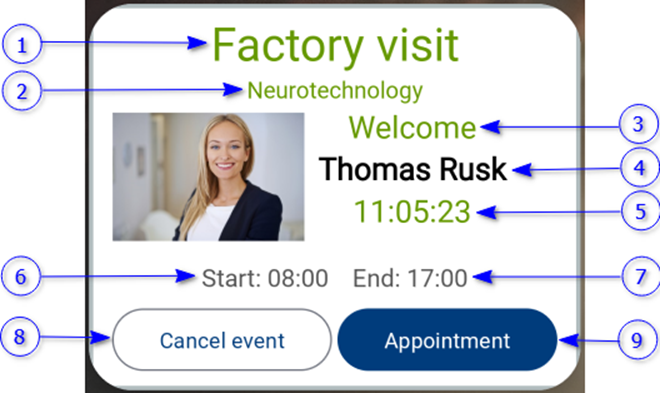
Once a visitor attendance event is recorded, the visitor feedback view will be shown below.
If the recorded event is unsuccessful, Appropriate error message will be shown in the following cases.
Table 66 Reason for unsuccessful employee/visitor events.
Reason for unsuccessful event
Error message
Peripheral is not available
Peripheral is not ready
The biometric or ID data is not matching with any employee/visitor
User not found
Failed to deliver event response before the timeout exceeds (socket timeout)
Cannot connect to the service. Please retry online.
Try to record with biometrics not supported by the server.
Modality is not supported.
The device is unregistered from the server.
Device not registered. Please check with the administrator.
Client sending event time zone with the event time to record event. If there is a considerable difference between event and sever GMT time, this error message will be shown. This prevents recording events with incorrect time.
Time difference detected. Check device time setting.
No biometrics are enrolled for the employee/visitor.
No template enrolled
The Shift used to record events is unavailable in the server.
This message might appear in the client devices registered with cloud server when the cloud subscription is ended. Pay the total outstanding amount to unblock the customer account.
Customer blocked.
Location restricted and device location service is disabled. Enable location service to resolve this error.
Location not available. Check your setting.
The location is away from the restricted location from the shown distance. Record events in the restricted location or contact administrator prevent this error.
The current location is away from restricted location by {distance} (±precision) meters!
The location accuracy of the location service is not enough to determine the device location to find restricted locations.
Current location accuracy is not enough to determine the location
This message appears when try to record events from face wearing a mask. Remove the mask or enable mask detection setting as mentioned in Mask detection section.
Identifying with a mask is not enabled.
The captured image is not clear enough to identify employee/visitor. Capture again.
Failed to identify. Try again.
The captured image does not have enough lighting. Avoid shadows and capture with more lighting.
Current location accuracy is not enough to determine the location.
This error happens due to the licensing issue in the server. The server license may expire. Contact administrator.
Licensing issues in server! Please contact administrator.
The error is shown the time between consecutive events of the same employee/visitor is less than the Duplicate event timeout . To prevent this error, prevent consecutive events or decrease the Duplicate event timeout .
Already checked-in, already checked-out (Od versions)
Last event time %1$s. Next event is allowed after %2$s seconds
The device is blocked. Unblock he device from Device view .
Device blocked! Please contact administrator.
The employees who are on restricted leave cannot check-in on the leave day. Refer Edit leave section in Manage Leaves and holidays for more details about applying leaves with restricted/normal leaves.
User not allowed to Check-in while on Restricted Leave
Event biometric data matches multiple employees/visitors. This might happen due to the quality of the enrolled biometric images of the employees not having enough quality (lighting issues, distance between camera and face, etc..). Contact NCheck support for more details with diagnostic data.
Matching with multiple users. Please contact the administrator
The location is restricted without the bypass enabled. To prevent this issue, record attendance in the restricted location or bypass the location restriction as mentioned in Edit location restriction section.
Location is restricted. Bypass is not allowed.
Uknown error. Contact NCheck support for more details with diagnostic data.
Failed
Note
This section explains how NCheck clients can be used with basic attendance recording for employees and visitors. For additional features refer Additional features of capturing section for more information.
Rotate camera preview anti clockwise direction by angle 0, 90, 180 or 270. By default, the camera preview might be rotated for some cameras connected. This setting can be used to rotate the camera preview at the correct angle.
Mirror setting
Mirror camera preview. For some connected cameras, the camera preview might be mirrored. Enable this setting to correct the camera preview in these cases.
The basic attendance capturing has explained under the Attendance view section. The following extended features can be used to record attendances as well.
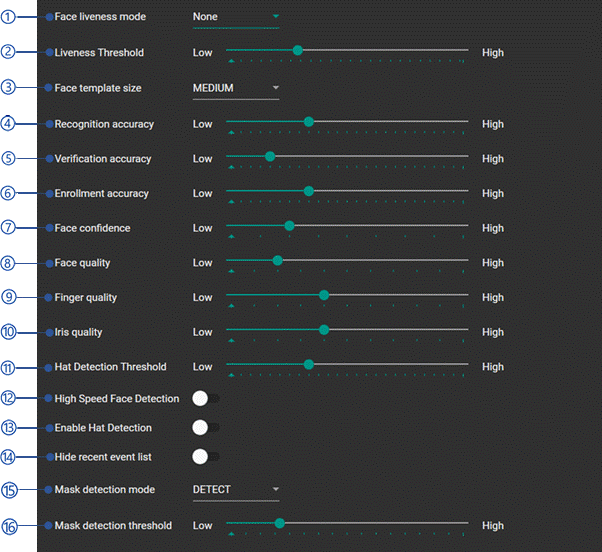
The basic attendance capture is used to record employee and visitor attendances. But it is not preventing attendances recorded using someone else biometrics (Face image, iris image, etc.) or id data. This is called buddy punching. To prevent this face liveness can be used. When face liveness is enabled, client will show set of instructions in the face peripheral preview in the Attendance view and employee/visitor should follow these instructions to record attendance. Otherwise, the attempt will fail.
Face liveness can be enabled from Face liveness mode for client application setting in either Biometric setting of Settings or Device settings of the Manage devices .
The default value of the Face liveness mode for client application setting is None. That means basic attendance capturing. Refer Face liveness mode for client application for more information about face liveness modes and instructions.
Multi face is available for Attend clients registered to employee groups.
The basic face capturing captures one employee at a time. If there is a group of employees to record attendance each employee should be captured individually. This is not convenient. Multi face feature available in Attend clients can be used to record all of employees capturing all faces in single capture.
To enable multi face capture in android and IOS Attend clients, Select Enable multi face setting from the Attendance menu in Attendance capturing .
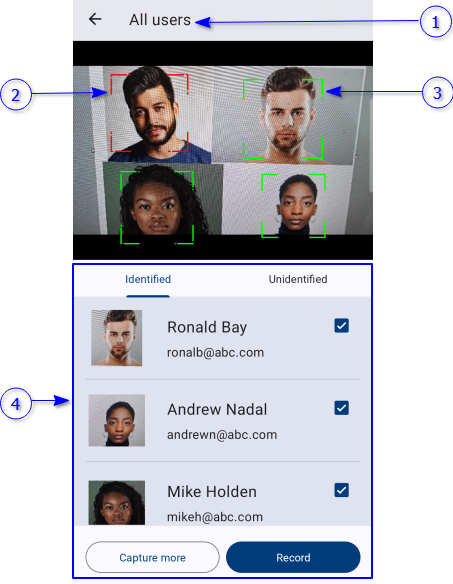
Once captured employees in multi face mode multi face session will be started and multi face view will be available as follows.
Capture the employee faces again. The identified and unidentified faces in the captured images are added to the current multi face session. This feature can be used in the following cases.
Can not capture all faces from single capture
If there are employees whose are not identified
Record
Record selected identified employees. Once employees recorded, the employee feedback view will be shown as mentioned in Multi face events feedback view section.
If there are unidentified faces in the captured images, these faces can be assigned to the unidentified employees and record employees as identified. To enable this feature, Manual face selection setting from Biometric setting of Settings .
Assign a face dialog is shown below.
If the face is not assigned, the face is available to assign for unidentified employee. If the face is already assigned, the face can be assigned to an unidentified employee, and it will be removed from the previous unidentified employee.
By default, client are capturing all peripherals and this consumes battery power and CPU. If the continuous capturing is not required, Manual capture start setting can be used to invoke all capturing views when attendance capturing requires. This is enabled by default for Attend client.
This feature can be enabled from Manual capture start setting from either Client settings view of Settings or Device settings of the Manage devices .
There are 2 manual capture options.
Select start button
This option is using in Attend clients by default because the Attend clients are capturing faces manually. Once this setting is enabled, Admin client will show start button. Once select start button it will start the Attendance view .
Check-in/check-out selection
Employee/visitor can select event type as check-in or check-out. Once select check-in or check-out button it will start the Attendance view .
This feature is available in Attend clients for Android and IOS registered for an employee only
If the Authentication mode of the Attend client is set to none, employees can record attendance without using any peripherals. Once the Authentication mode is set to none, the application will show start capture button and employee can record events just by clicking on the button.
If the device has in-built identification scanners (fingerprint unlock, face unlock), NCheck Attend client can use these options to enhance the security of using Attend application when capture attendance without peripherals. Currently Android Attend clients can use fingerprint unlock available with the device. IOS Attend client can use face ID and finger ID options.
To use in-built scanners, enable Use in-built biometric verification on personal clients setting in the Client settings section of the Device settings .
Before using in-built scanners for Attend client, make sure that you have configured the scanners from system settings.
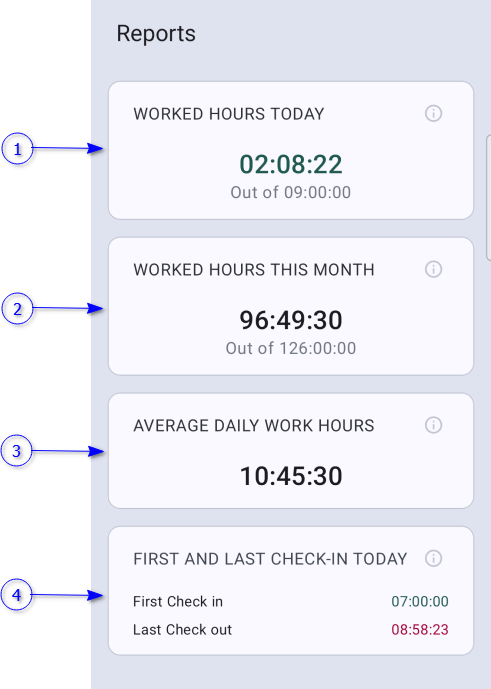
Employee reports are available for Attend clients registered to an employee.
NCheck Attend client registered to an employee can be used to record personal attendances. The employee can check his work hours statistics from report menu in bottom navigation bar as mentioned in Open clients section.
Employee reports are shown below.
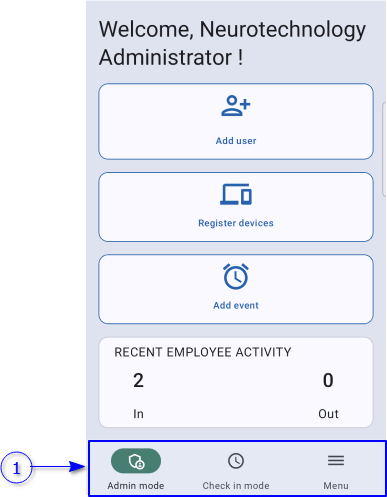
Admin mode is available for NCheck Admin clients only.
Admin mode of the Admin clients allow to manage employees of the registered user group for Admin, visitor admin, employee ( Offline operation mode is disabled) and device admin( Offline operation mode is enabled). The available features are,
In offline mode, the dashboard data will be sent to the server when synchronizing the client.
If the Offline operation mode is disabled, either admin, visitor admin or employee role can log into the admin dashboard. The features are available based on the logged in role as shown below.
Table 67 Admin dashboard features availability based on the user permission
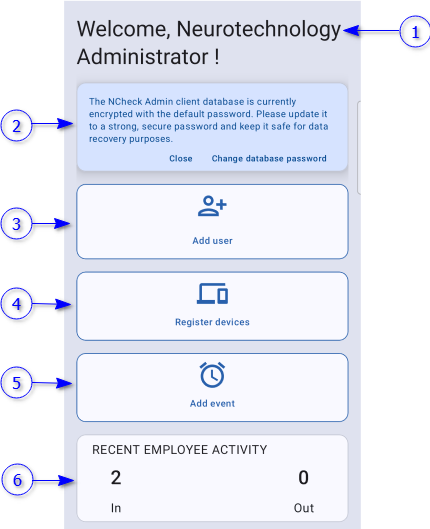
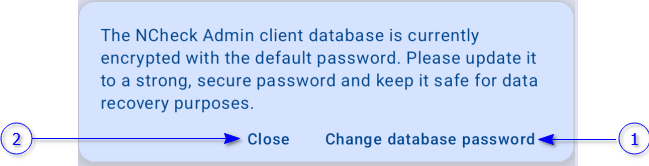
The database of the Admin client is encrypted using default password “123456”. The database warning appears in the Admin dashboard to change the encryption password as below.
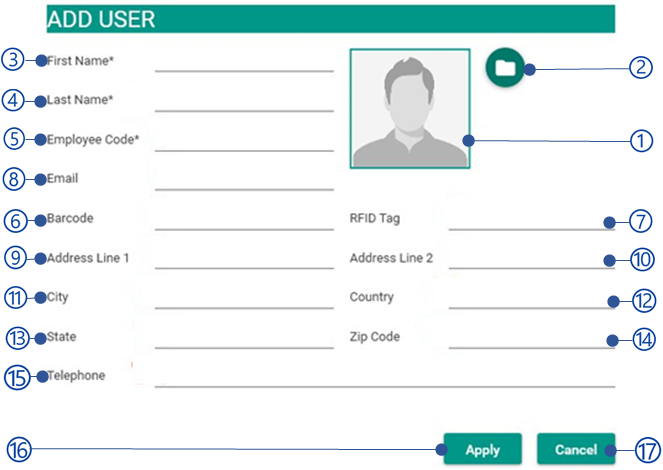
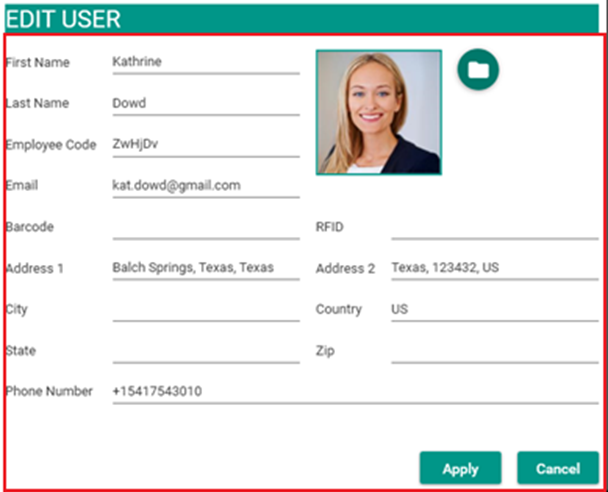
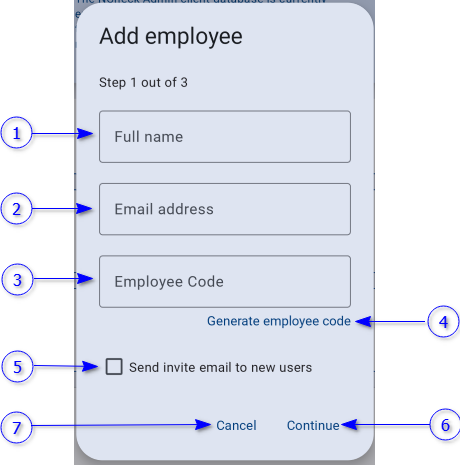
Full name of the employee. This is a mandatory field.
Email address field
Email address if exist.
Employee code field
A unique identification for an employee. This is a mandatory field.
Generate employee code button
Generate employee code.
Send invite email to new user option
Check this option to send invitation email, if user enter email. To send invitation email, Email notification settings should be configured in the Notifications .
Continue button
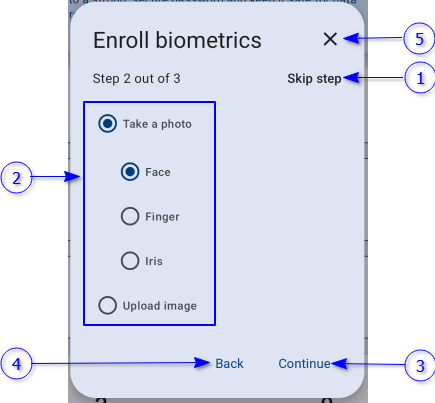
Select this button to create the user from entered information and open enroll biometric dialog as mentioned in Enroll biometrics section.
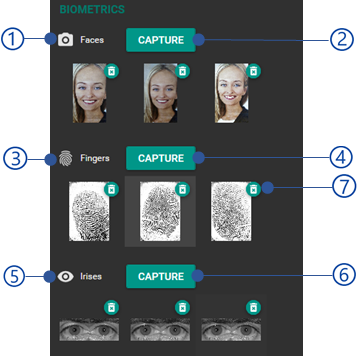
Capturing face, finger and iris from the Admin clients. This will open a capturing view for selected biometric type. If a peripheral is available, biometric can be captured and enrolled. Refer Biometric capturing for enrollment section for more details about capturing biometric image.
Upload biometrics
Upload biometric image from the local file system. Refer Upload biometric images section for more information.
Continue button
Continue to biometric upload according to the selected biometric image upload option
Once the biometric enroll complete, a registration token will be generated for the employee to register a device as mentioned in Generate registration token for employee section.
Register NCheck client with the server. This feature will generate a registration token to register the device. There are 3 steps to generate registration tokens.
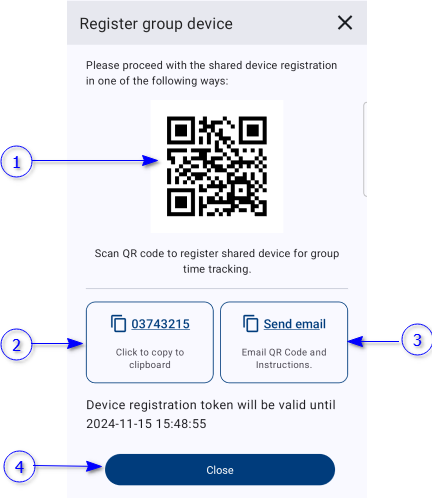
Once select user/user group or location as mentioned in Select registration type section, register device dialog will show the generated registration token as below.
To identify employees/visitors at least one biometric should be enrolled to them self. This can be done either from the web control panel as mentioned in Biometric authentication view section of User Management or NCheck Admin/Attend client. NCheck Attend client can be used to capture/upload face and enroll to an employee/visitor. NCheck Admin client can be used capture/upload face, finger and iris images and enrolling to an employee/visitor.
The following enrollment options are available based on the client.
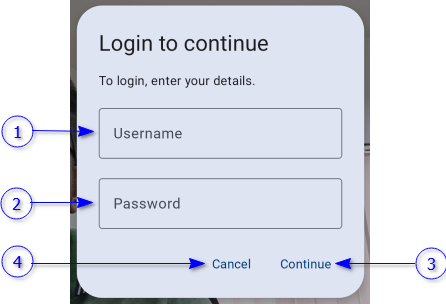
Capture web control panel when opening from client. When the web control panel is open from the clients as mentioned in Login to control panel section, the biometric images can be captured and enrolled for the selected employee/visitor using the capture button of the Biometric authentication view of the User Management .
Self-enroll image. If the employee/visitor tries to record events without enrolled images, client will ask to enroll employee/visitor. In Admin clients, to self-enroll employee/visitors, a valid pass is required. For more details refer Attendance capturing section for more details.
Note
To capture biometric images, a peripheral should be available with the client.
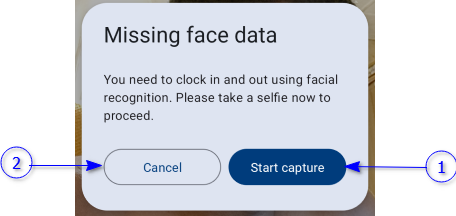
Attend clients registered to an employe can be used to enroll face images using self-enroll feature.
If the employee That the Attend client registered has no face images enroll, the Attend client will show below view before self-enroll templates.
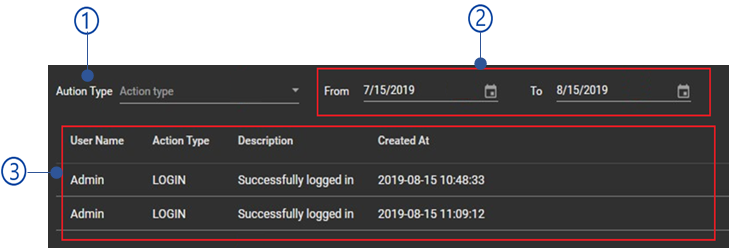
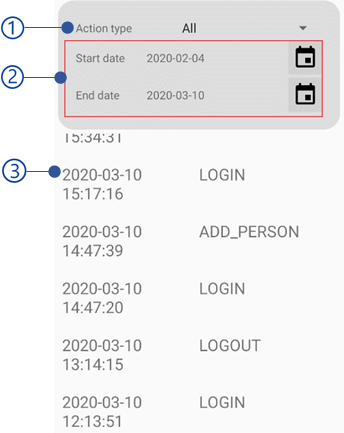
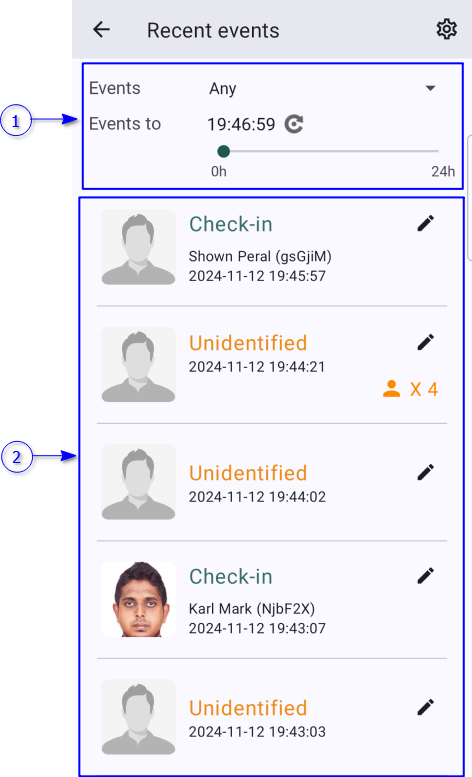
The recent events view shows the following type of events recorded by clients.
Whitelist
Check-in, Check-out events are known as whitelist events.
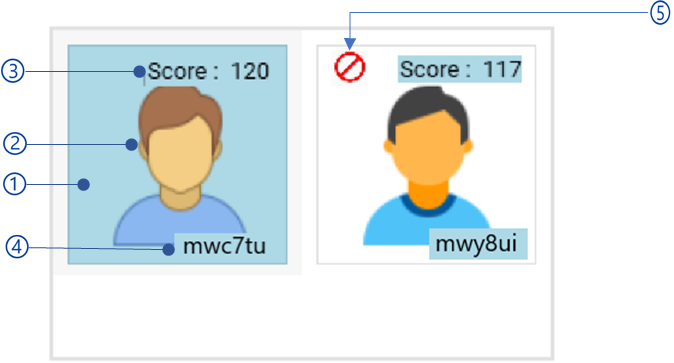
Close match
The matching score calculated by matching algorithm for the captured image and the employee face image is greater than the Recognition threshold for multiple employees.
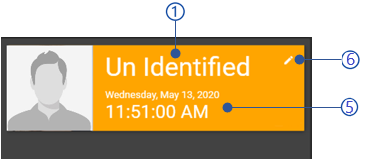
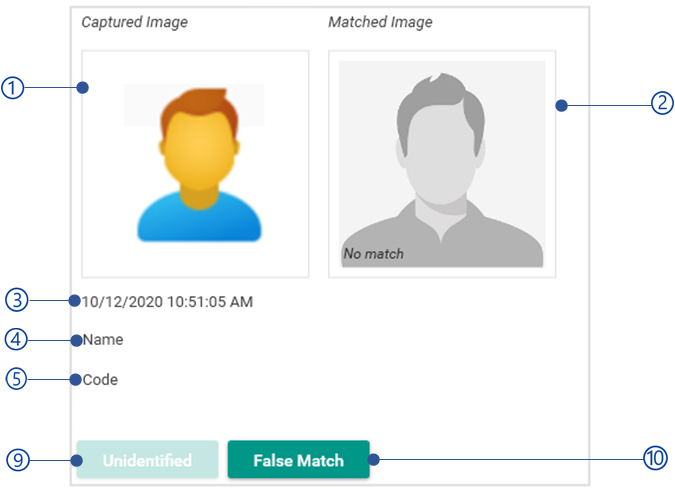
Unidentified
Events that the event image is failed to match with any employee are known as unidentified events.
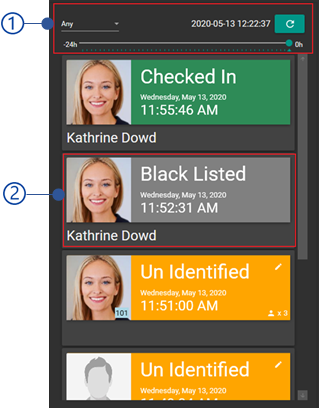
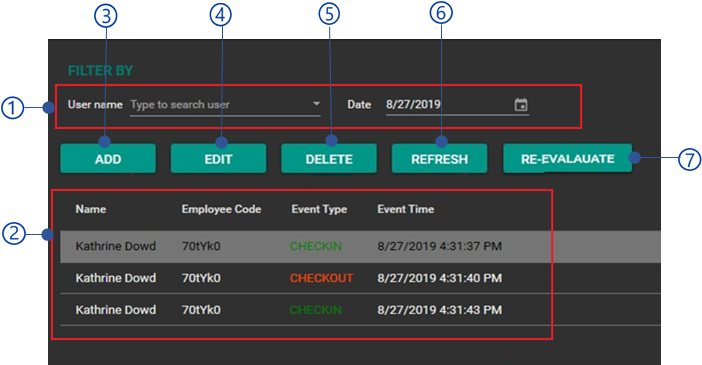
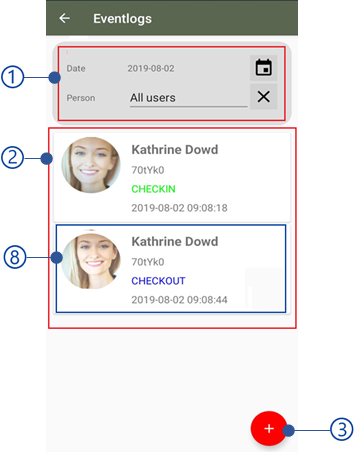
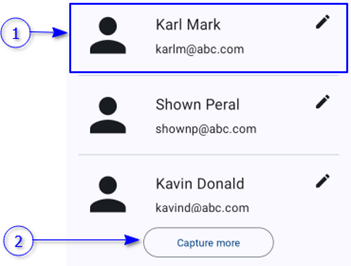
Recently recorded events are showing in this view. Recent event list shown below.
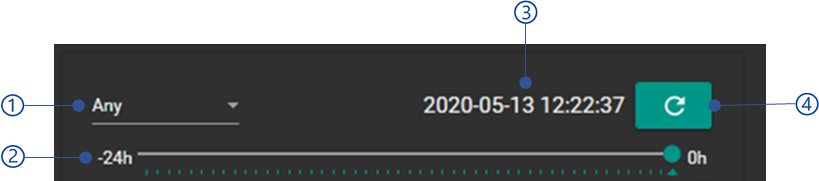
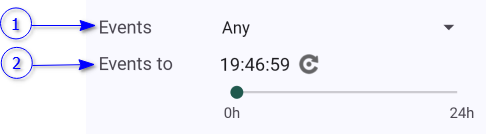
Using the timeline selector, the timeline can be changed, and it will support 24 hours of period to backward. It will filter the events according to the timeline selected
Timeline of the event
By default, this shows the current timeline, and timeline can be changed using the Timeline selector.
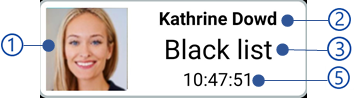
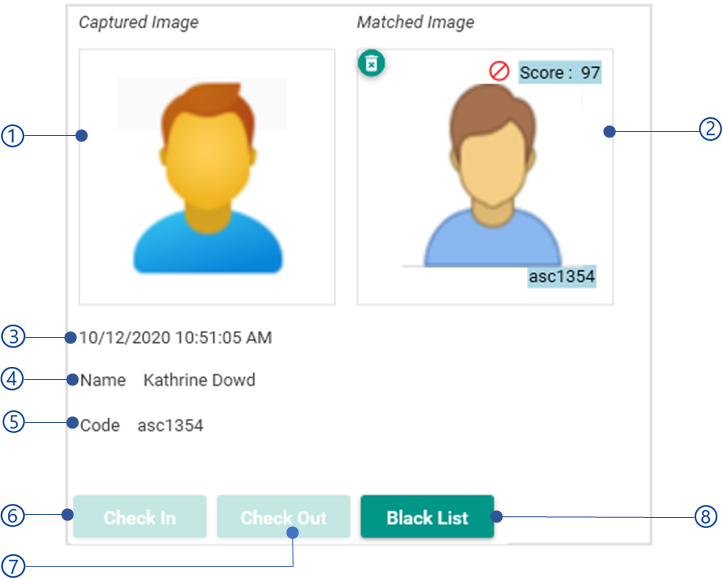
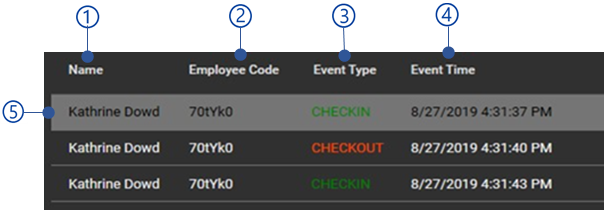
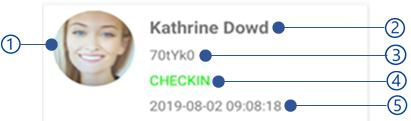
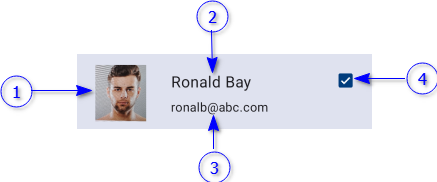
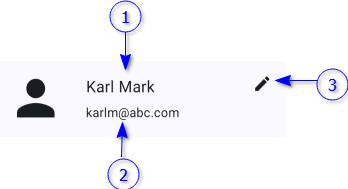
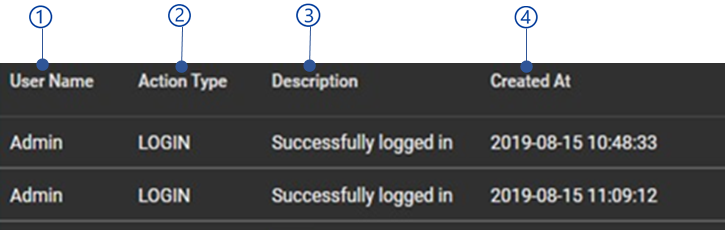
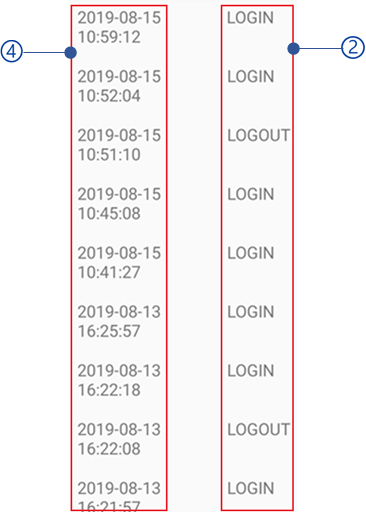
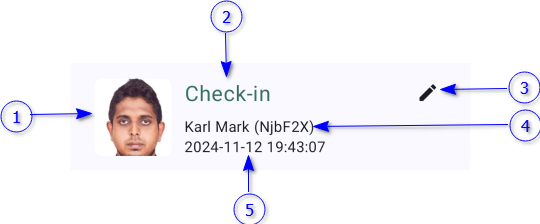
The recent event list shows a list of recent event views as shown below.
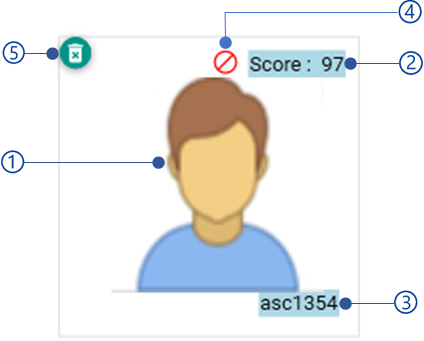
Event thumbnail of whitelist event
Event type as
Check-in
Check-out
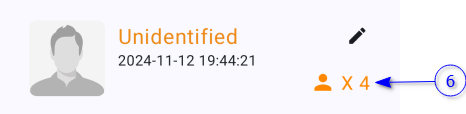
Unidentified
Close match
Edit button
Edit button is available for Admin and surveillance clients only. The edit button is showing Admin mode of the client is enabled. Refer Edit employee event section for more details.
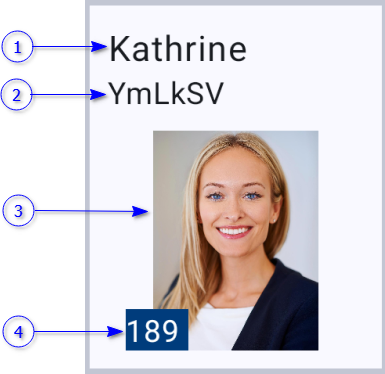
Name and employee code of the whitelist event
Event date and time
The number of templates closely match with the event image
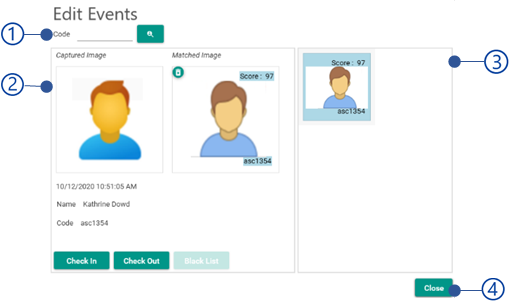
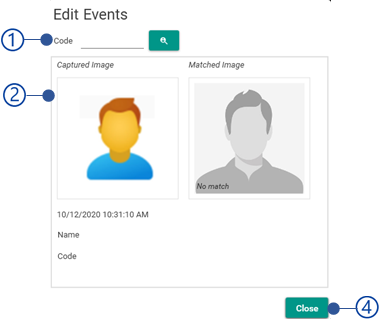
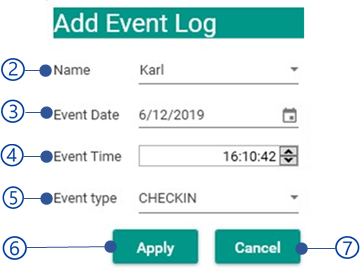
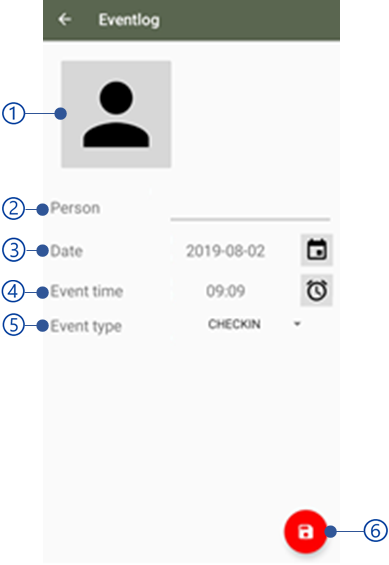
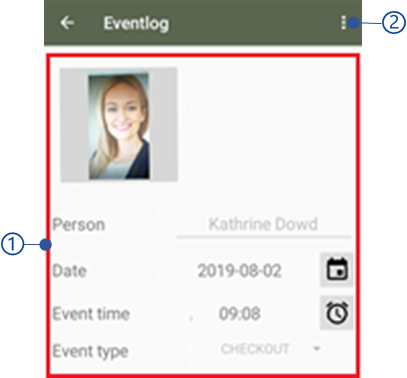
Edit event feature is available for Admin and surveillance clients only.
Once an event is recorded, the event can be edited if the device in Admin mode . Edit employee event dialog can be open from the employee event feedback view as mentioned in Attendance view or from the recent event list as mentioned in Recent events .