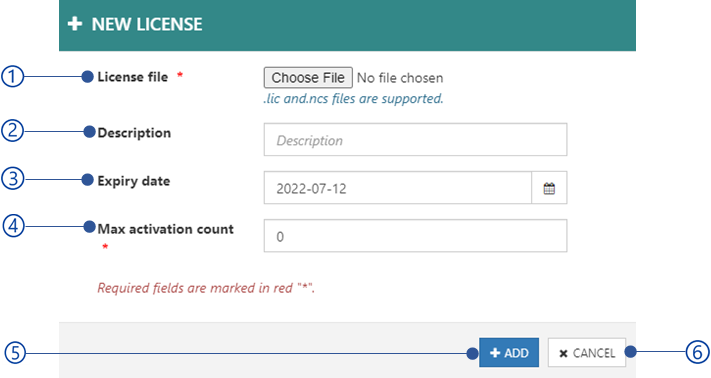
NCheck administration and configuration application is a control panel application. This is a web-based application that can be accessed using popular web browsers using following URL.
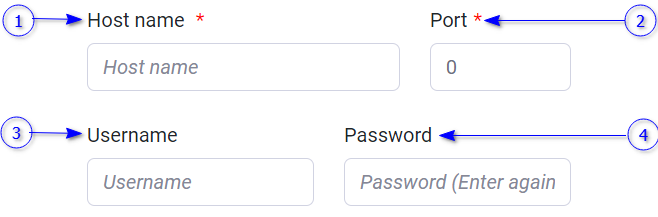
Port – Service port configured on the server. Default port is 8443.
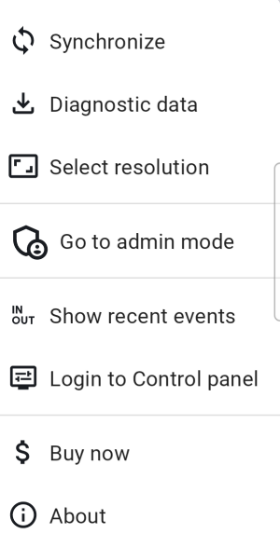
NCheck control panel launcher application with extended data capture capabilities is available with the NCheck Server and NCheck Admin client installations. This application can be launched from
Table 14 Launch NCheck control panel from server and clients
Server
Right click on the NCheck server tray application icon
NCheck server interface will work with recent versions of Mozilla Firefox, Google Chrome, Microsoft Edge, Opera and most common web browsers. It does not work with the Internet Explorer browser.
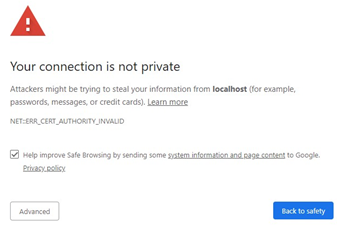
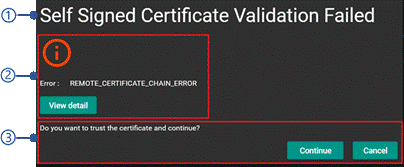
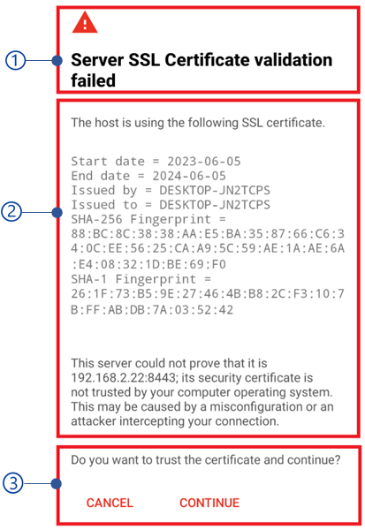
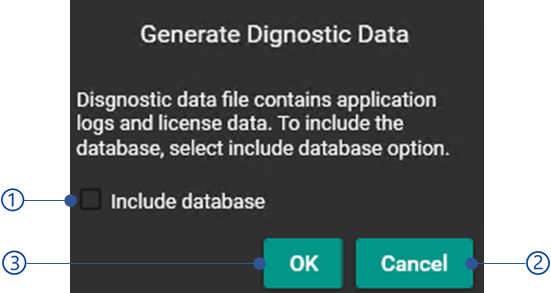
Once the NCheck control panel sign in is triggered in on-premises mode, you may see browser warning as shown in Figure 56 because it fails to validate the SSL certificate with trusted certificate authority. To prevent this warning
Figure 56 Browser warning without SSL certificate
You may use the browser option to skip and proceed to the site.
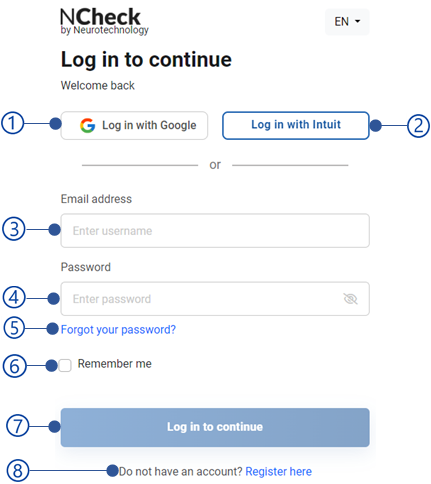
If you are using your Gmail email address to login to the NCheck control panel, you can use this option to login into control panel, signing with the Gmail account.
Intuit login button
If you have Quickbook account, you can login to the NCheck control panel if you are using same email address.
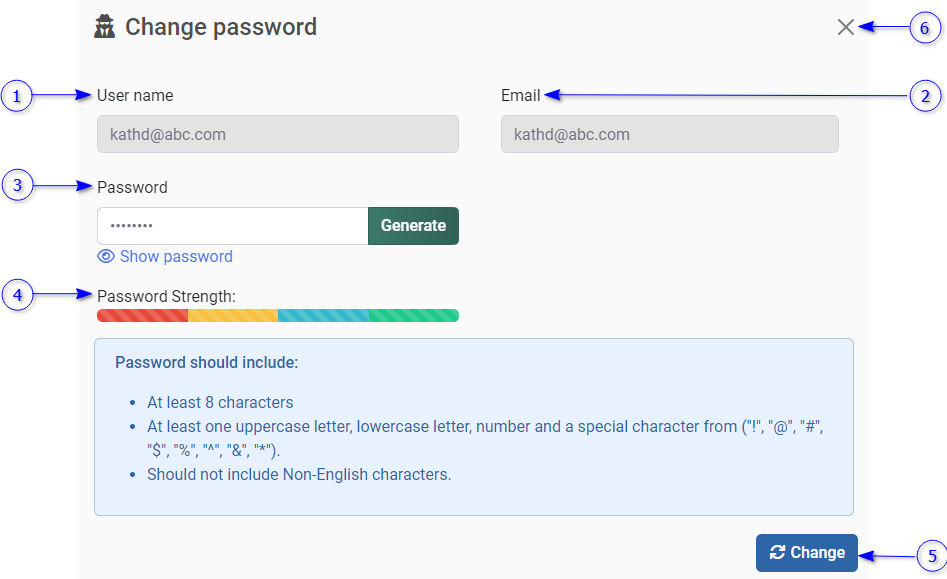
Username
Password.
Forget password link
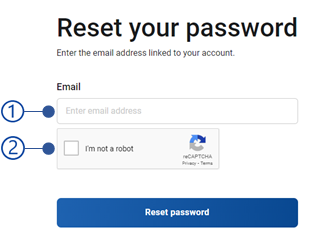
The forgot password view appears as shown in Figure 58 .
Email address
Security check for human
Reset password button
Password reset email will be sent to the email address if that is specified to a user in NCheck. In on-premises mode Administrator allows to reset user password as mentioned in Change password section. The error message could appear as shown in Table 16
Remember me
Once you logged in to the NCheck control panel, the logged in session will expire after limited time and you will be asked to login again. To continue the logged in session without expiration, select this option.
Login button
After successful login in, you will be landed in the NCheck Control Panel Dashboard. The possible error messages after selecting login button are shown in Table 15
Sign up link
This is available only on NCheck Cloud. It loads the signup page for subscribing to NCheck Cloud.
Note
For NCheck on-premises server, the default admin username and password are “admin”.
Table 15 Error messages of web control panel sign-in
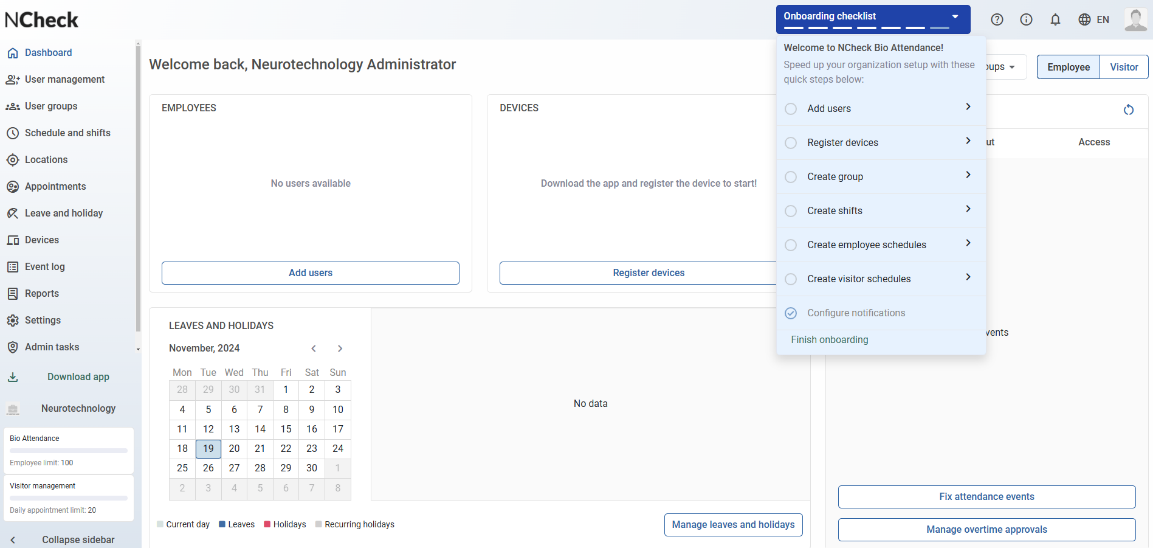
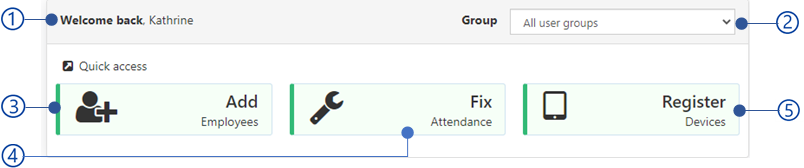
After signing in, those who have administrator privileges will be landed in the NCheck Control Panel Dashboard, it will show a tour to demonstrate how to setup NCheck for attendance recording.
Once you login to the system, it will show onboarding checklist menu in the Navigation bar . This will guide you to set up the attendance and visitor management system for the first time use. The onboarding checklist is shown below.
This will open Add employee dialog as mentioned in Add employee/visitor section.
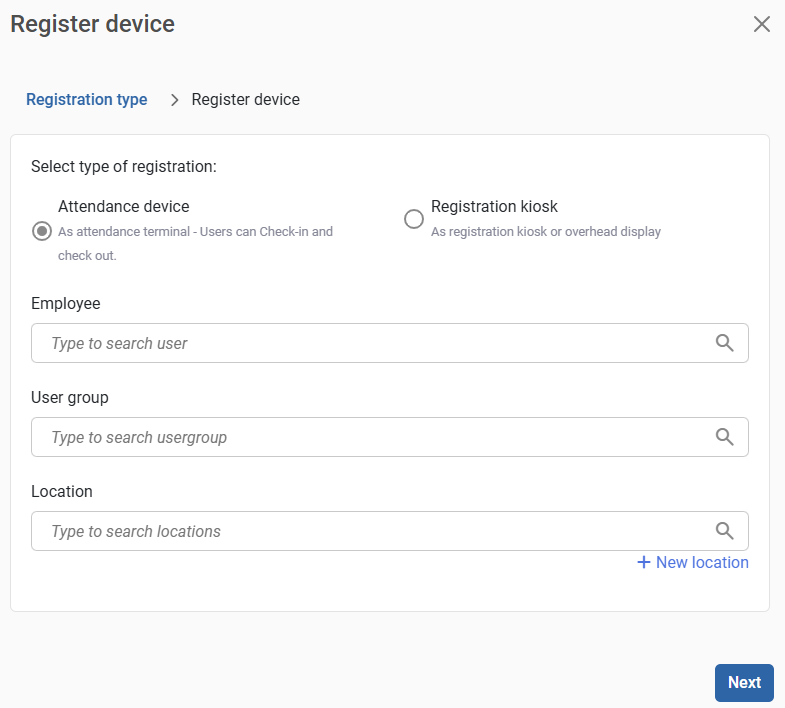
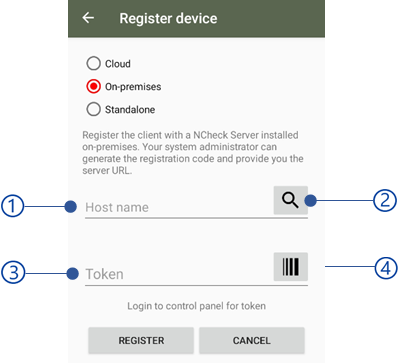
Register devices
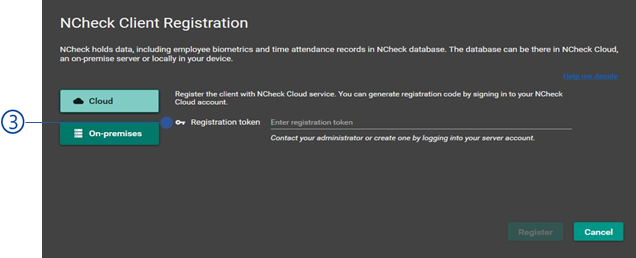
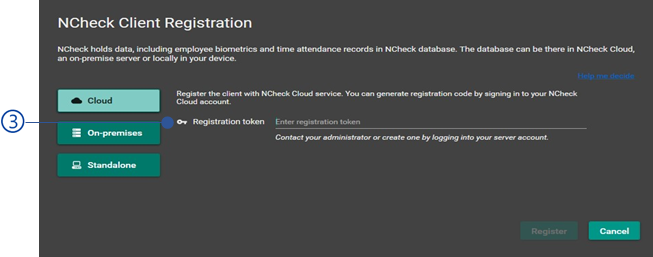
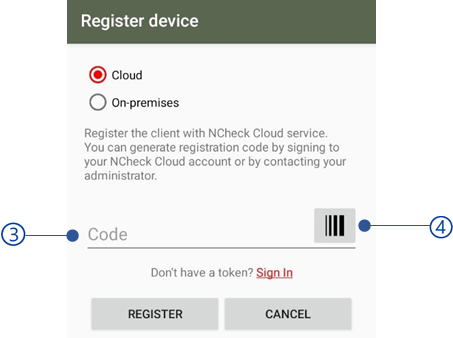
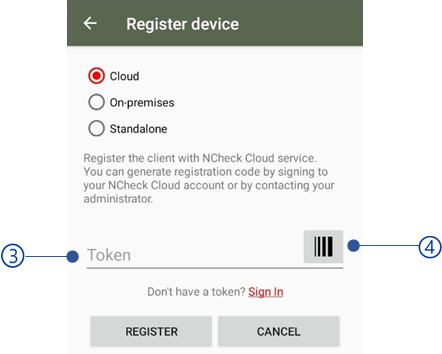
This will open Register device dialog as mentioned in Register device section to generate registration token to register NCheck client device with the system.
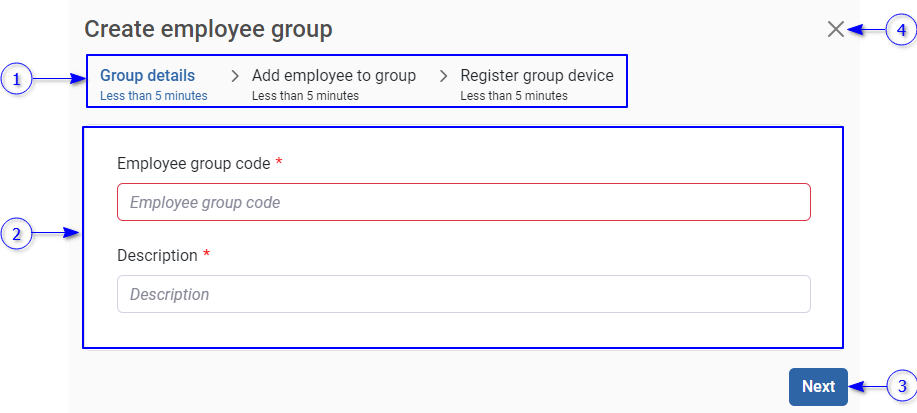
Create group
This will guide open Add employee group dialog to create new employee group as mentioned Create group in section.
Create shifts
This will open Add shift dialog to create new shift as mentioned in Add/edit shift section.
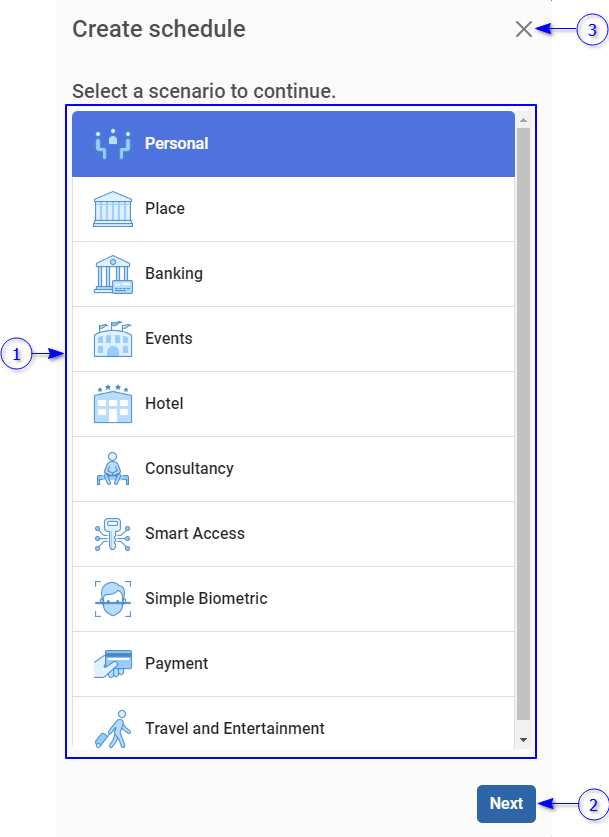
This will open create schedule dialog to create visitor schedule as mentioned in Add/edit visitor schedules section.
Finish onboarding
Once the onboarding checklist is done, select the finish onboarding section to close the menu.
Once the initial setting up has done, users will be able to access the NCheck control panel as assigned roles mentioned in Web Control Panel Roles section.
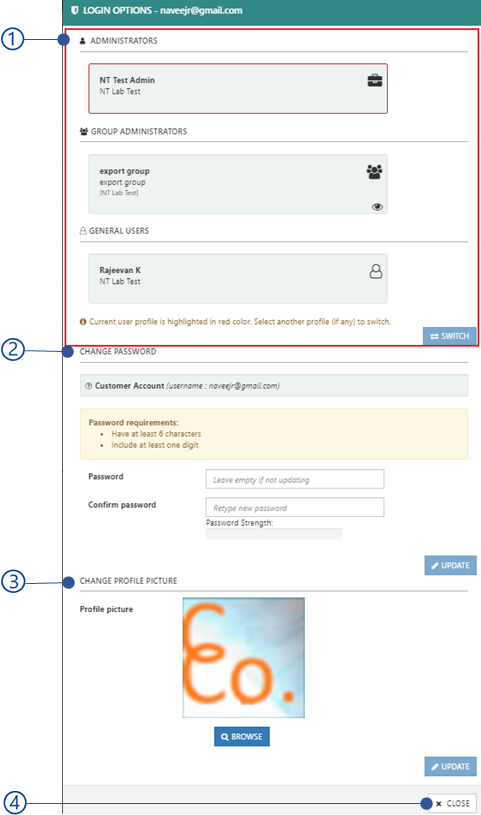
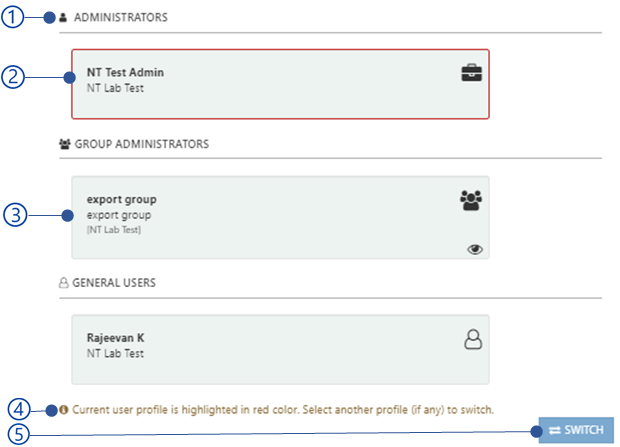
The current role of the control panel logged in user is shown in the login options. It can be
Account administrator
Account administrator is the owner of the account. He has full authority and can perform all administrative operations.
Administrator
System users can also be assigned administrative privileges. These administrators can do all the admin operations except subscription management and account detail editing.
Admin Auditor
Admin auditor can access all control panel data like administrator. But cannot change and save them.
Visitor administrator
Visitor administrator can manage all visitor data such as visitors, schedules, appointments, etc.
Visitor admin auditor
Visitor admin auditor can access all visitor data as visitor administrator. But it does not allow to change and save.
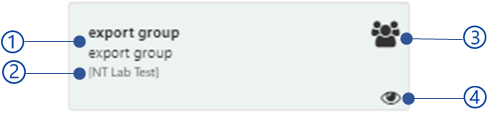
Group Administrator
Group administrator is an Administrator who can manage an assigned group of users.
Group admin auditor
Group admin is also can access all the data which can accessed by a group administrator. But cannot change and save
Standard user
NCheck Control Panel provides self service functions for standard users.
A virtual demonstration which guides how to setup NCheck for attendance recording. This will be popup once you login to the system as mentioned in Sign in to web Control Panel section.
Resource center
Onboarding tutorial
Open onboarding checklist menu.
User guide
Open NCheck user guide.
Contact us
Report a bug
This will open the email client application installed in the device to report bugs via email. NCheck support team will respond immediately.
System info
Show information such as NCheck server version, terms and conditions, privacy policy.
For normal users, it will show his/her details.
If you are an account administrator, you will get the account details. For other administrators cannot access account details.
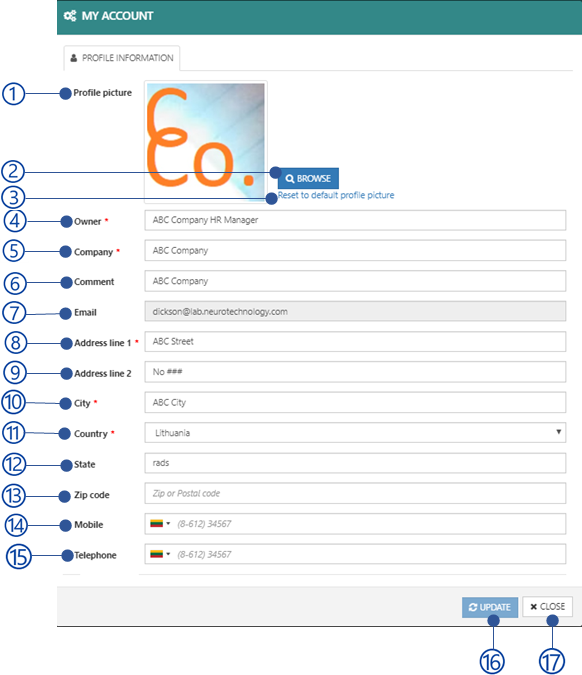
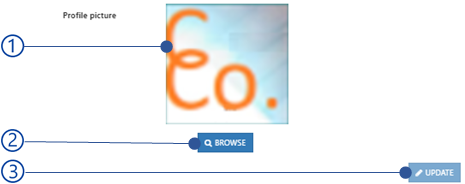
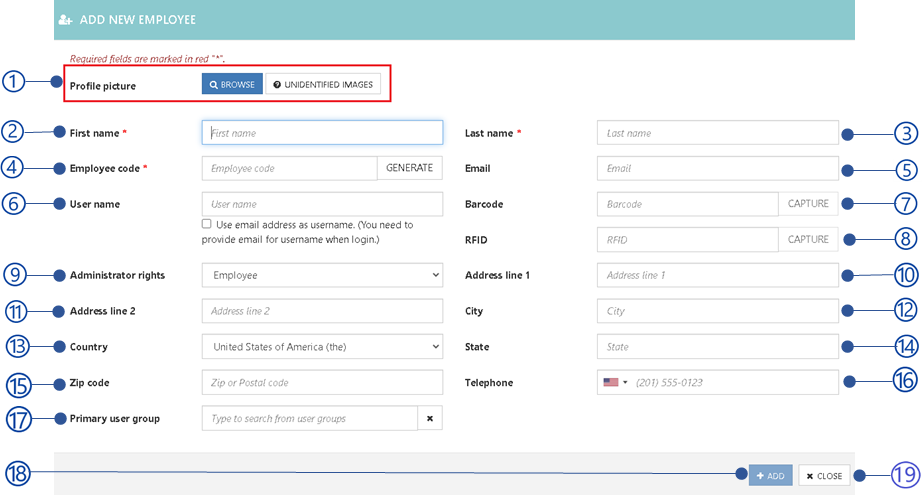
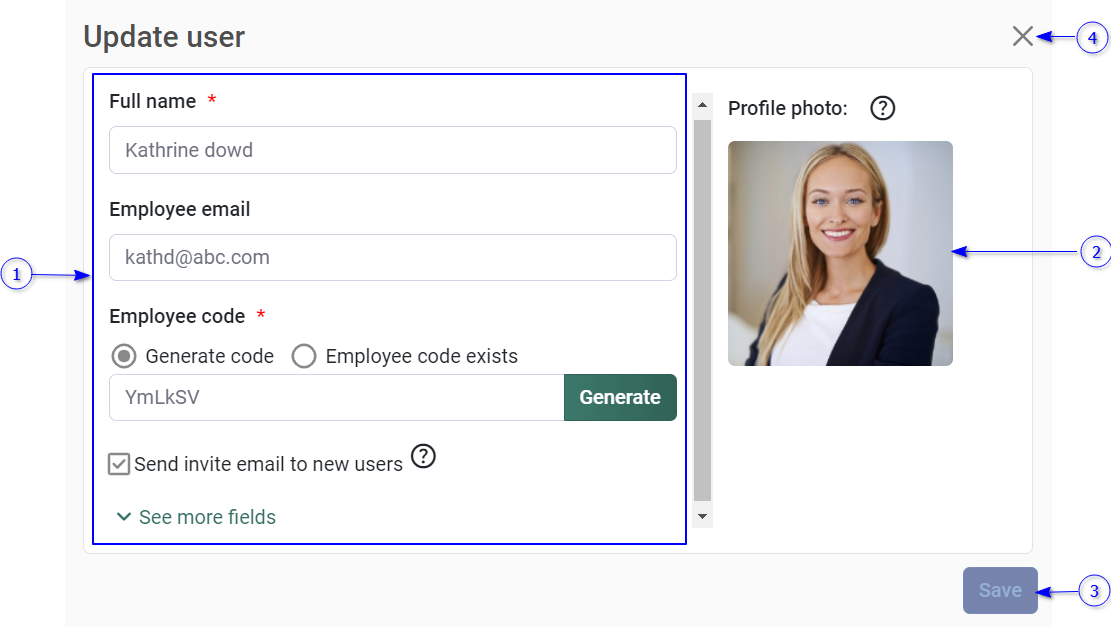
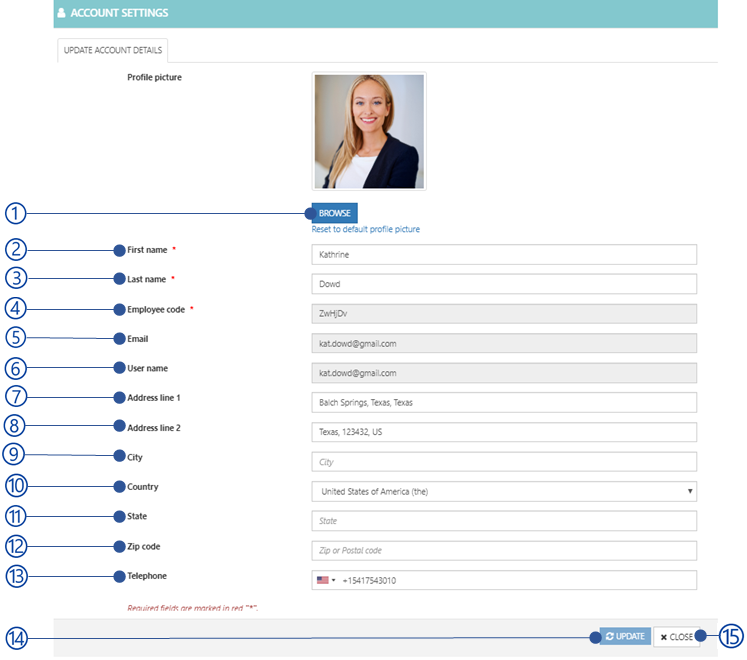
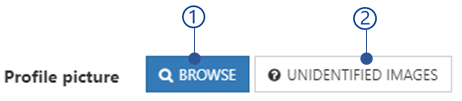
Profile picture
Browse button
Select the profile picture from the local file system.
Remove photo
Rest the profile picture to the NCheck default profile picture as shown in Figure 510
To select the profile image from locale file system.
Remove button
Remove profile image.
Full name
New password
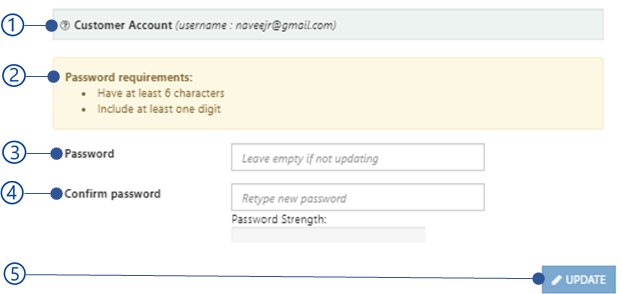
Password must contain at least 8 characters including once upper case, lower case, number and special character from (“!”, “@”, “#”, “$”, “%”, “^”, “&”, “*”).
Confirm password
Update button
The update button will be disabled if data Validation errors exists. All error messages are shown in the table below.
Close button
Table 18 Error messages of changes password in login options view
Error code
Description
3003
Password does not match.
3004
Password must contain at least 6 characters with one number.
NCheck allows to manage employee and visitor functions in the system. In the control panel, for menus such as Dashboard , User Management , Manage schedule and shifts , etc. are showing bio attendance and visitor mode selection view to show the specific view in the content area. Bio attendance and visitor mode selection controller can appear in following ways.
Figure 69 Bio attendance and visitor management switch view
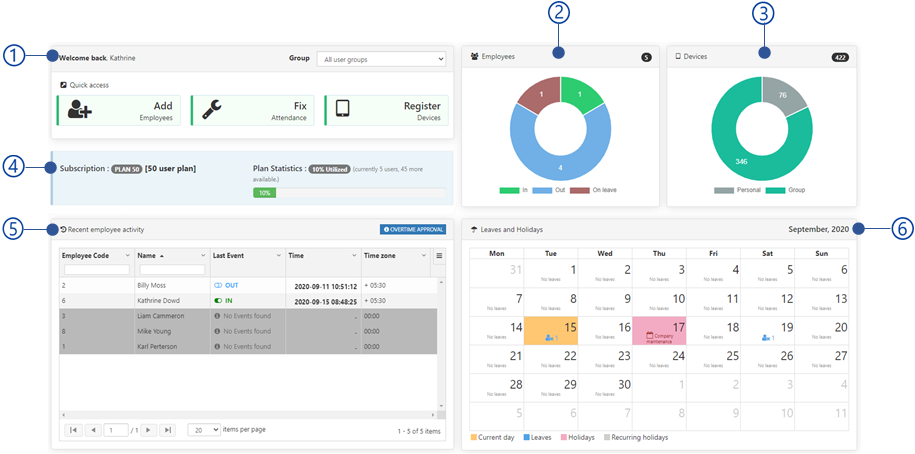
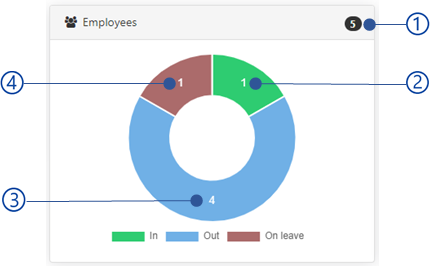
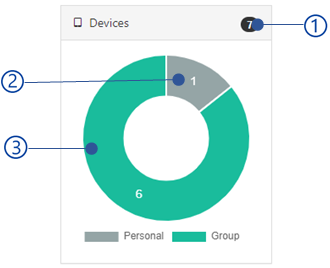
The dashboard provides a graphical summary of the employee and visitor activities of the NCheck customer account. Customer account administrator and users marked as administrators can access the Dashboard. Summary includes.
Dashboard view is shown below.
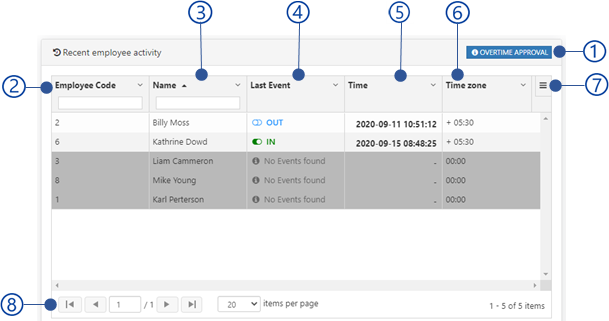
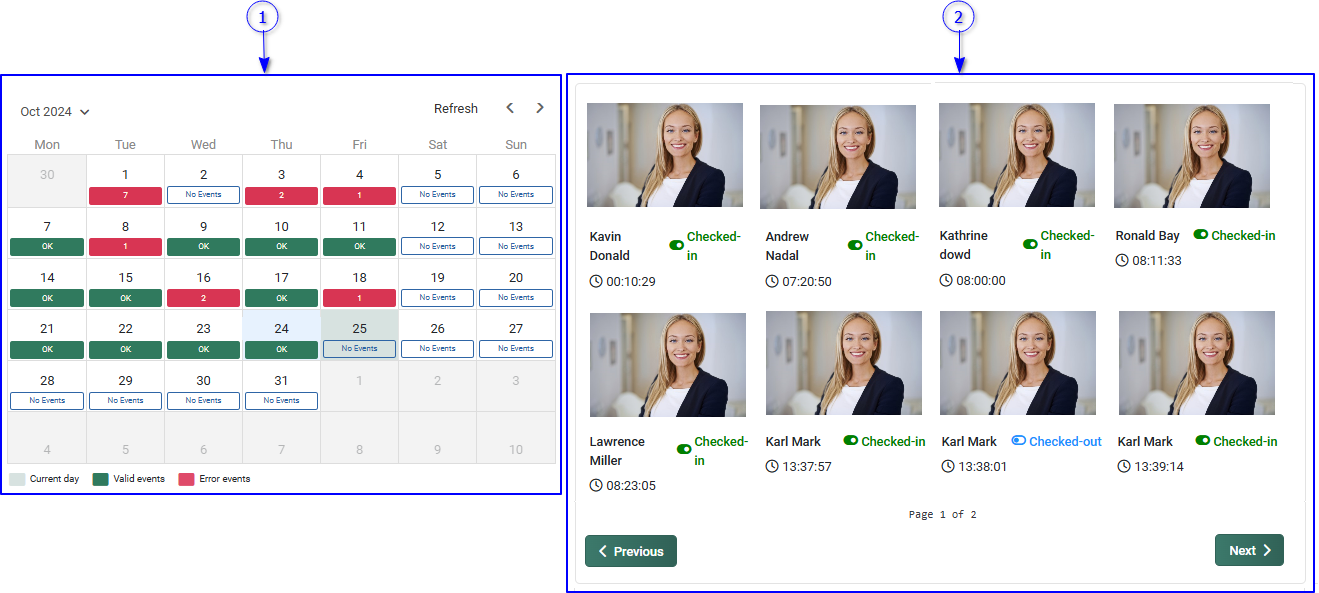
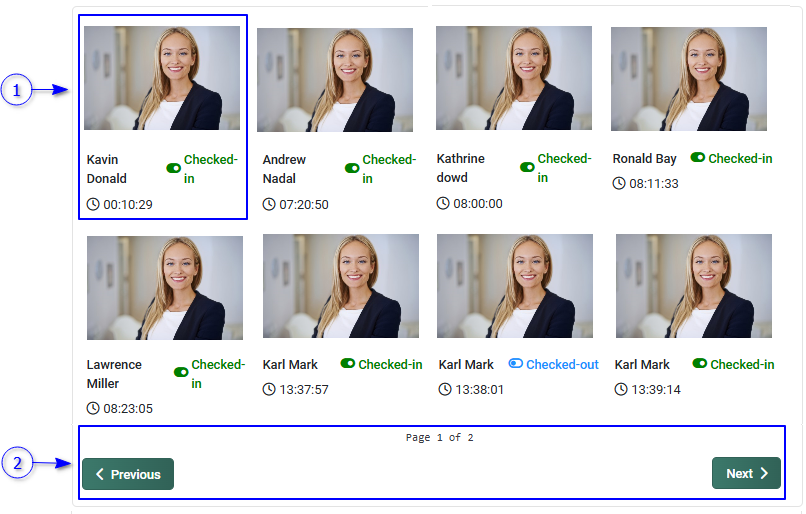
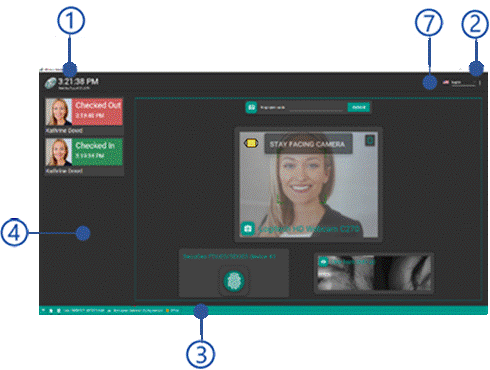
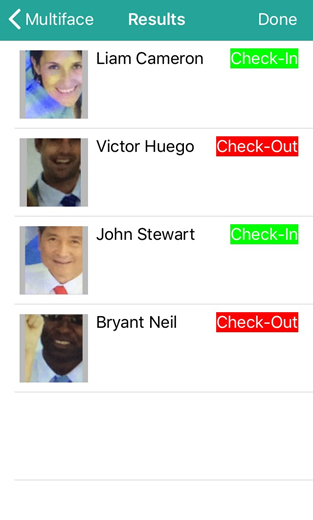
The recent employee activity view shows the last event of all employees in the current day.
Figure 76 Employee activity view of the Dashboard
Event type tabs
Select event type from check-in, check-out and access, to filter out the last user events.
Event list
Event list is showing check-in, check-out and access events according to the selected event type from the event type tab. Refer Recent employee event view section for more details about event information.
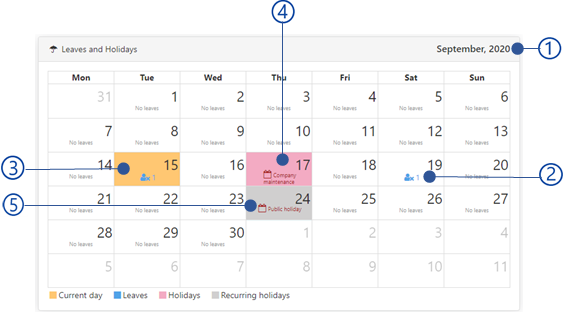
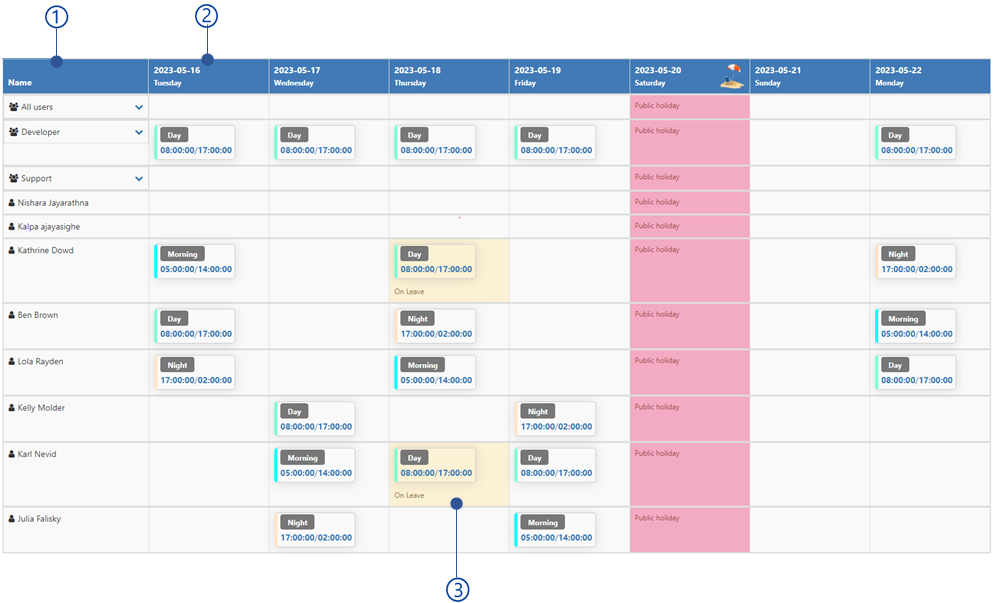
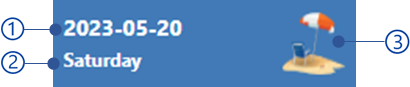
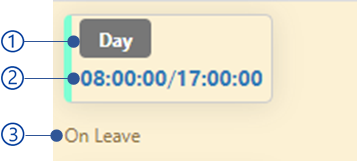
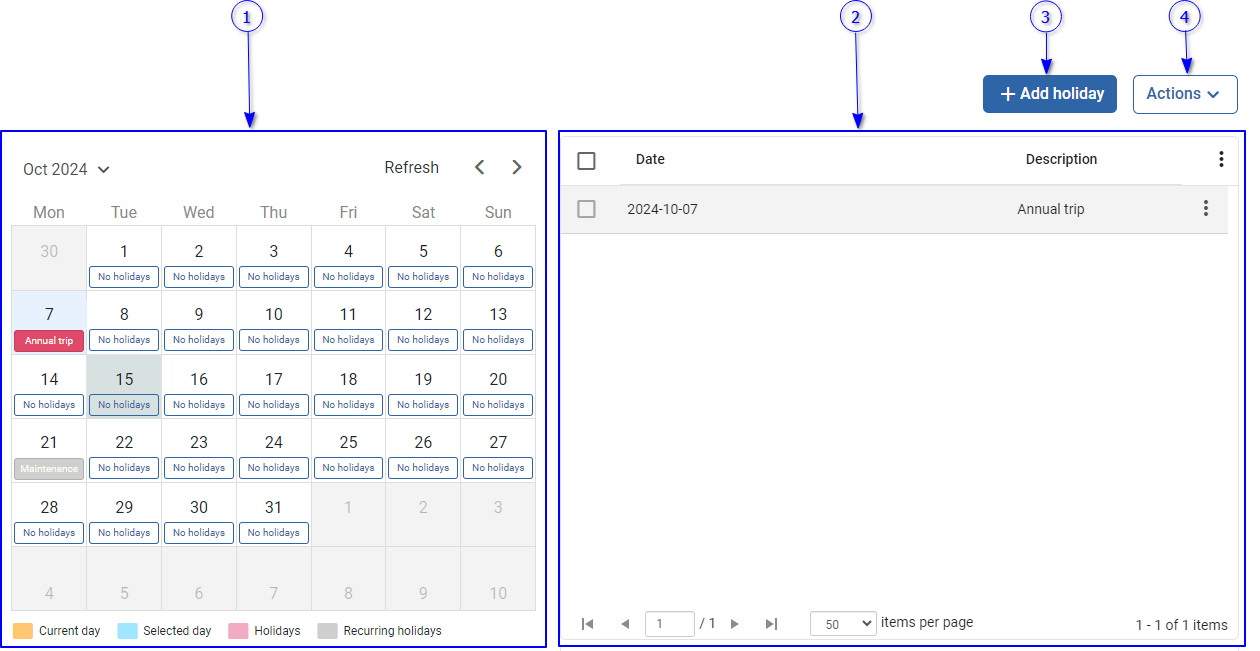
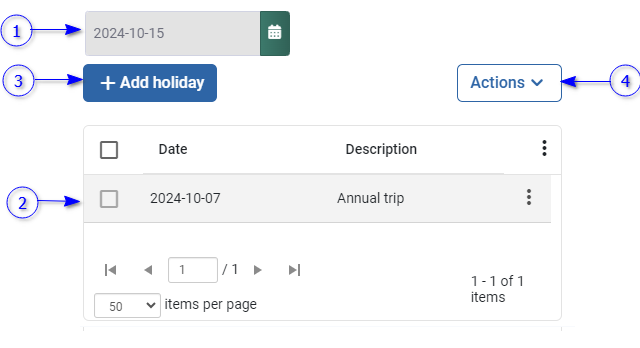
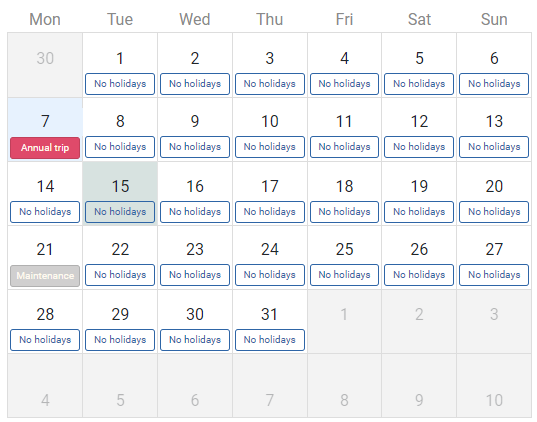
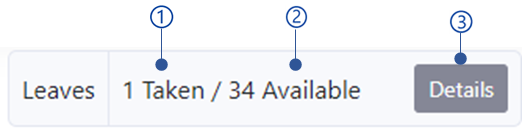
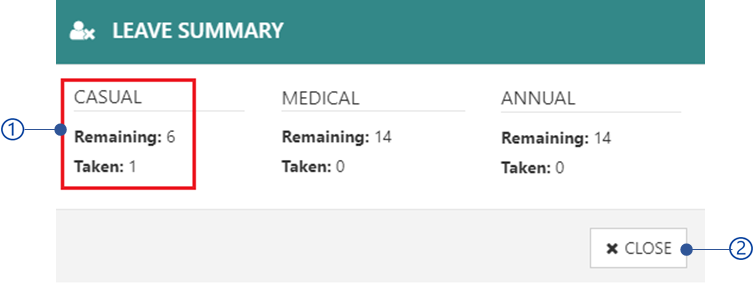
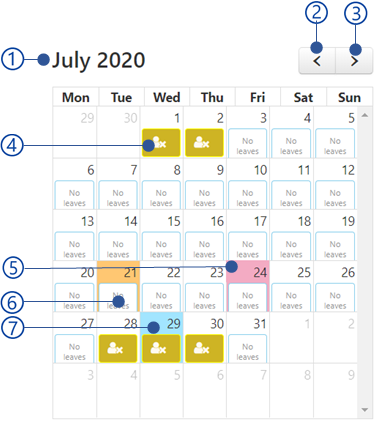
Calendar is showing dates with available leaves and holidays. Leaves, holidays and recurring holidays are shown in separate color codes. For the selected date, all available leaves and holidays are shown in the leave and holidays list view. The leave tab shows a list of Leave view and holiday tab is showing list of Holiday view available for the selected date in the calendar.
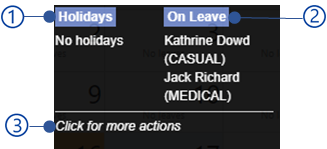
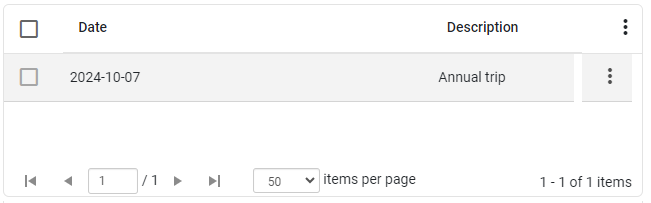
Leave and holidays list view
This view is showing available leaves and holidays for the selected date from the calendar.
Manage leaves button
You will be redirect to the Leave and holiday section.
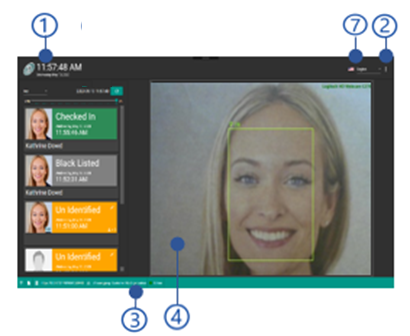
The recent visitor activity view shows last event of the visitors in the current day.
Figure 84 Recent visitor activity view of the dashboard
Event type tabs
Select event type from check-in, check-out and access, to filter out the last visitor events
Event list
Event list is showing all recent events of visitors according to the selected event type from the event type tab. Refer Recent visitor event view section for more information about visitor events.
User management allows employees to manage and visitors’ data such as personal information’s, biometrics, appointments etc. The user management view can be switched to either employee or visitor as mentioned in Bio attendance and visitor mode selection section.
The user management view is shown below.
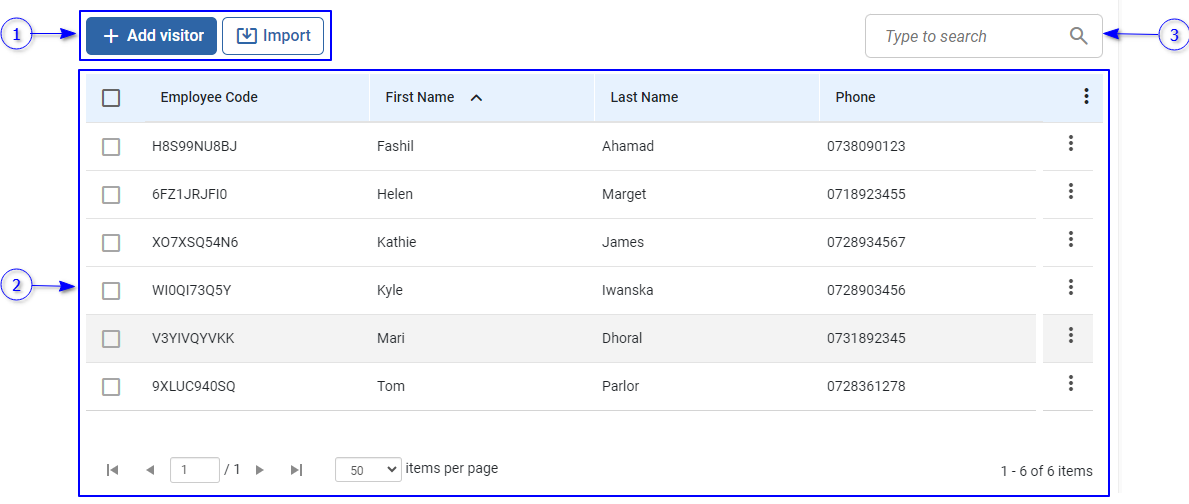
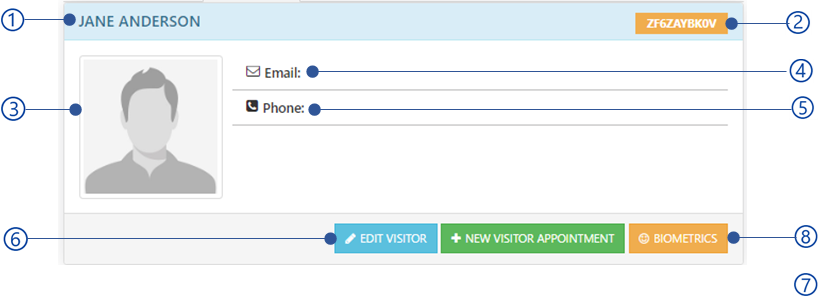
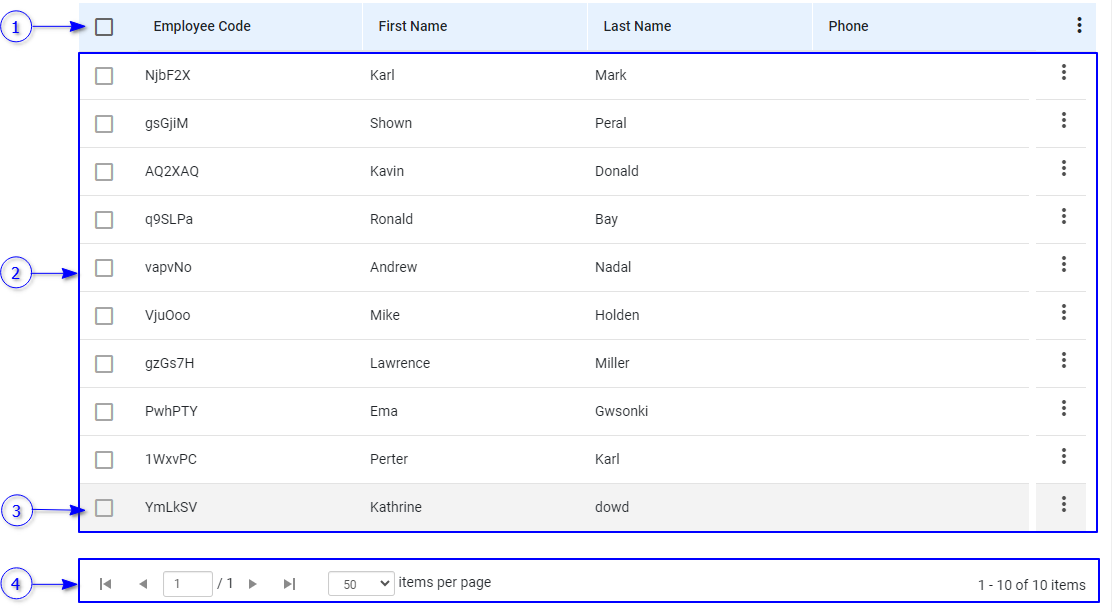
A Data table represent list of employees/visitors. Selected employee/visitor information can be seen in Employee/visitor view . The employee/visitor Quick access menu is showing following options
Send invite email to new employees (Employee only)
The employee will receive an email containing a one-time registration token and links to download NCheck client application once employee created successfully. To send email notifications, Email notification settings should be configured first.
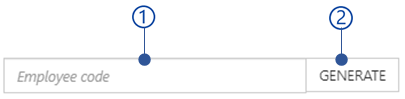
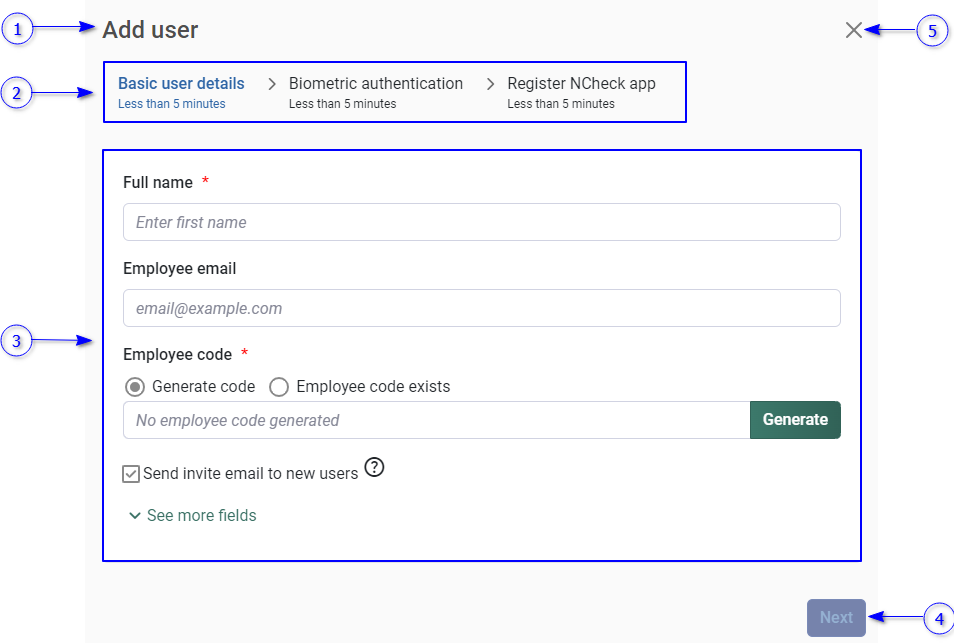
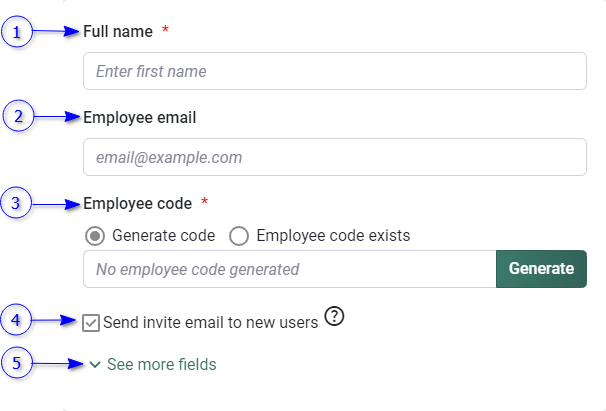
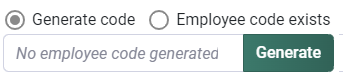
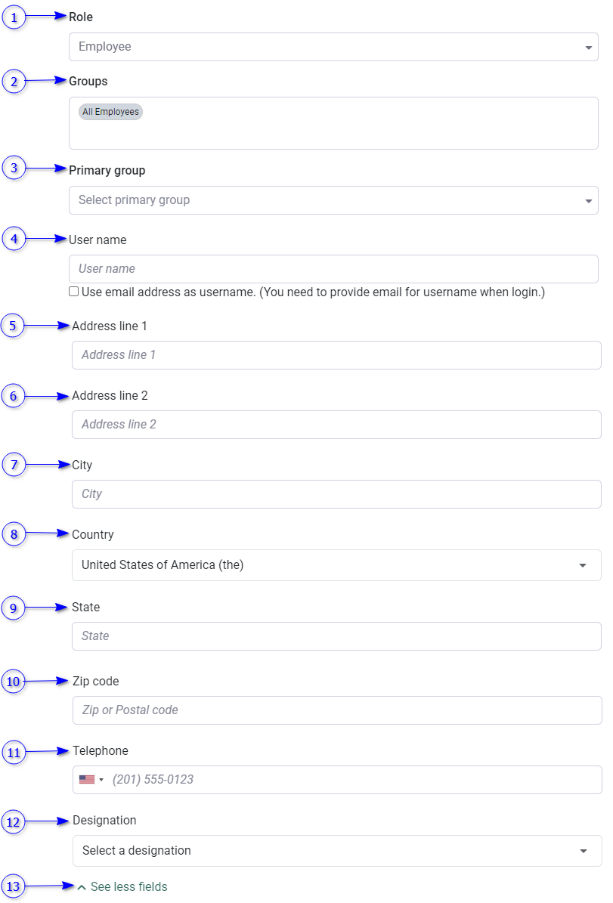
The employee/visitor code is a unique identification for employee/visitor. Employee/visitor code can be given as following when adding employee/visitor
Assign employee role as employee, admin, or admin auditor. Refer Web Control Panel Roles section for more details.
Groups (Employee only)
Employee groups to assign employees. By default, employees are assigned to the all-user group. Refer Manage User Groups section for more details about employee groups.
Primary group (Employee only)
Username (Employee only)
The username to allow to login users to the NCheck control panel. Select User email address as username option to use the email address as the username.
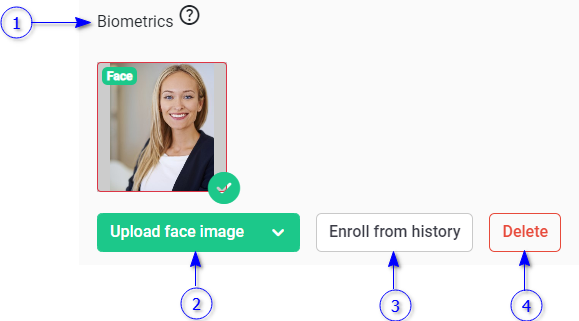
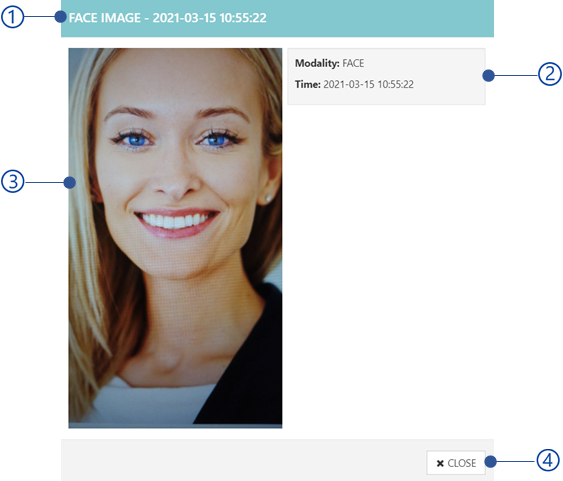
List of enrolled biometrics for the employee/visitor are showing here. To see the biometric details, click on each biometric image.
Upload biometrics button
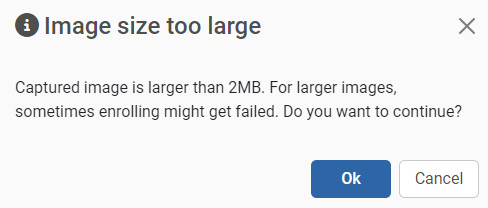
Upload face, finger and iris images from the local file system. A warning message will appear if the selected image is larger than 2 MB as shown in Figure 93 .
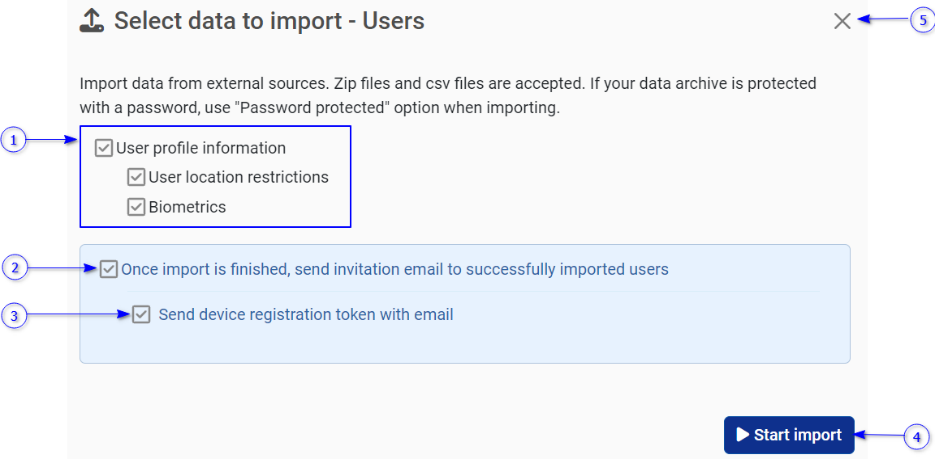
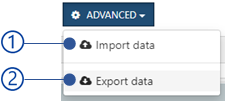
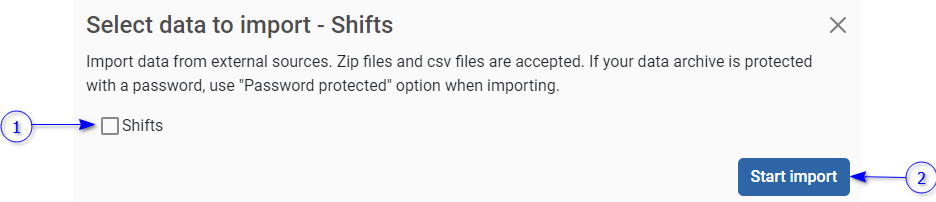
The import option is to add many employees/visitors to the system as a zip file. Refer Import and Export information section for more details for importing file structure.
To import employees/visitors,
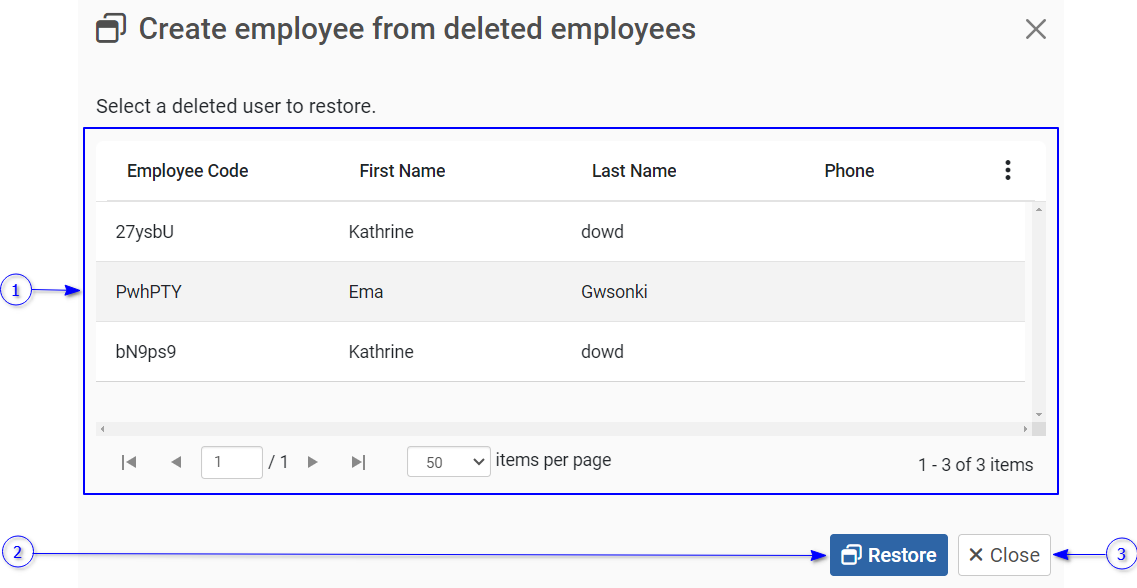
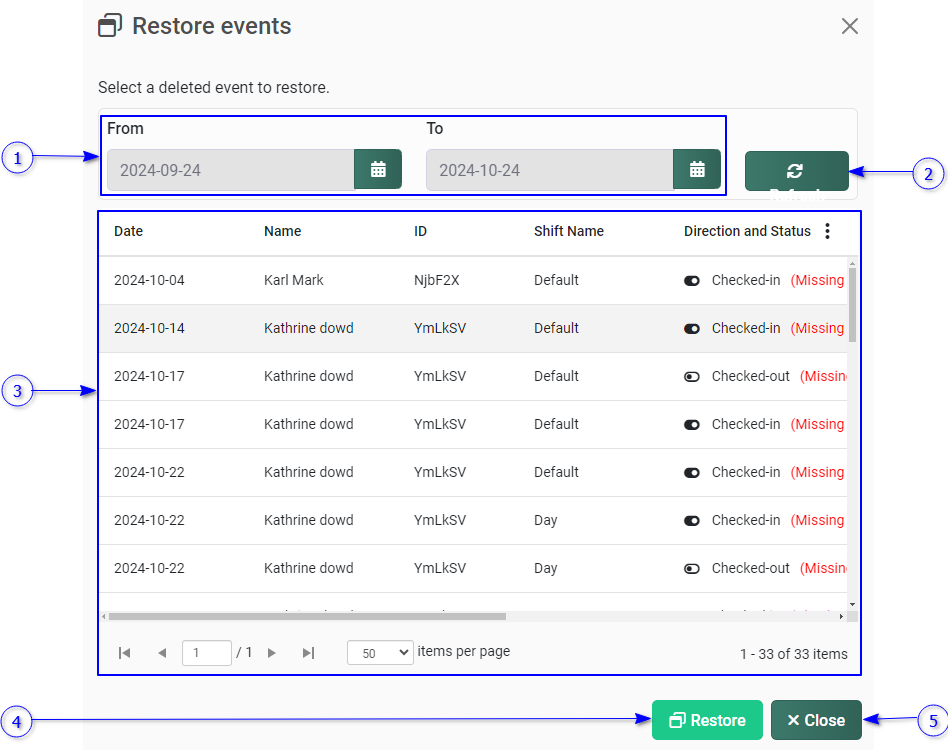
Deleted employees can be restored from this option. This option will restore the employee details only. Previous biometric data, event logs and other data will not be restored.
Create employee from deleted employees’ dialog is shown below.
Figure 96 ..Create employee from deleted employees dialog
Deleted employees
A Data table represent a list of deleted employee list. Select employees from the list to be restored.
Once employee/visitor event record events which are not matched with any employee/visitor in the system, which are known as unidentified events. Unidentified event images can be selected as employee/visitor profile images as follows.
Figure 100 Choose from unidentified images dialog
Unidentified events dates filters
Select from and to date to retrieve all unidentified images in between.
Refresh button
Refresh unidentified event images.
Unidentified event images list
Previous button
Browse previous page of unidentified event images
Next button
Browse previous page of unidentified event images.
After assigning a username as mentioned in Add employee/visitor section, the password can be changed. Password must consist of one digit and 6 characters.
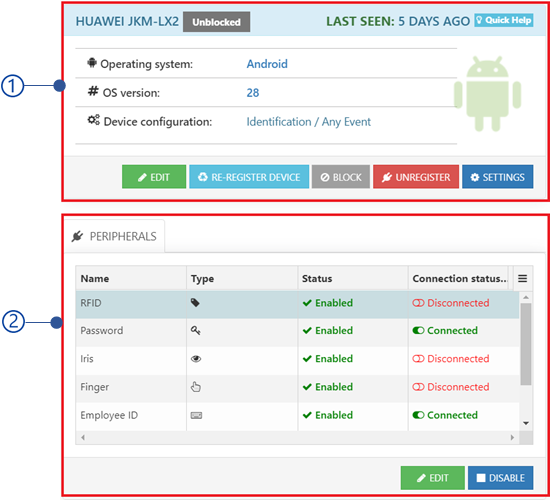
Unregister client application registered to the employee. Once unregistered, the client cannot be used to record employee attendance until it registered again.
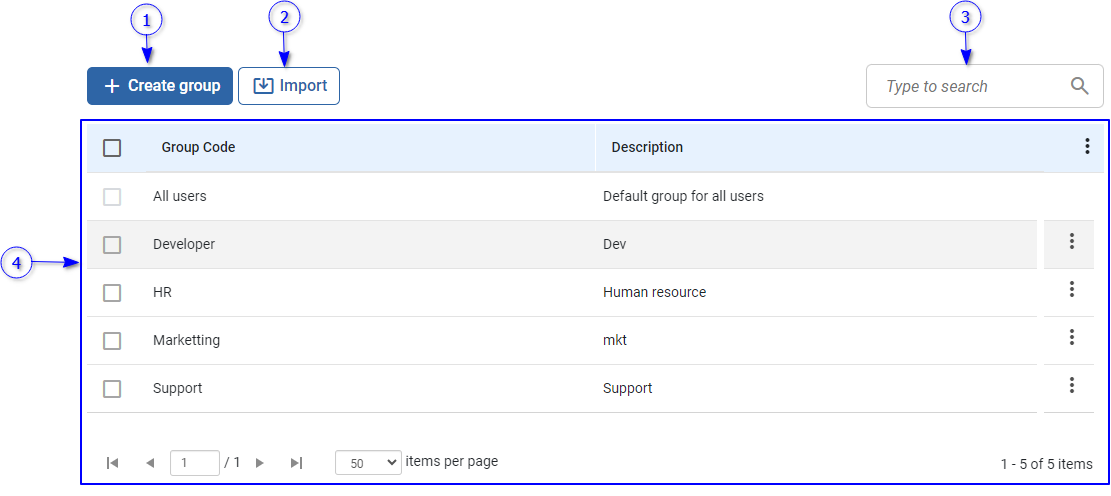
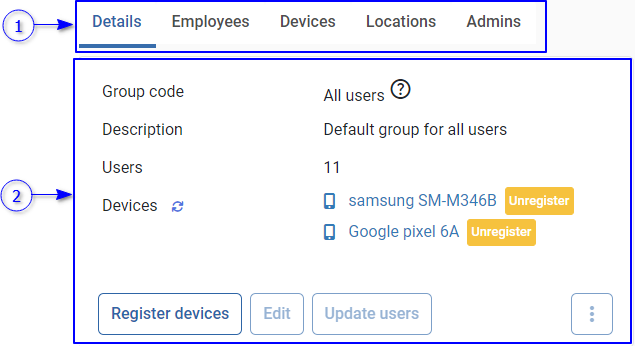
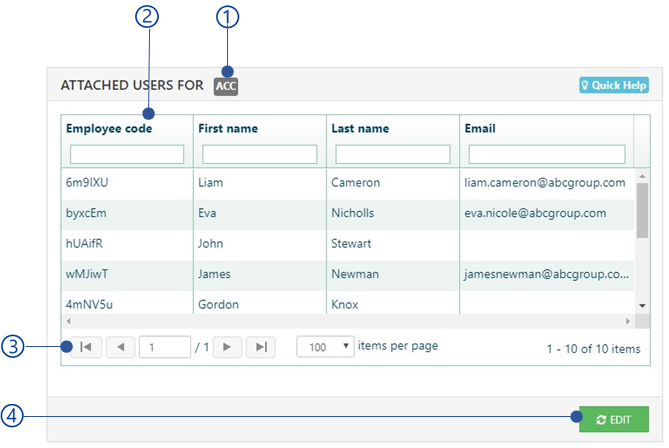
Administrator and employee group administrators allow managing users as user groups. All user groups are the default employee group including all employees and it is accessible for administrator only. The employee group management view is shown below.
A Data table represent list of employee groups. Selected employee group information can be seen in employee group view. The employee group Quick access menu is showing following options.
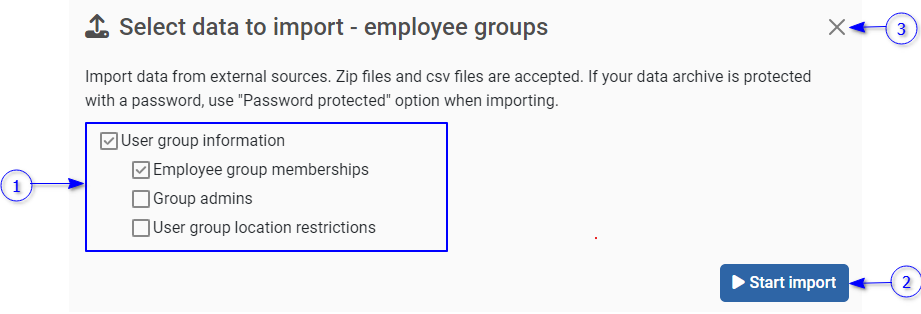
The import option can be used to add a number of employee groups or restore previously exported employee groups. The data imported as zip file. Refer Import and Export information section for more details for importing file structure.
To import employee group,
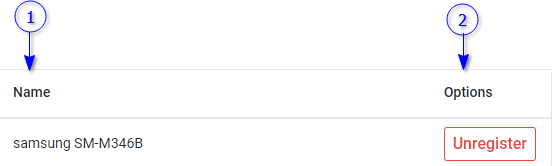
All registered devices for the employee group are showing here. Each device is shown with device name and unregister button next to it. The device will be unregistered if click on this button and the device cannot be used with the server.
Upload profile image for the employee group from local file system. Hovering on the thumbnail image will be shown upload button and remove button to update profile image.
The import group employees option is using to add many employees to the employee group as a zip file. Refer Import and Export information section for more details for importing file structure.
To import employees/visitors,
Export group employees information as a zip file. Refer Import and Export information section for more details for importing file structure.
Export group employees dialog is shown below.
Please note that once restored users, user details will be available. Past employee details such as event logs, enrolled biometrics, etc. will not be restored.
Group admins have permission to manage the employee group. There are two types of group admins.
Group admin
Group admin has full permission to do changes to the group such as add/remove employees, import /export data etc.
Group admin auditor
Group admin allows to review the employee group such as export data, generate registration token etc. Group admin is not allowed to make any changes to the group.
Group admin may have group manger permission. Group admins who have group manager permission can approve restricted leaves of the employees in the group (Refer section for more information). There can be only one group manager for the employee group. Selecting a different manager will be caused to remove previously selected group manager.
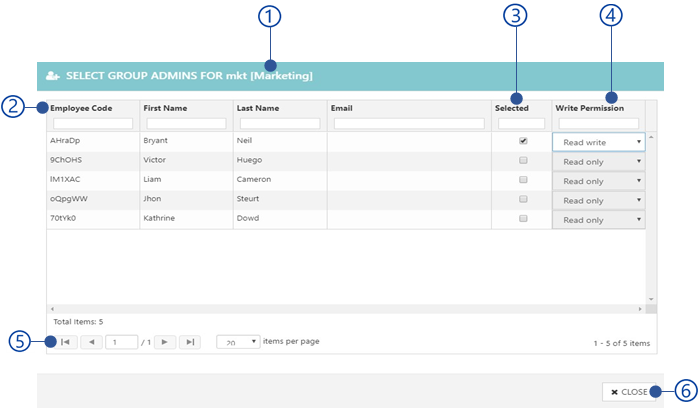
Select group admin dialog is shown below.
Note
Group admins are not available for the All users group
A Data table represent the list of employees in the groups. Select checkbox before the employee code to select employees to be group admins. A selected group admin can assign group manager by select manager checkbox. The permission can be assigned as follows.
Read write
Assign full permission to group admins to manager employee group.
Read only
Assign read only permission for group admin auditors.
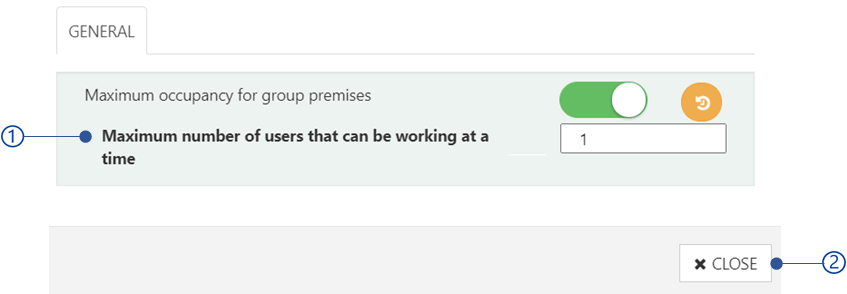
Administrator/user group administrator allows the limit the number of employees/users of the user group on the premises. To limit users, enable this setting and add the number of allowed users. The users who are entitled to the user group as the primary user group will be counted when check-in to the premises. If the check-in count is greater than the maximum occupancy for group premises, the check-ins will be restricted.
Unregister client application registered to the employee. Once unregistered, the client cannot be used to record employee attendance until it is registered again.
This option allows to restrict group employees to specific locations. Refer Location restrictions section for more information about adding location restriction for the selected employe group.
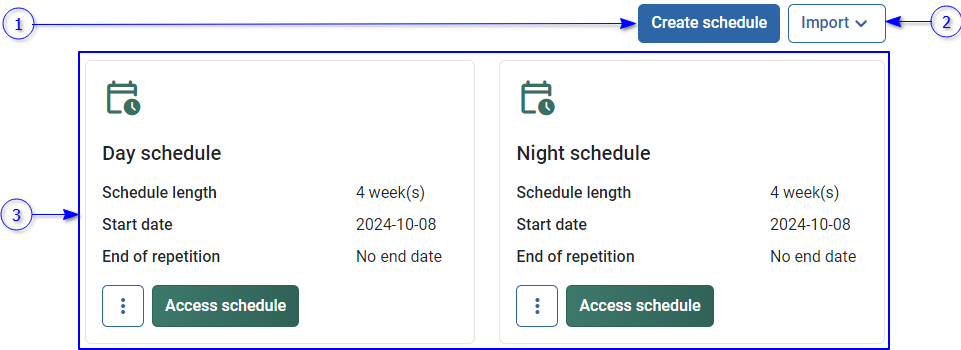
Schedule and shift can be used to manage attendance and visitor activities in the organization. When it comes to attendance operations, schedule and shifts can be used to manage employee work hours during the working period. By default, NCheck has 24 hours shift and 7 days schedule.
In visitor management, schedules can be used to manage visitor attendance based on the use cases.
The schedule and shift view can be switched as either bio attendance or visitor management as mentioned in Bio attendance and visitor mode selection section
Schedule and shift for bio attendance view is shown below.
Figure 129 Schedule and shift view for bio attendance
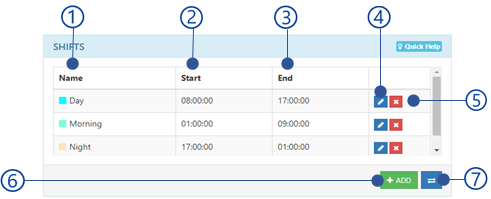
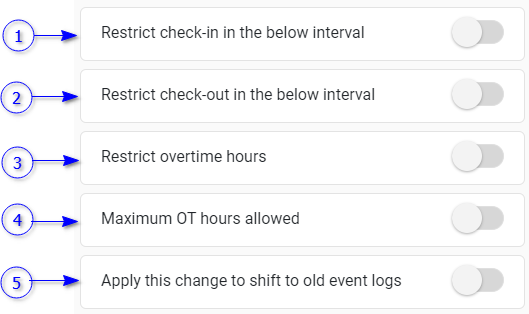
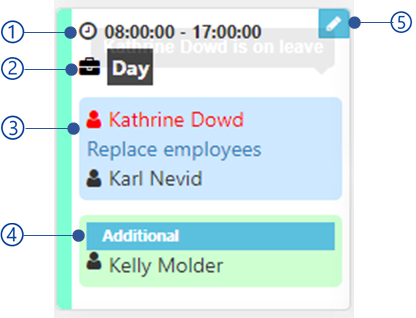
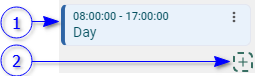
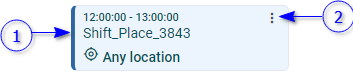
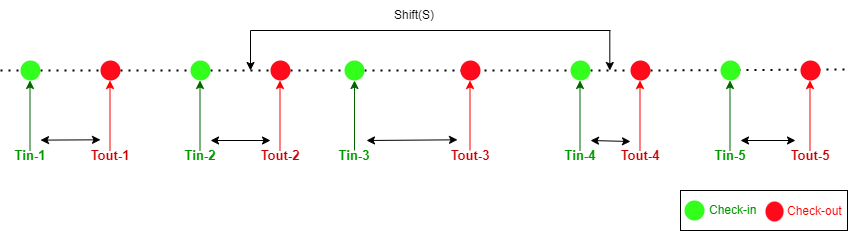
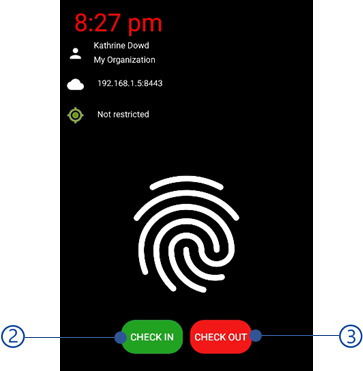
Shift defines the work time and by means of the start of the shift and end of the shift. Users can check in after the start of the shift and check out at the end of the shift.
Allowed time for check in and check out can be also configured. Allowed check in time can be configured by means of check in start and check in end. Similarly Allowed check out time also can be configured by means of check out start and check out end.
Figure 130 Check-in and check-out events recording in the shift
Default shift is a system defined shift which will be used for attendance tracking if there is no scheduled shift. Refer Shift management section for more details about shift management.
Number of hours restrict check-ins before shift start. The default value is Minimum (Shift end -24 hours, Shift start). Check-in start hours could be between shift start and (shift start -24 hours).
Check-in end
Number of hours restrict check-in after shift start. The default value is shift end. Check-in end could be between shift end and 7 days.
Number of hours restrict check-out before the shift end. The default value equals to shift start. Check-out start restriction could be a value between (shift start - 24 hours) and 7 days.
Check-out end
Number of hours restrict check-out after the shift end. The default value is minimum (shift start + 24 hours, shift end). Check-out end restriction could be a value between 0 hours and 7 days.
A schedule is a list of shifts assigned to each user or user group over a specific period. Refer Schedule management section for more information about managing employee and visitor schedules.
How many weeks the roster should span - Default is 1 week. Maximum 4 weeks.
Start date of the roster
You may select any day, but the starting day will be Monday of the selected day’s week by default.
End of repetition
If no end date specified, the roster will iterate infinitely. If you specified the end date, the roster would end on the specified date and thereafter you will not be able to add roster items to it.
Payment gateway configuration allows to configure payment gateway(s) for the schedule. If “Configure payment gateway” setting is disabled, the payment is considered as manual payment so that visitor can pay to the person in charge (Ex: Cashier). Any payment gateway can be configured upon the customer request.
The payment gateway configuration view is shown below.
Enable/disable payment gateways for the schedule. If the setting is disabled, the payment will be a manual payment so the visitor who create appointment should pay to the person in charge (Ex: cashier).
Available payment gateways
Select the payment gateway to configure. The selected payment gateway is shown in blue color.
Payment gateway configuration
Relevant parameters for the selected payment gateway should be provided here. As an example, for PayPal payment gateway, the configurations are client ID and client secret.
Save change button
This button will be appeared if the valid configurations are provided. Once select the save changes, the payment gateway will be shown with the check icon as shown in Figure 152 .
Remove selected payment gateway configuration
Figure 152 Checkbox appeared for the payment gateway once configured
Normally the booking time for an appointment is in a single day. But some tasks like a class, seminar etc. span for several days period they can be defined with no of days, weeks, or months.
No closing date. Can be booked booking open date to schedule ends if 1 day period schedule. Otherwise booking open day to period closing date
After
Minus day(s) to specify number of days booking close before schedule start if 1 day schedule. Otherwise, minus and plus day(s) to specify number of days booking close before period start and after period start.
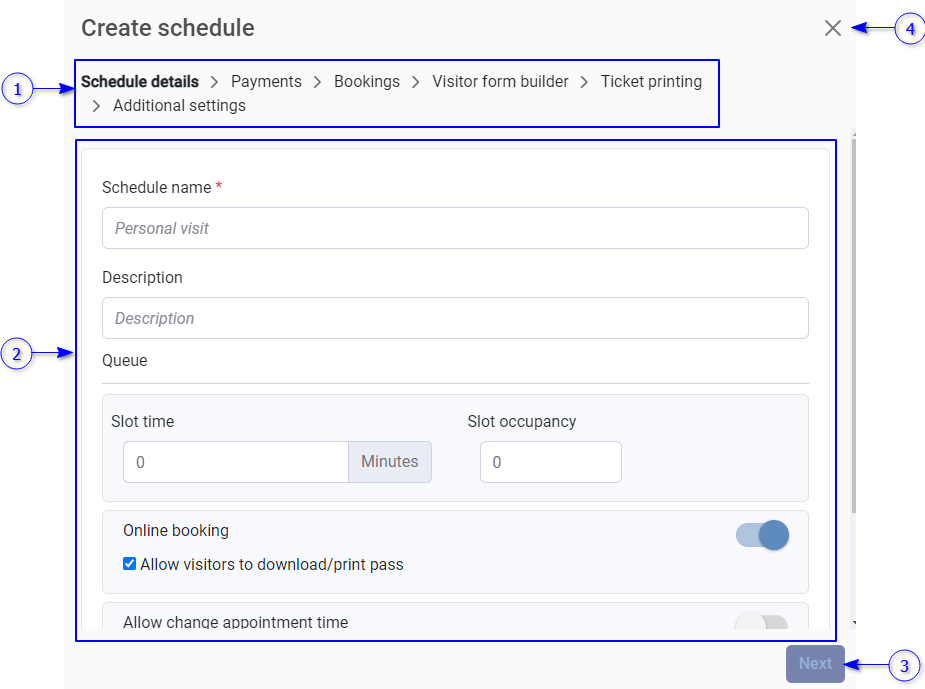
Visitor detail forms are used to collect visitor details when booking appointments for the schedule. This section allows to create a visitor form for the schedule by drag and drop form fields from existing fields. By default, schedule have default visitor form fields inherit from the scenario.
Field configuration allows the behavior of the form fields to change. For example, field is required or not, minimum, and maximum validation of a number input.
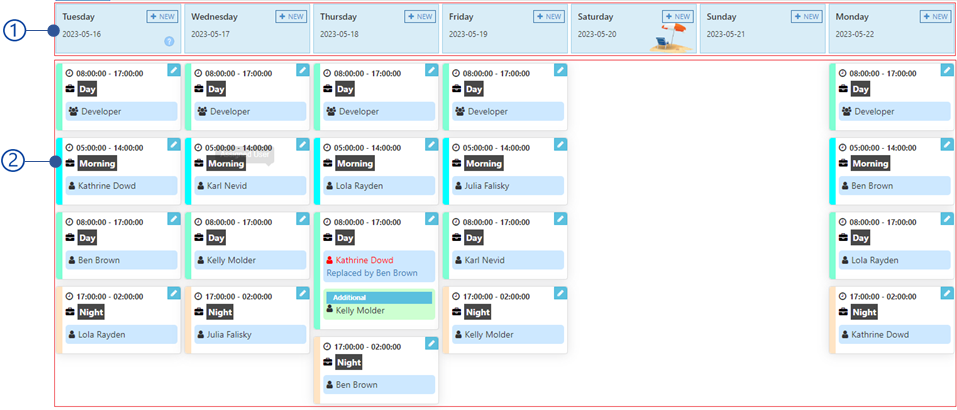
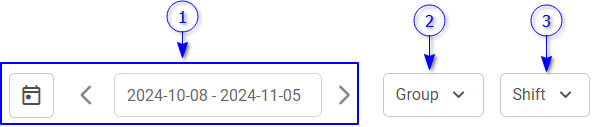
The access schedule option allows to manage schedule items of each day for visitors and employees. Once shifts and schedules are created, the schedule items should be added for the working days to record attendance for the shift and schedule.
Schedule view is shown below.
Figure 164 Access schedule view for bio attendance
Schedule items for all employee groups and employees added to the schedule for selected week from the repetition selector. Refer Schedule items view section for more information.
Add more users button
Update employee groups and employees in the schedule. Refer Add group or employees view section for more information.
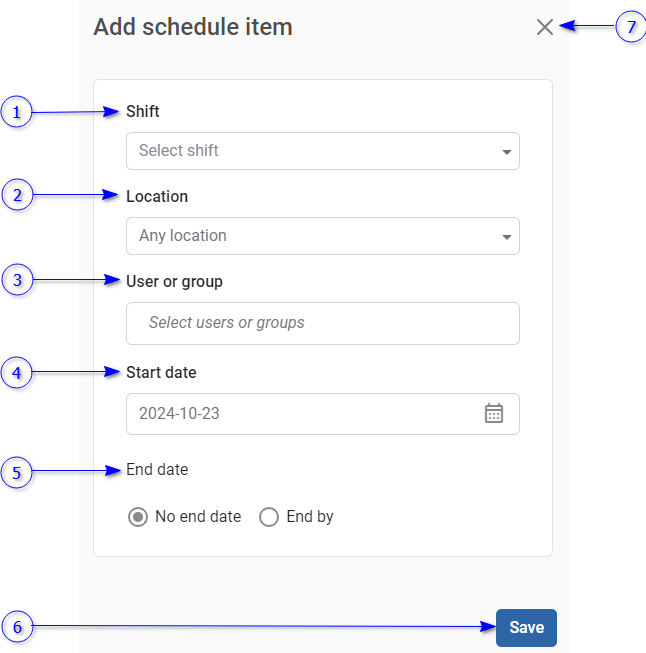
Schedule item is a combination of a employee group/employee with a shift for selected date, which represents how employees should be worked during the day.
Add schedule item dialog is shown below.
Refer Manage Locations section for more details about locations.
Employee/employee group
Start date
End date
If no end date is selected, schedule items will be created infinitely.
Save button
Add new schedule item or save changes for the existing schedule item.
Close button
Note
Schedule items for bio attendance are added to the selected user or user group from the access schedule view. Therefore, user or user group of the adding schedule item is pre-selected and cannot be edited in bio attendance.
This column is unavailable in access schedules for visitor management.
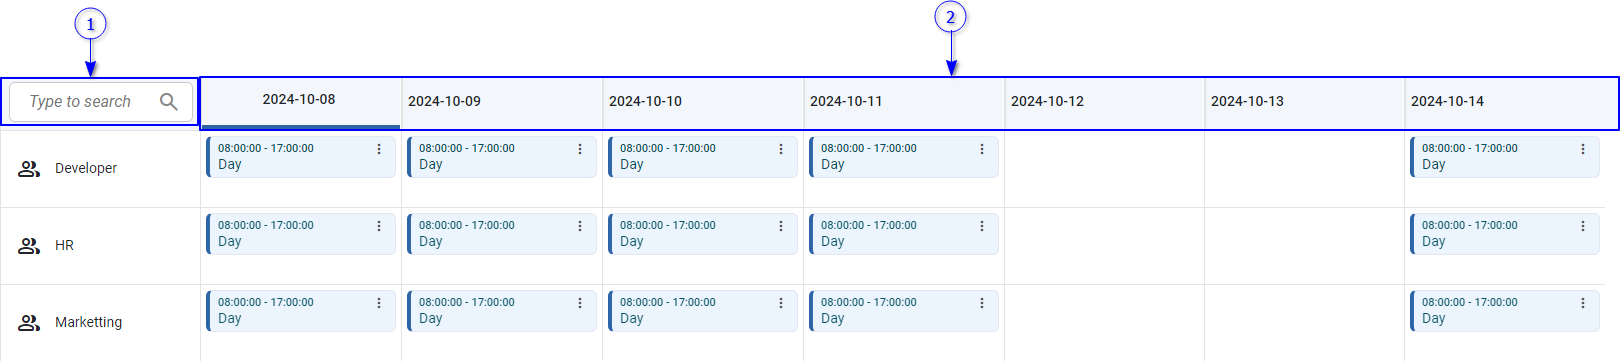
Days for the selected week
Each table cell for a day and the employee group/employee represent schedules item(s) for the employee group/employee for the day. You can add schedule item for each cell using the add button that appears in the bottom right corner when hovering on the table cell. A table cell view is shown below.
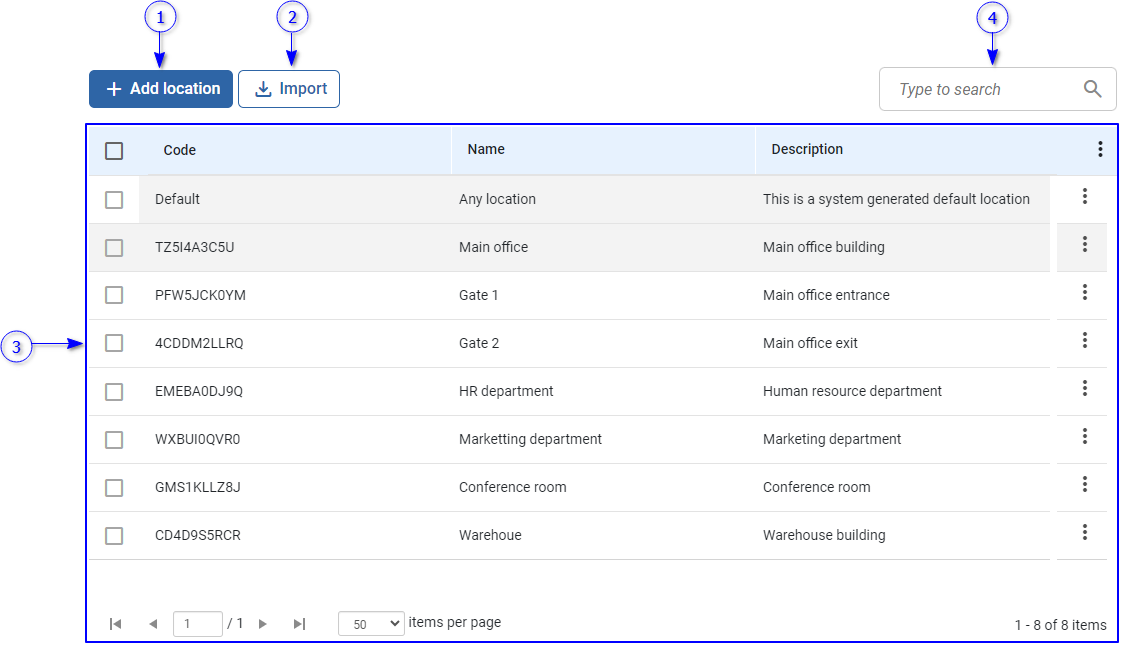
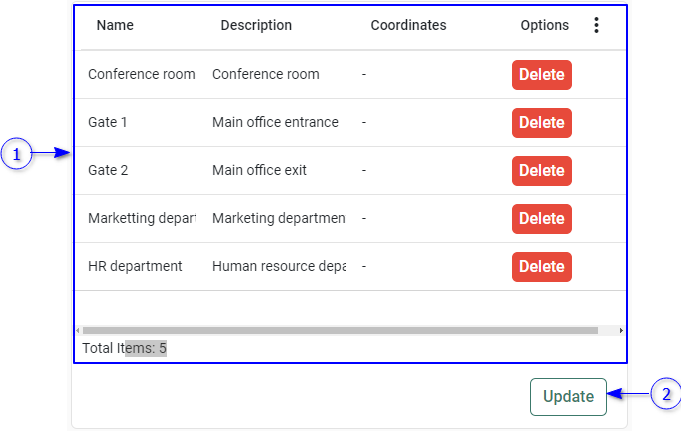
A Data table represent list of locations. Selected location information can be seen in location view. The employee group Quick access menu is showing following options.
Edit
Edit selected location. Refer Add/edit location section for more information
Delete
The Actions view of the selected locations shows the following options.
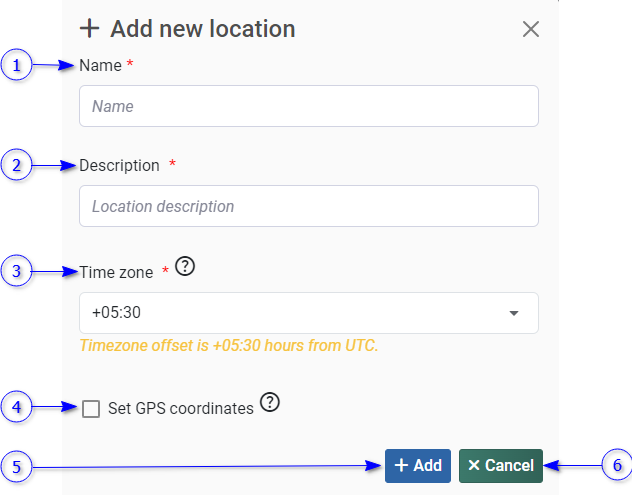
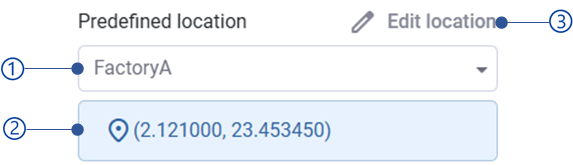
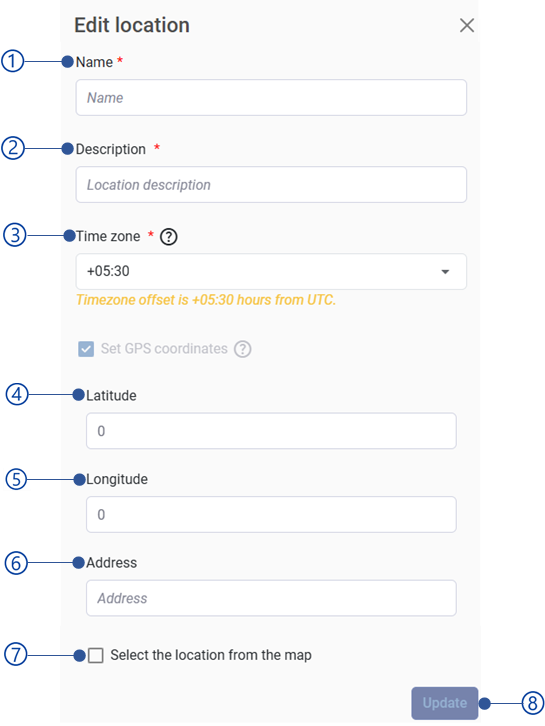
Time zone of the location. The default time zone is browser time zone.
Set GPS coordinates
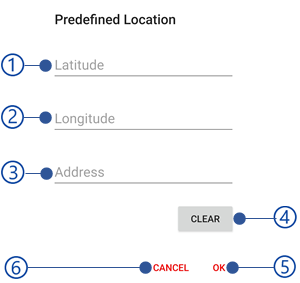
Select this option if the location have longitude and latitudes. This coordination will be used as fallback location for attendance. After enable the view will be extended as shown below.
Latitude
Longitude
Select the location from the map
You can configure map from Web interface settings view section to select to select GPS coordinates form the map as showing below.
Map view
Map marker
Selected location will be pointed with this marker.
Figure 175 GPS coordinate view in add/edit location dialog
The import locations to the system are as a zip file. Refer Import and Export information section for more details for importing file structure.
The import location data dialog is shown below.
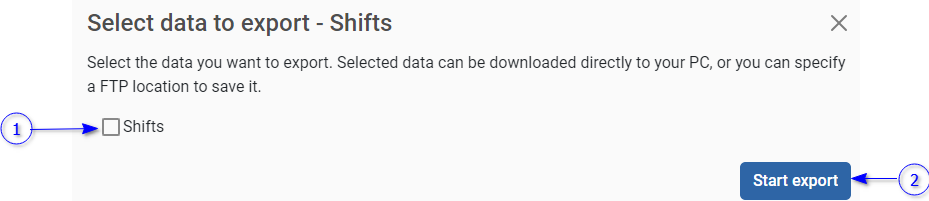
Export selected location information as a zip file. Refer Import and Export information section for more details for importing file structure.
Export location data dialog is shown below.
A device can be registered to a location so that the visitors who have appointments for the specific location can be used to record their attendances. The device registration dialog for location is shown below.
The select location name and description to generate the registration token.
Generate button
To generate the registration token. The Registration token view will be shown once the token generated.
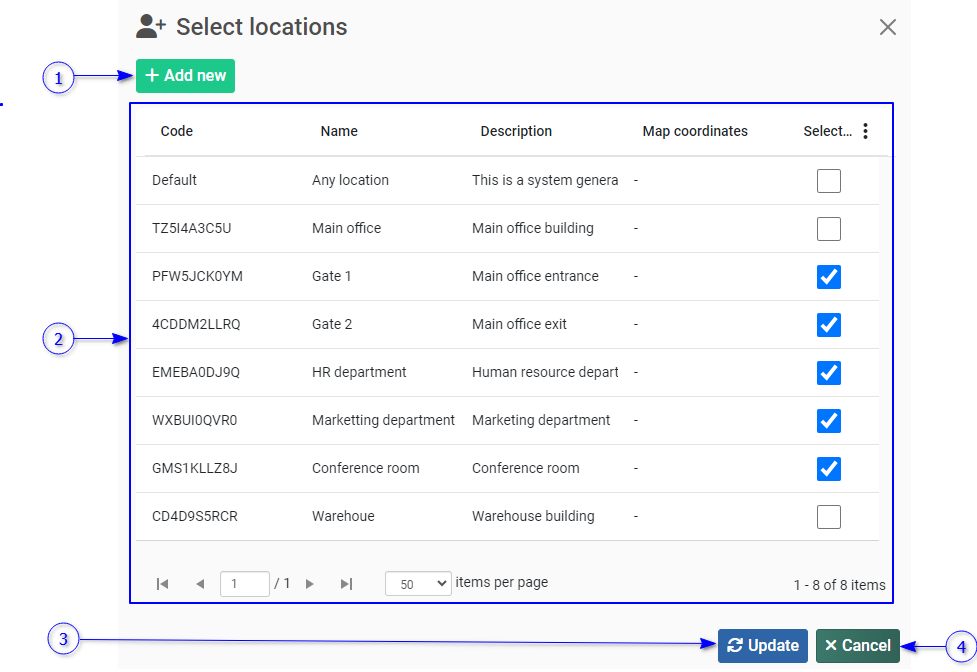
By default, a visitor is allowed to access the appointment location. If the location cannot access directly and visitor must pass additional doors or gates, those places also should be allowed to access. Such locations can be added as access locations for the location.
The access location view is showing a list of access locations added to the “Main office” location.
A Data table represent list of locations. Use select options to select locations to be updated as access locations. Unselect locations to be removed from the access location list.
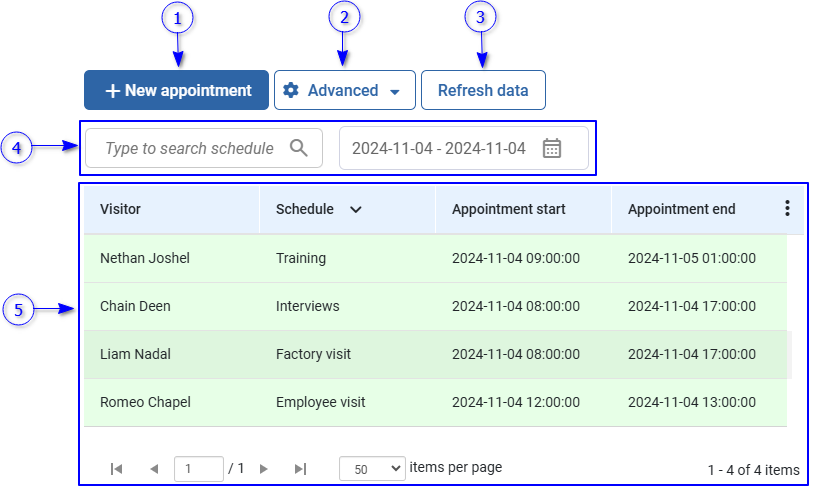
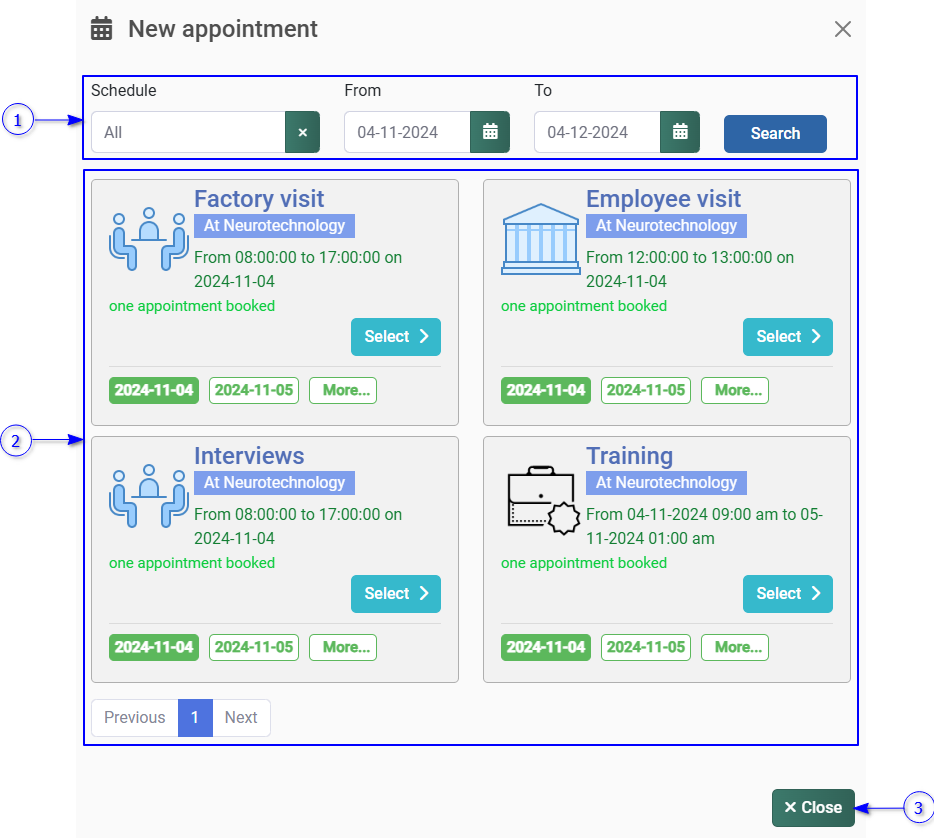
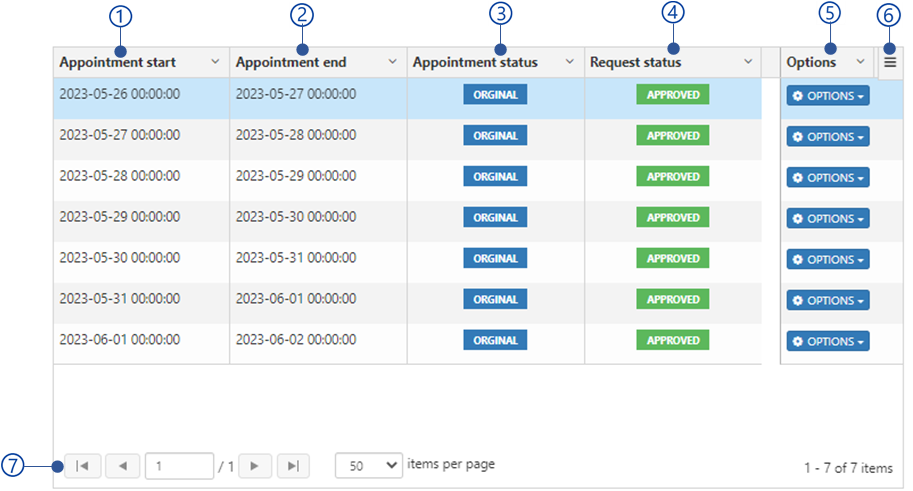
Visitor appointment is a request from the visitor for the visit with specific date and time as defined for the visit schedule. Appointments management is allowing to manage all visitor appointments,
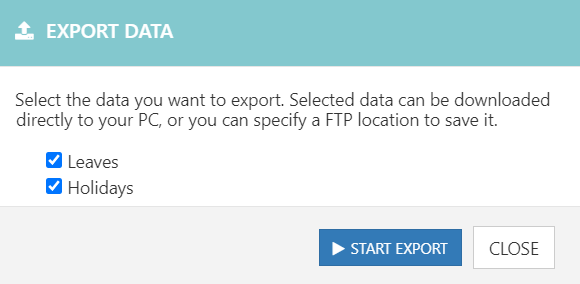
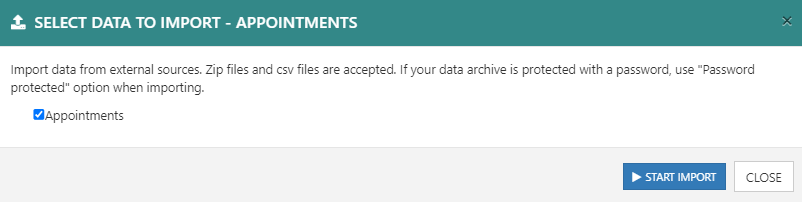
Select appointments checkbox to import appointments.
Once select Start Import button, it will show import data dialog to select import file location as mentioned in Select import location section.
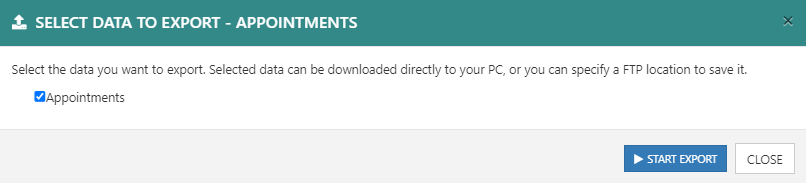
Select appointments to export all appointments.
Once select Start Export button, it will show export data dialog to select export location as mentioned in Select export location section.
If the Slot time is 0, the default appointment start time is schedule start time. If the Slot time is greater than 0, the default appointment start time is default slot start time. Default appointment start time allows to change between schedule ( Slot time = 0)/slot ( Slot time >0) start time and appointment end time.
Appointment end time
If the Slot time is 0, the default appointment end time is schedule end time. If the Slot time is greater than 0, the default appointment end time is default slot end time. Default appointment start time allow to change between appointment start and schedule ( Slot time = 0)/slot ( Slot time >0) end time.
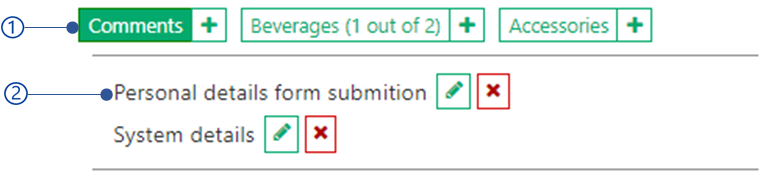
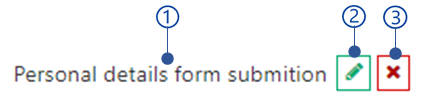
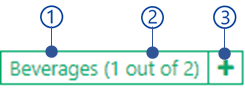
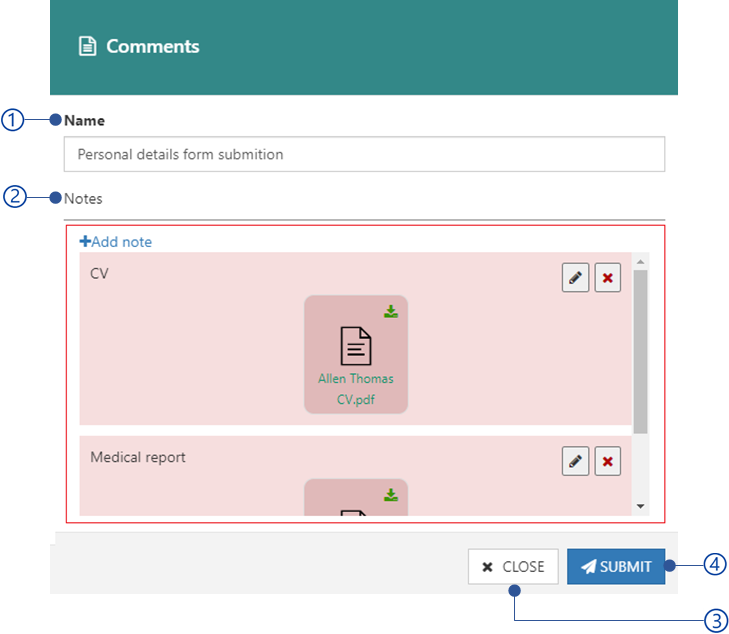
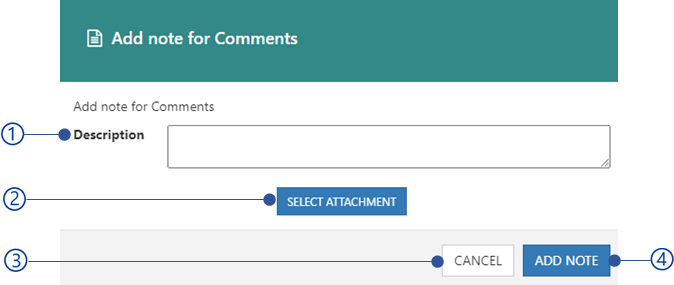
Visit notes are customizable templates that can be used to keep additional details to the appointment. Visit note may have maximum number of notes for each appointment as configured. By default, all scenarios consist of default visit note template “Comments” with unlimited notes for appointments. As per customer requirement, additional visit note template(s) can be introduced for each Scenario as an extension as mentioned in Use extension section
Available templates of the scenario which is used to create appointment schedule will be listed for the selected appointment as follows.
The notify menu allows to send notifications such as appointment summery, welcome note and reminders for the selected appointment.
The notification can be configured to the schedule as mentioned in the Appointment reminders section. From the notify menu the following notifications can be sent to the visitors.
Appointment summery
Send appointment summery for the visitor. Once select appointment summery, it will show the Notifications to send notification.
Welcome note
Send welcome note for the visitor. Once select a welcome note, it will show the Notification to send notification.
Reminder
Set reminder notification for visitor about the appointment start. Once select reminder, it will show the Notification to send notification.
Note
To send notification, either email or SMS notification must be configured as mentioned in Notification section
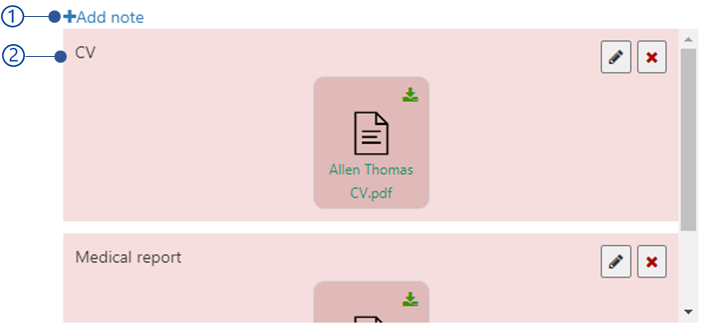
Once the appointment is created, the visitor pass(ticket). This can be used to identify visitors if the visitor biometric data is not available. Refer Manage passes section for more details about visitor pass.
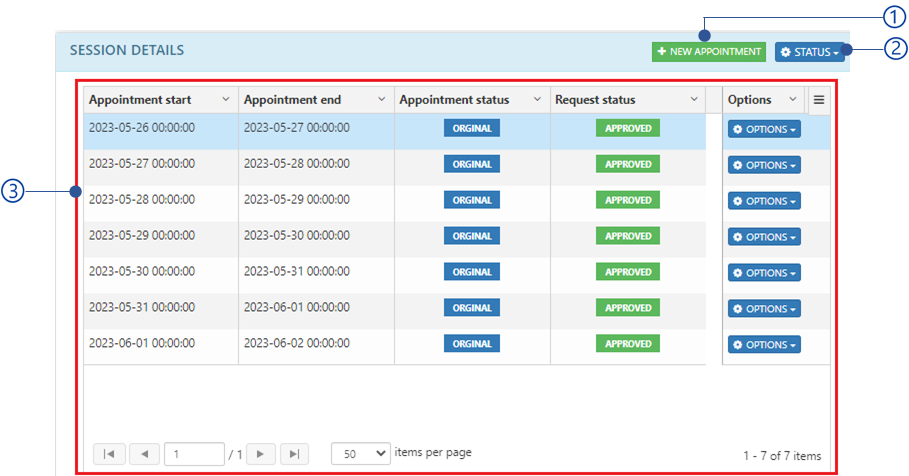
If the selected appointment belongs to a session, created from the session schedule, all appointments belong to the session schedule are shown under the session details. The session details are shown below.
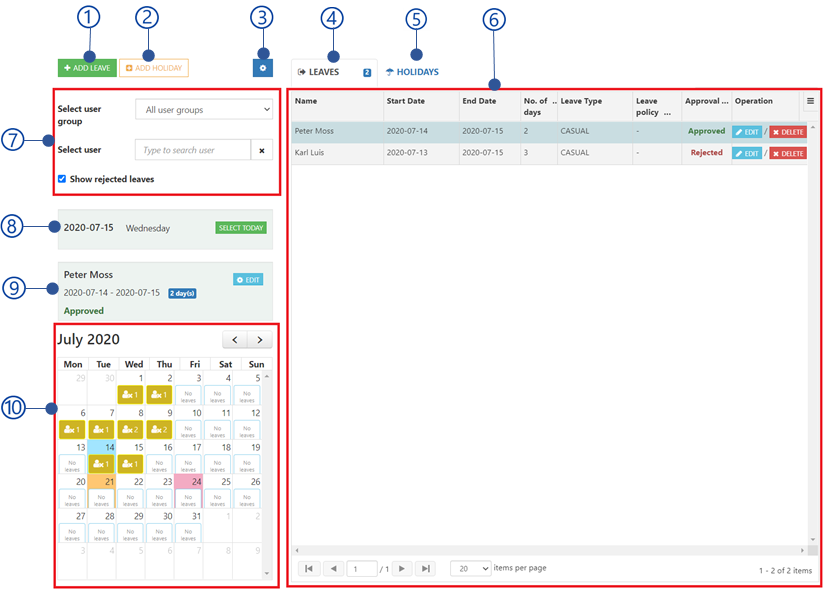
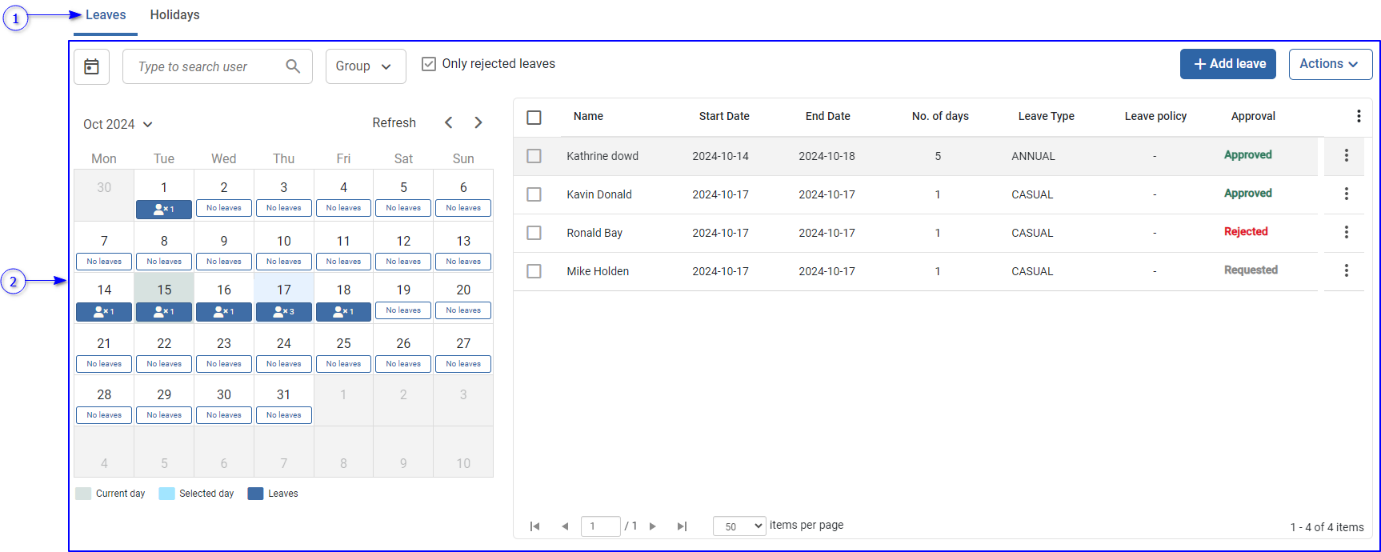
Leaves and holiday management of NCheck web control panel allows to manage all employee leaves and holidays. The Leaves and holiday management view as follows.
Leave and holiday tab
Switch between leave management view and holiday management view.
Leave calendar view is used to select the date to show the employee leaves. There are two calendar views in smaller screens(mobile) and larger screens. The detailed calendar view is available for larger screens as mentioned in Calendar view section. For smaller screens, the calendar popup view is showing.
Detailed calendar view shown below.
A Data table represent list of employee leaves. All available leaves for the selected date are shown in the leave table as below. Please refer Add leave section for more details about leave table column.
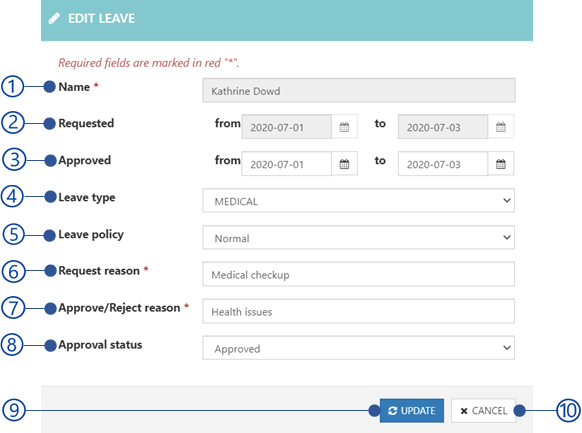
Once leave is added to a system, the leave approval status can be shown as below.
Requested
If the leave is in requested, it is considered as leave request. Requested leaves are not taken as leaves until it is approved by an admin.
Rejected
If a leave is rejected the status can be set as rejected. Rejected leaves cannot be taken by employees.
Approved
If the leave status is approved, the system is considering the leave as valid leave.
Note
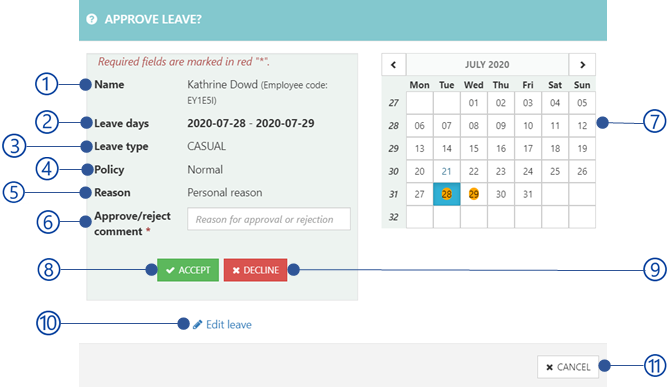
Employees are allowed to request leave. Once an employee requests a leave, any person who has an administrator role can approve or reject the leave. If an administrative add a leave, the leave type will be approved by default.
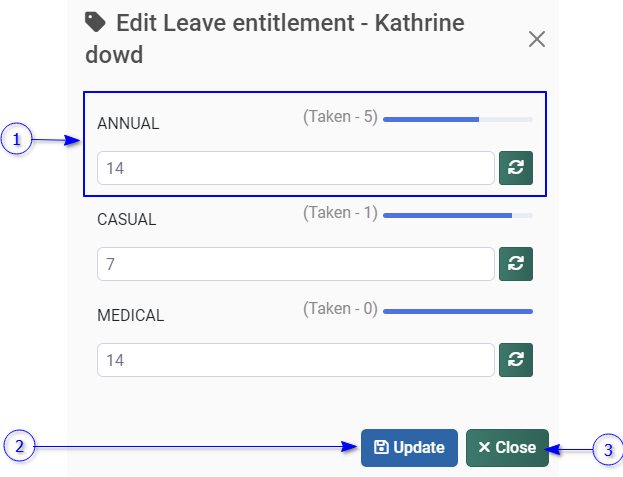
The default leave types are Casual, Medical and Annual. Administrator allows to add custom leave types as mentioned in
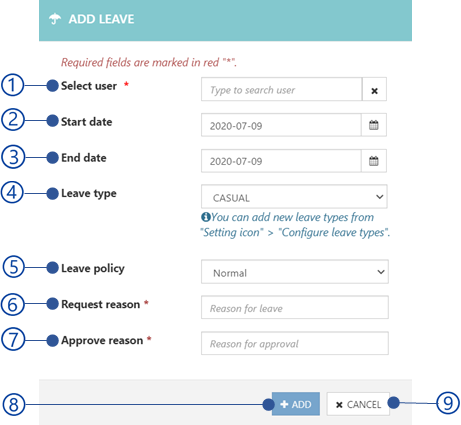
Select user
Select the username who need to apply the leave.
Start date
Start date of the leave.
End date
End date of the leave
Leave policy
There are two available leave policies.
Normal
This is the default leave policy. No restriction will be applied for the leave.
Restricted
Once the leave is approved, employee will not able to check-in or check-out while on leave.
Holiday calendar view is used to select the date to retrieve available dates. There are two calendar views in smaller screens(mobile) and larger screens. The detailed calendar view is available for larger screens as mentioned in Calendar view section. For smaller screens, the calendar popup view is showing.
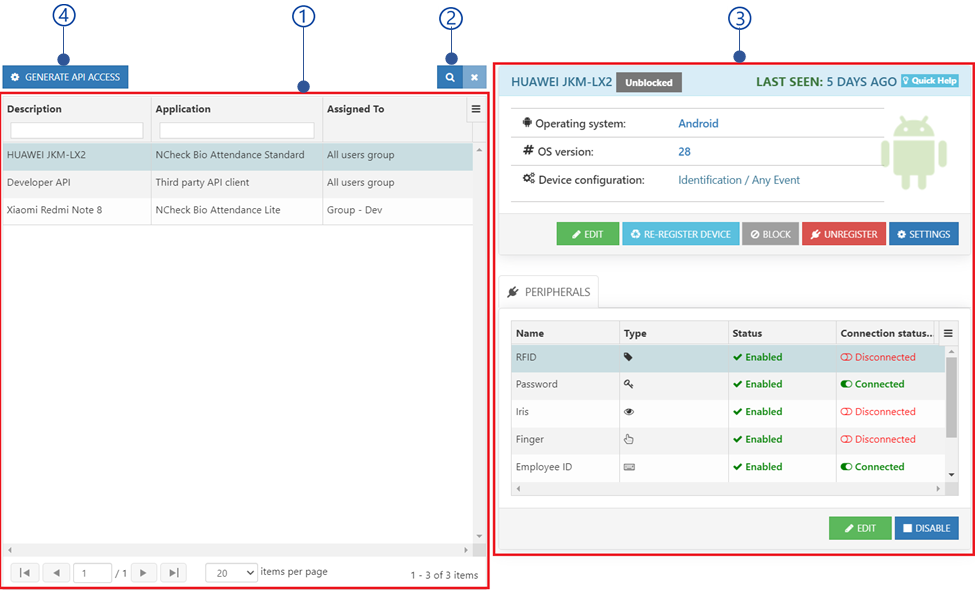
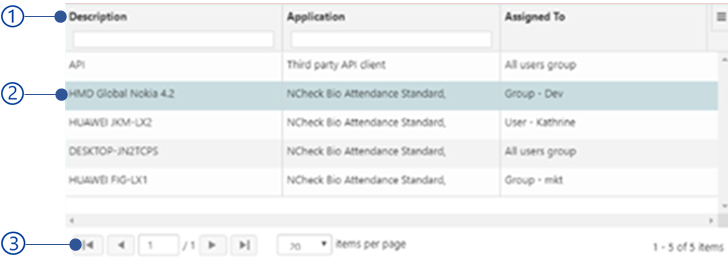
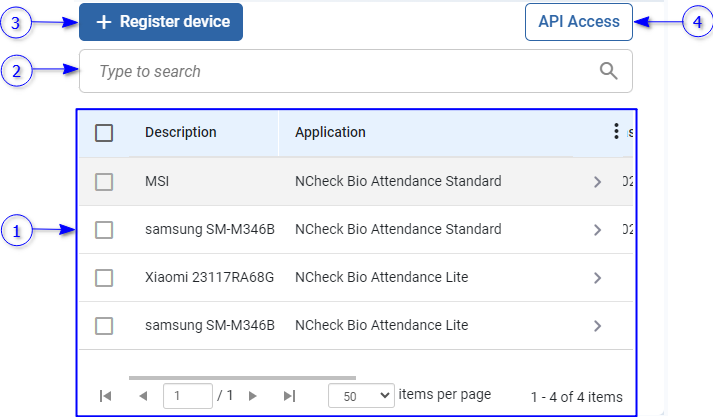
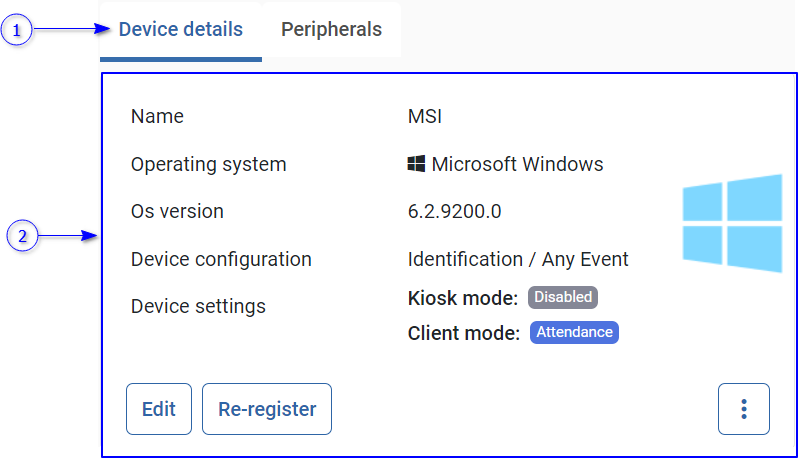
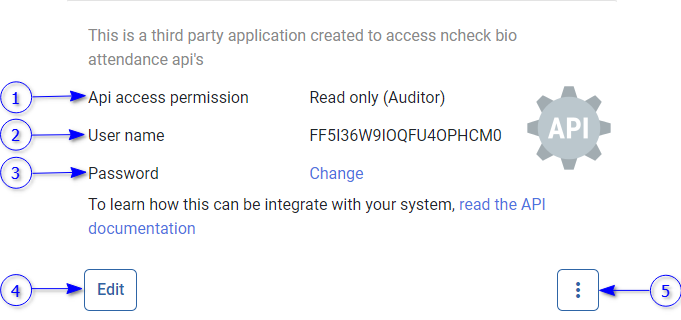
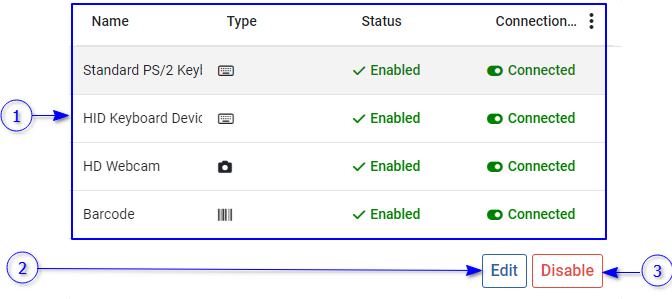
A Data table represent list of devices and APIs. Selected device information can be seen in device view. The selected device information from the table is shown in device view. The employee group Quick access menu is showing following options
Re-register client device. Re-register client option can be used to register the client application for the previously registered device in the server in case of application get deleted. For reregistration, registration token can be generated as mentioned in Register device section.
Block/unblock
Block/unblock device or API. Once blocked the client/API cannot be used with the system until it unblocked.
Unregister
Unregister client/API from the system. Once unregistered, the device/API no longer use with the server.
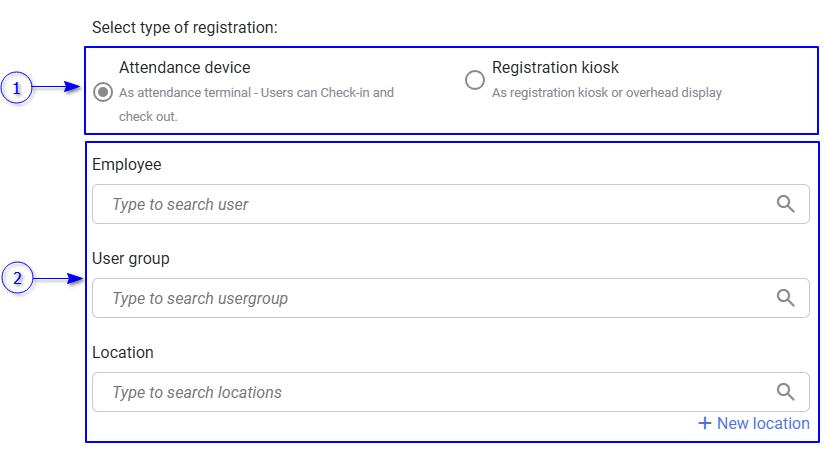
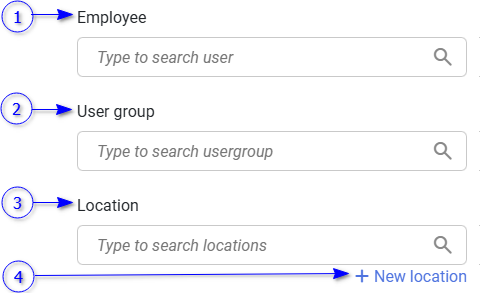
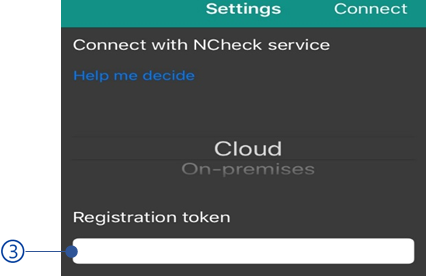
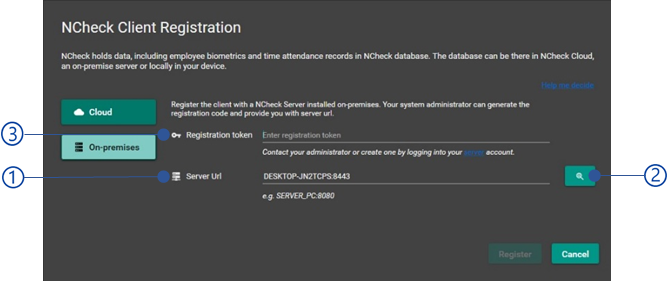
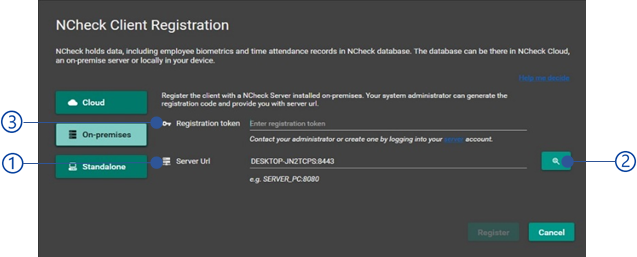
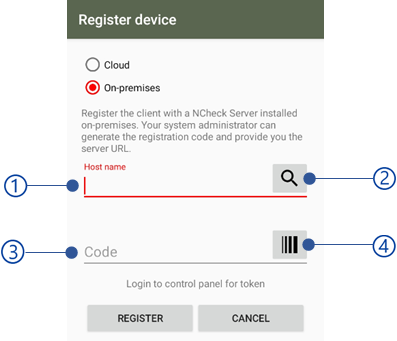
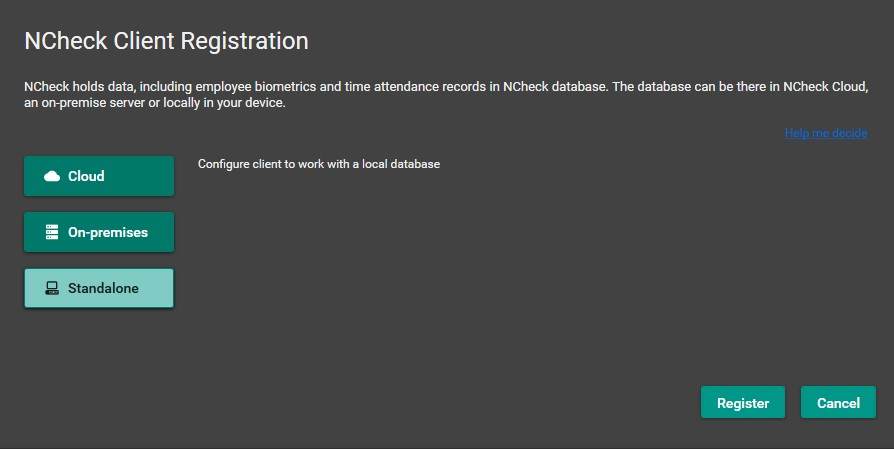
NCheck clients should be registered with NCheck server to use for attendance recording. The client application can be installed in Android, Windows and IOS (Attend client only) devices in the following modes
Register for employee
Employees can install the client application in their personal device and register to record the personal attendance, check reports etc.
Register for groups
Register client application for employee groups. Once client application is registered to a group, any employee in the group can record their attendances using the device.
Register for location
Once client application registered for a location, any visitor who has appointments in the device location can be used the device to record their attendance.
Register for group and location
This is combination of register for groups and locations.
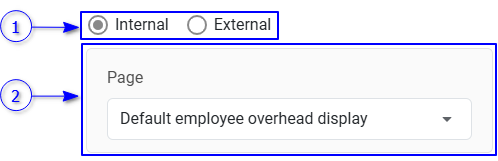
Register for registration kiosk or overhead display
Use the device either registration kiosk to create appointments for visitors or overhead display as mentioned in section. Employees or visitors are not allowed to record attendances in these devices.
Generate registration token to register device for registration kiosk to create appointments for visitor or overhead display. The kiosk registration view is shown below.
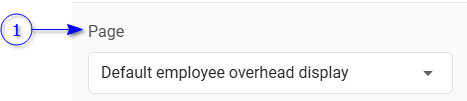
The pages available for attendance management and visitor management to use as either a registration kiosk or overhead display. Any page can be added to the system depending on the use case. Refer section for more details about adding pages to the system. If configuration requires, the configure button is available next to the page selection control.
The overhead display for employees with attendance details.
Common booking page
Users can select schedule from the available and create appointments.
Login page
This shows NCheck login page so employees can login to the system using their credentials and use web control panel.
Schedule booking page
Open specific schedule from available so that the user can create appointment. Use the configure button to select the schedule that needs to be open with this page in the device.
Overhead display for schedule
Open specific schedule which showing the current in progress appointment number. Use the configure button to select the schedule to be displayed.
Overhead display for multiple schedule
Show all schedules with the current appointment details in progress.
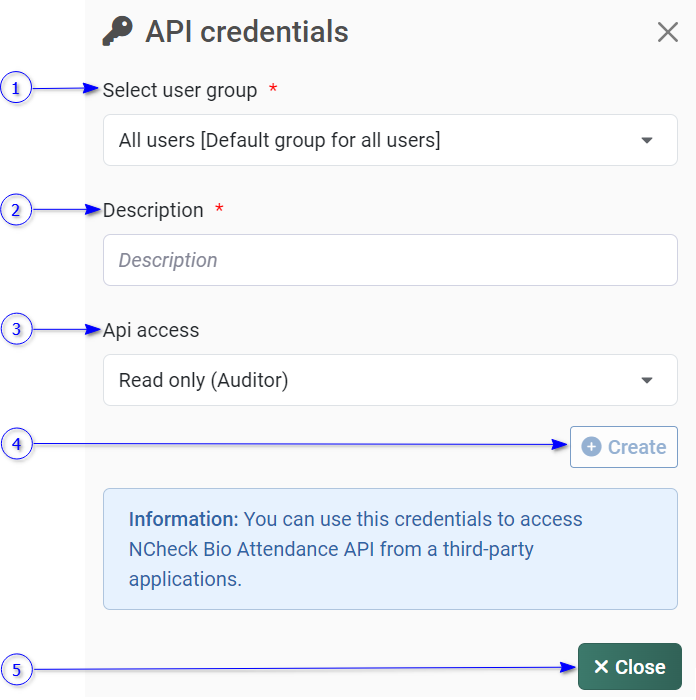
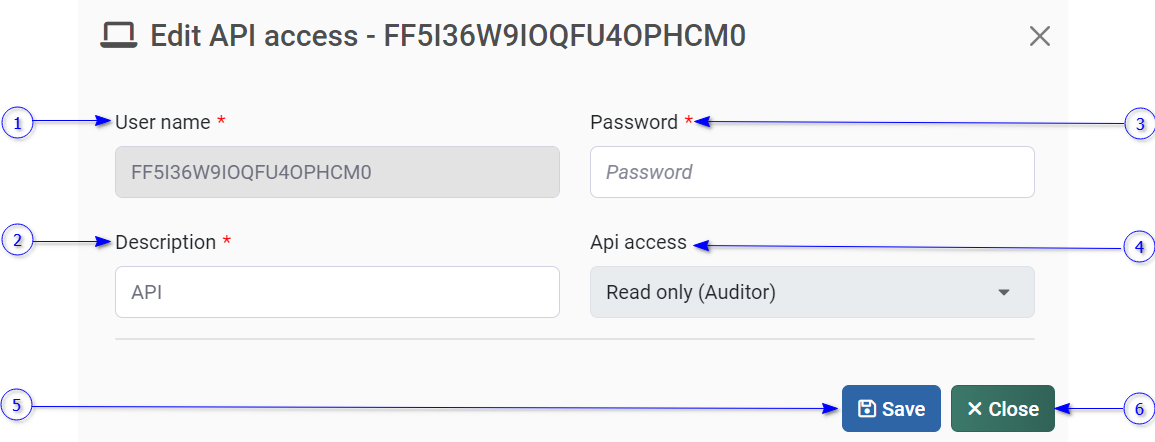
Assigned user group allows only to retrieve data from the API.
Read-Writer (Admin)
Assigned user group has permission to retrieve and alter data.
Create button
Create button will be enabled if the API description has added. After creating API, username and password which is required for API access will appear as shown in Figure 229 . For more details refer to the API Documentation section.
Close button
Once created an API access credential view will appear in the API credentials dialog.
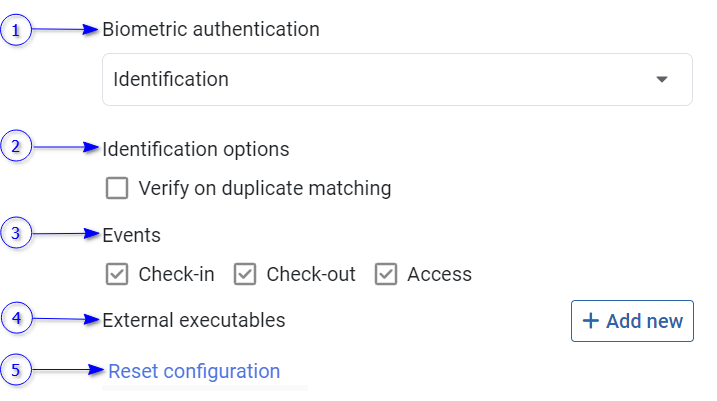
Authentication mode can be applied to authenticate users to identify or verify user. Available authentication modes are,
Biometric
User biometric data such as face, fingerprint and iris are comparing against the database with previously collected biometric samples depending on the Recognition threshold . If the matching score is greater than the Recognition threshold value, user is considered as identified. Therefore, this mode may demand large processing time.
Pass
User id data such as QR code, RFID or Number plates are comparing against the database and giving the matching users.
Biometric and pass
The verification mode can be applied with a id peripheral and a biometric peripheral to verify the user against the previously collected biometric sample. To get verified, matching score should be greater than Verification threshold .
Biometric or pass
Users allows to record attendance using either biometric or pass.
As mentioned in Authentication mode section, if the verification mode is selected, the verification order can be set as either the “id first” to enter the user id(barcode, RFID) first or the “Biometric first” to capture the biometric first.
System can be configured to run external scanners, printers and IOT devices during user identification. For example, an automatic door opening program can be executed upon successful user identification. The connection between NCheck Admin client and external devices is obtaining using following technologies.
REST API
Bluetooth
Bluetooth scanners and printers connected with the device.
MQTT
Parse data to the MQTT compatible IOT devices such as doors, gates.
Intent
Intents are using to parse data to the applications using app links.
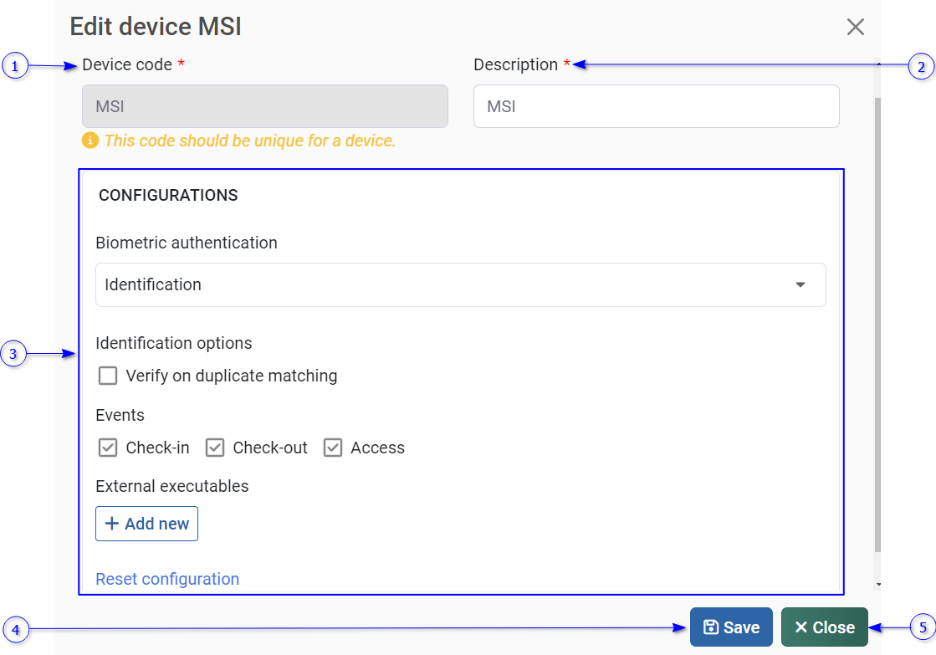
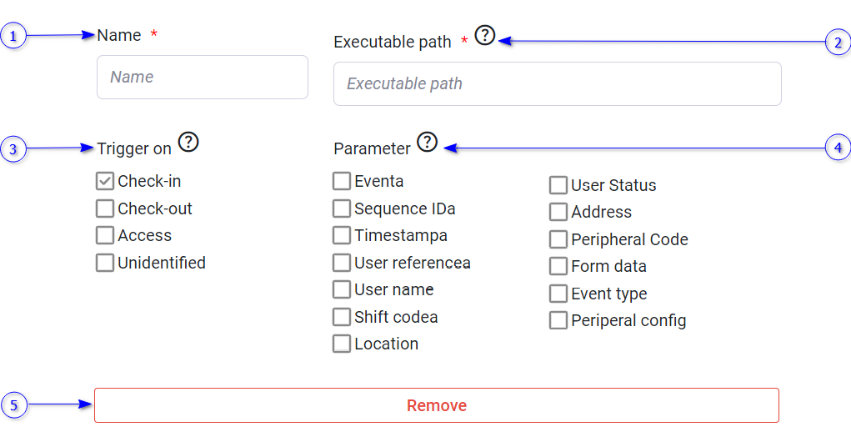
This view allows us to add new external executables or edit existing external executables.
Primitive or custom parameters. Primitive parameters are parameters which have value Strings. Custom parameters are parameters which have value in Json format. Parameters can be introduced depending on the requirements. The default parameters available with the system are shown below.
Event (EVENT)
Event type as CHECKIN, CHECKOUT or UNIDENTIFIED.
Sequence id (SEQUENCE_ID)
Id of the event.
Time stamp (TIMESTAMP)
Date and time of the event.
User reference (USER_REF)
Employee code of the user.
Username (USER_NAME)
First name and last name of the user event recorded.
Shift code (SHIFT_CODE)
Shift code of the NCheck Admin clients. In the standalone mode shift code is DEFAULT.
Location (LOCATION)
Longitude and latitude of the event geo location. example {Longitude, Latitude
User status (USER STATUS)
User is blocked or not. Pass 0 if the user has blocked otherwise 1.
The external executable can be configured to trigger following type of executables
Execute rest APIs
The primitive type parameters will pass as URL parameters. Custom type parameters will be added to the request body. To add custom type parameters, the Rest API should be POST API.
Windows executable
This can be used only for Windows Admin clients only. Absolute path to the .exe file in the client device.
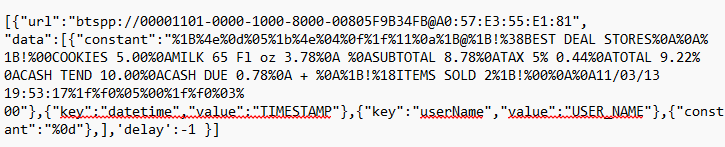
Bluetooth device/printer
The Bluetooth device/print connected with the client device can be triggered using Json array as external executable path as follows.
The Json array can be used to parse data to multiple Bluetooth scanners. Each Json object has following properties
url
The url to the Bluetooth device/printer. The format should be “htspp://{UUID}&{Bluetoothe device address}”
data
The data parsing to the Bluetooth device. This is a Json array that contains constant and variable data. The constant type of data object is a text. The variable type objects contain key and value to the primitive parameters selected from the external executable parameter list. The Bluetooth device receives text concatenating all the constants and parameter values in the sequence in the data array.
Delay
This is not a required. This can be used to set the number of seconds to delay Bluetooth scanner trigger.
Trigger MQTT device
Trigger any MQTT compatible IOT devices. This can be done using Json array as external executable path as shown below
The Json array is used to trigger multiple IOT devices connected to broker topics. Json objects contain following properties
url
The url of the MQTT topic that the IOT device connected. The format should be “mqtt://{MQTT broker URL}/{topic}”. Admin client has a default MQTT broker. In that case use localhost as the MQTT broker URL. Otherwise, the URL of the MQTT broker service.
Username, password
The username and password to connect with the MQTT broker.
data
The data publishing to the MQTT IOT device. This is a Json array that contains constant and variable data. The constant type of data object is a text. The variable type objects contain key and value to the primitive parameters selected from the external executable parameter list. The IOT device receives text concatenating all the constants and parameter values in the sequence in the data array.
Delay
This is not a required. This can be used to set the number of seconds to delay Bluetooth scanner trigger.
Intent
This type is using for Android clients only. Intents are used to parse data between android applications in Android. In NCheck , intent can be used to trigger application installed in android device where the Admin client is install using app links. The external executable URL is {scheme}://{host}. The primitive type parameters are parsed as URL parameters of the app link. The object type parameters are parsed as intent extras (String).
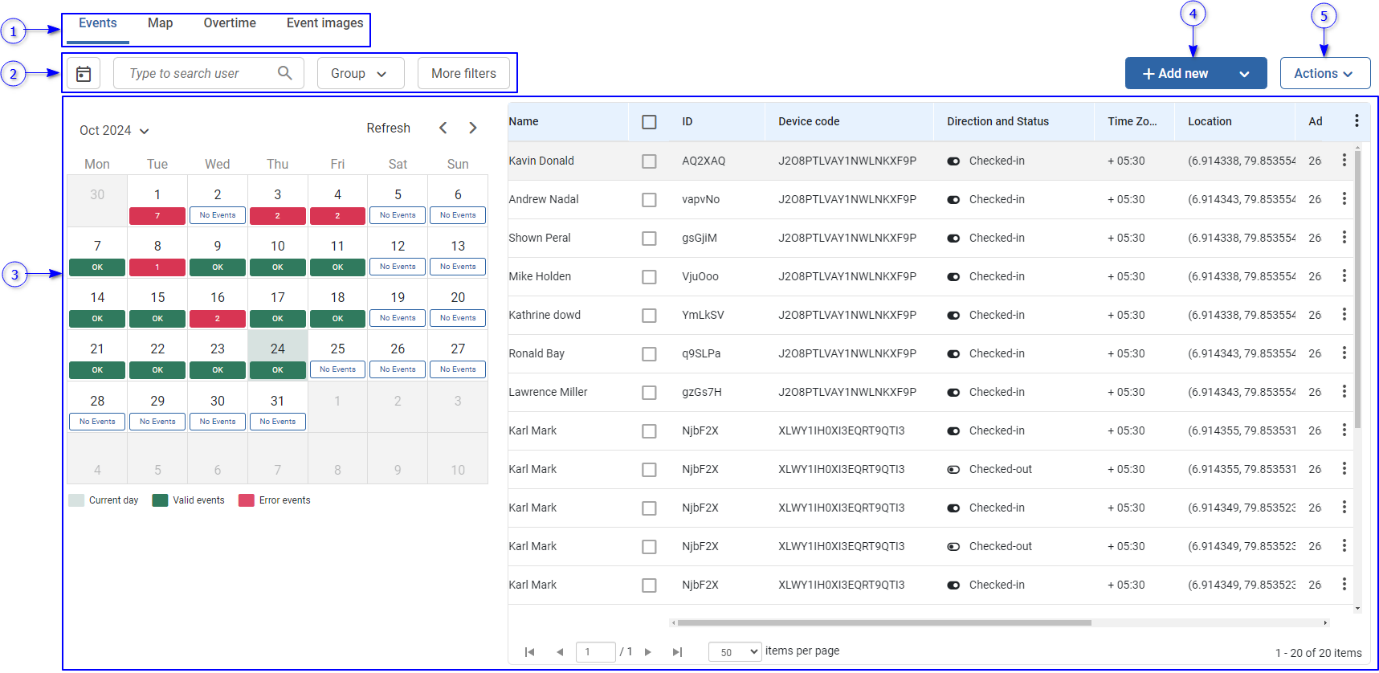
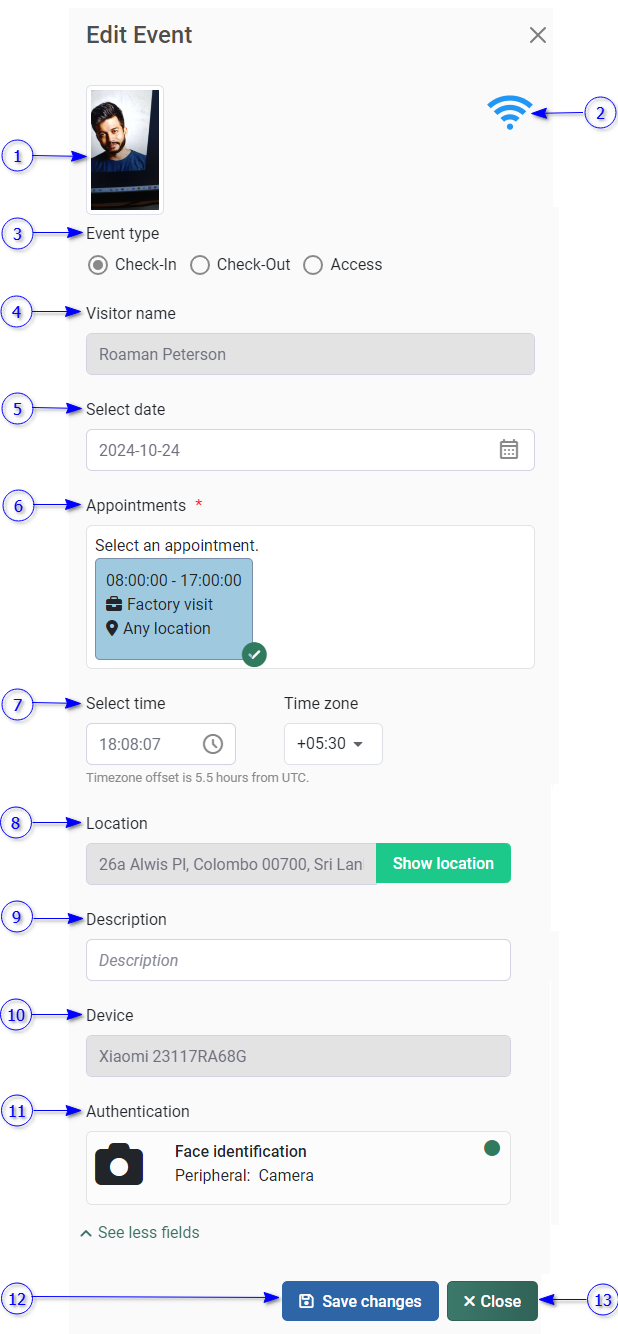
Employee and visitor event logs can be managed in the event logs section. Event log view is showing event logs for employees and visitors. The view can be switched to either employee or visitor as mentioned in Bio attendance and visitor mode selection
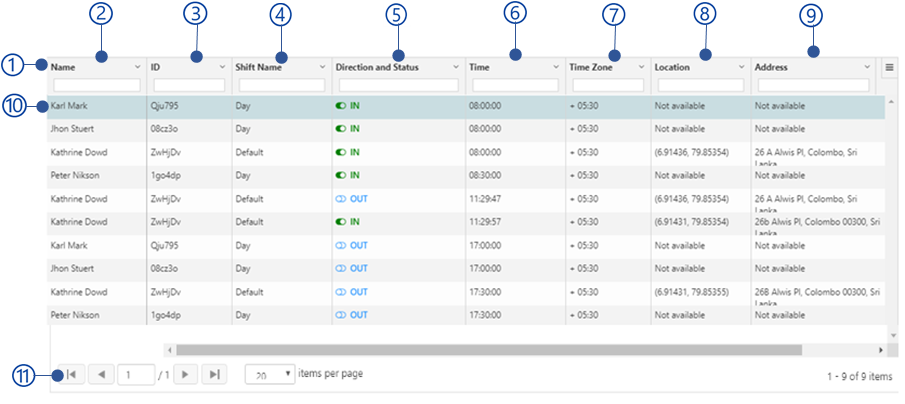
Event logs management view is shown below.
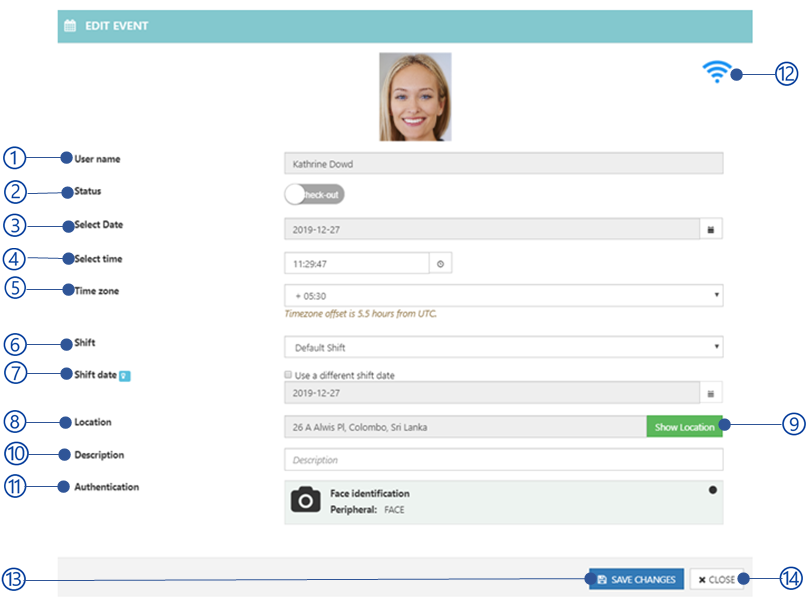
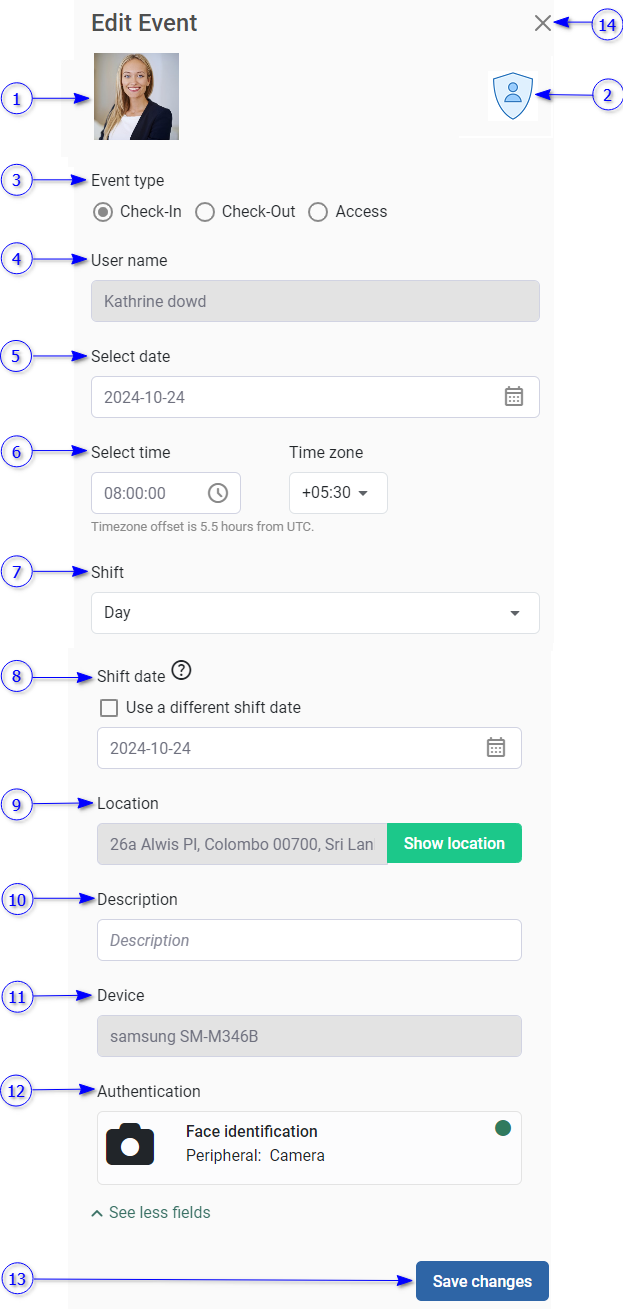
Event image of the editing event. This can be either face, finger or iris image if the event is recorded using biometric.
Event source
The event source how the event is recorded. This could be either by admin or attendance device.
Event type
Event type as check-in, check-out or access
Employee name
Select employee name. Once an event is added, employee name cannot be changed.
Select date
Select event date
Event time and time zone
Shift
Shift date
When an employee Check-in or Check-out is not in the same date, (E.g. Working overtime or Shift spans for two days) shift date should be specified. Otherwise, the event will belong to the current day’s shift
Location
Location coordinate where the event recorded. Once the location coordinate added, the location can be seen in the map as configured from Location map provider setting.
Description
Device
The device name if the attendance recorded form attendance device.
Event image of the editing event. This can be either face, finger or iris image if the event is recorded using biometric.
Event source
The event source how the event is recorded. This could be either by admin or attendance device.
Event type
Event type as check-in, check-out or access
Visitor name
Select visitor name. Once an event is added, the visitor’s name cannot be changed.
Select date
Select event date
Appointment
Select the visitor appointment to add the event.
Event time and time zone
Location
The location coordinate where the event recorded. Once the location coordinate added, the location can be seen in the map as configured from Location map provider setting.
Description
Device
The device name if the attendance recorded form attendance device.
Check-in and check-out recorded by the same employee or visitor are paired to count the system hours. But due to the following reasons the check-in check-outs might not be paired when added to the system.
Check-out event is synchronized with the server before the check-in event is recorded from another device.
Check-in or check-out event get deleted.
When the events are not paired correctly, re-evaluate option can be used to pair those events. Re-evaluate event logs dialog is shown below.
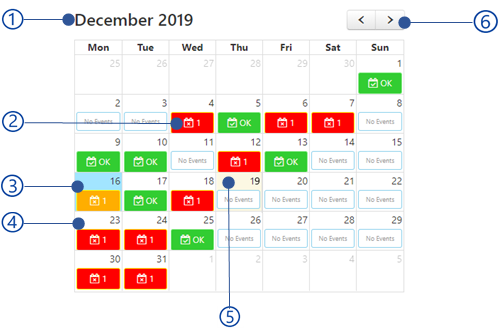
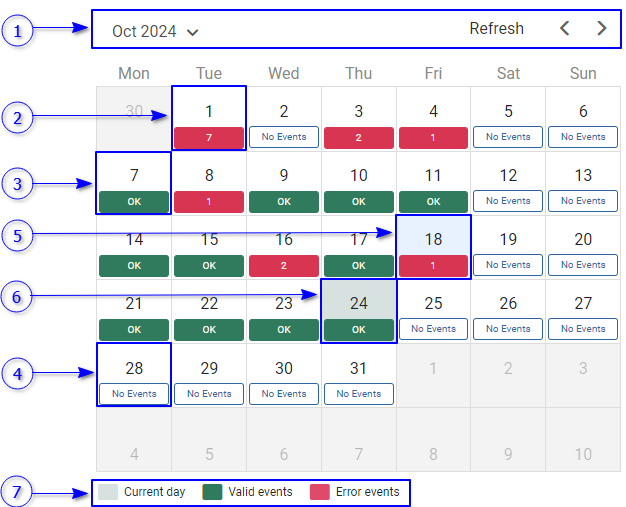
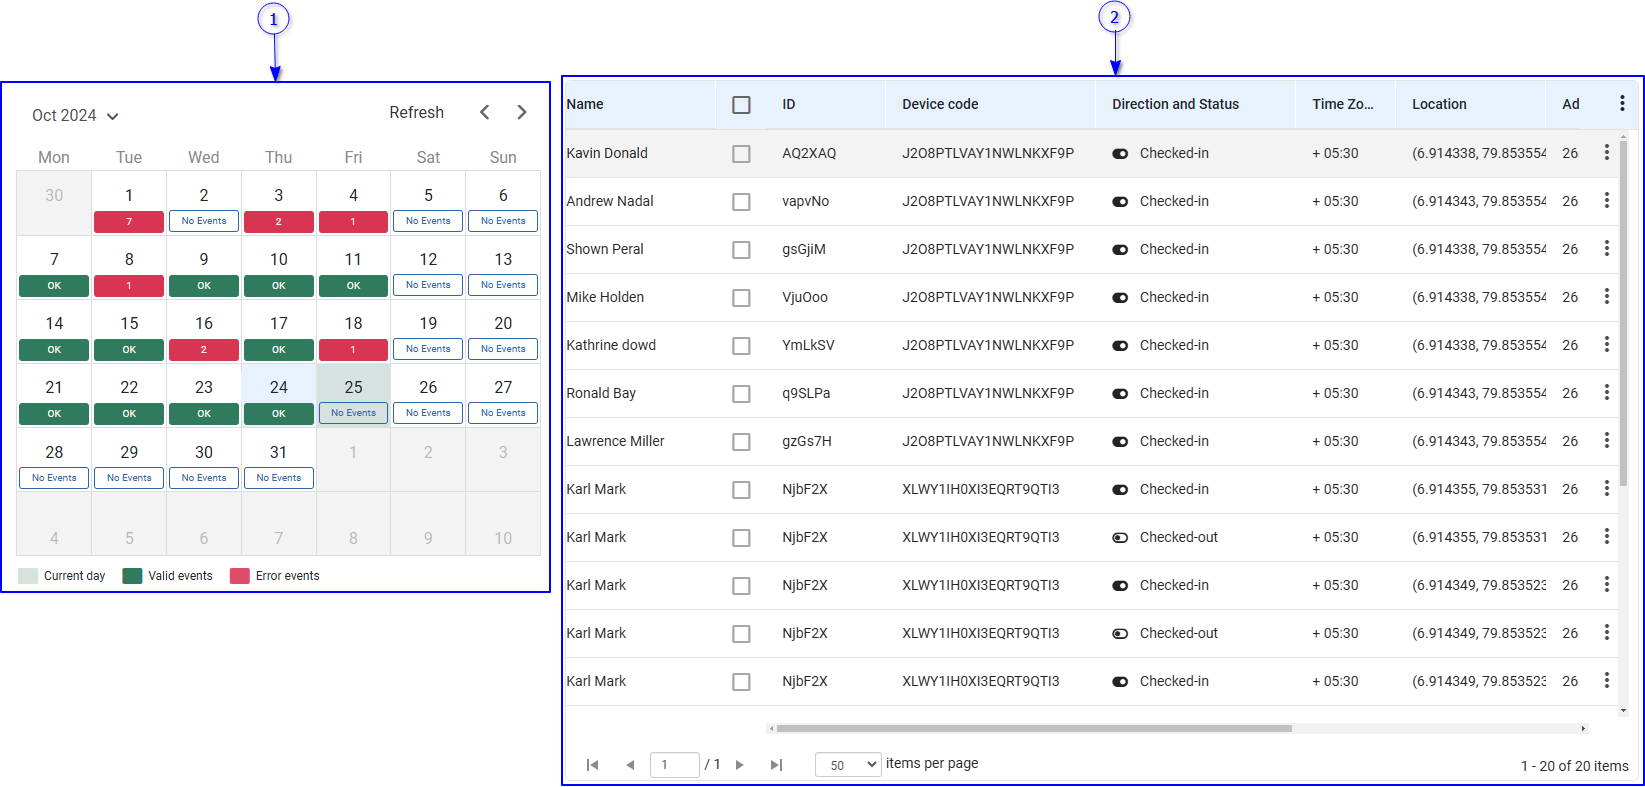
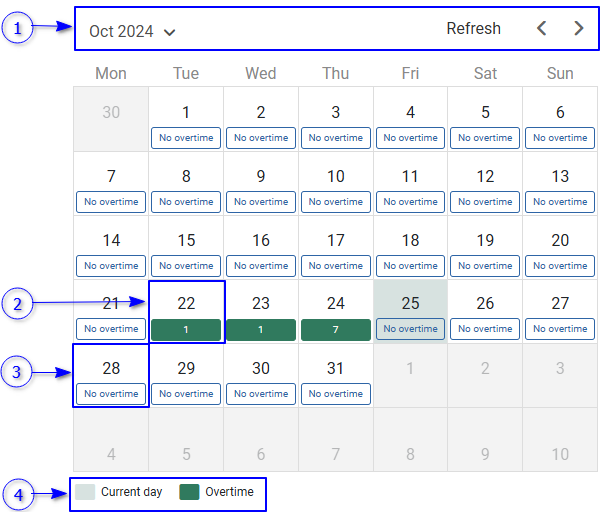
Eventlog calendar view shows an overview of valid and error event logs over the month. A day which has paired eventlogs in order is considered as valid event date. A day which has unpaired event logs considered as error event date.
Event log calendar view is shown below.
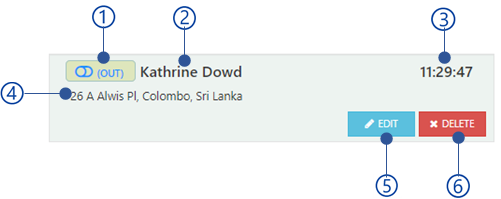
A Data table represent list of event logs. The employee/visitor event log Quick access menu is showing following options
Edit
Edit selected event log. Refer Add/edit employee event section for more details about editing employee event log. Refer Add/edit visitor event section for more details about editing visitor event log.
Delete
Delete selected employee/visitor event log.
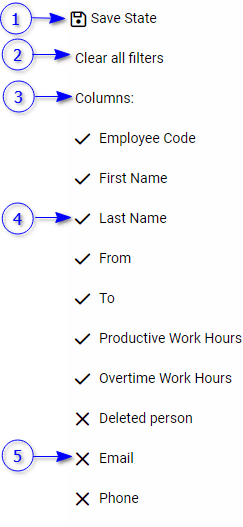
The following table shows event logs data showing in the event table. The columns can be visible/hide from the table as mentioned in Table menu section.
Column name
Description
Available for employee events view
Available for visitor events view
Name
Name of the employee/visitor
Employee/visitor code
Scenario
Scenario used to create a visitor schedule that the appointment has created
Schedule name
The name of the schedule
Appointment location
The location of the schedule that the appointment created
Shift name
Name of the shift that the event log created for
Shift start
Start time of the shift
Schedule start
Start time of the schedule
Direction and status
Event types such as check-in, check-out or access
Sensor data
The sensors (ex: temperature sensors) available with the attendance device can be configured to get the data when recording attendance. This data will be shown here
Index number
Appointment number
Time (GMT)
Event time in GMT
Time
Local event time
Event location
The location where the attendance recorded
Address
Device code
A unique identification for the device that the client application is installed. System assigns unique ID when register the device
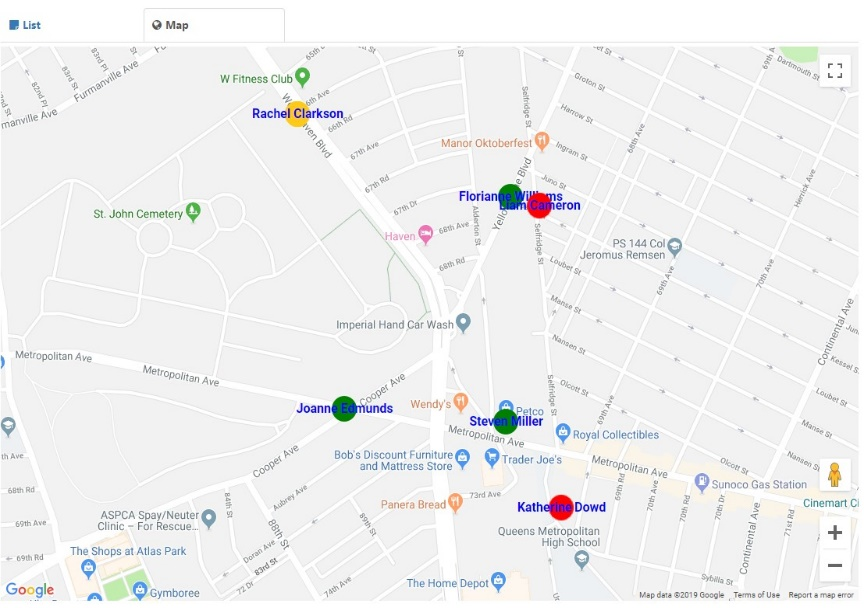
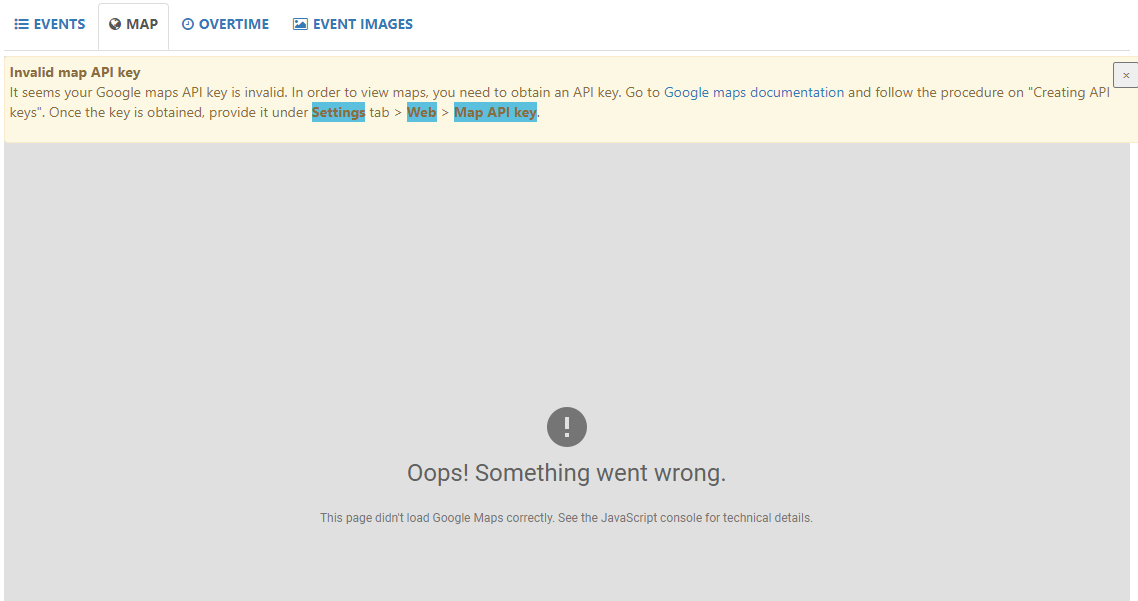
Events map shows employee/visitor recent events in a map for the given location coordinates. The map provide can be either google or Baidu configured from Event log location map provider setting, The events map view is shown below.
To configure google maps obtain a google map API key as mentioned here.
If you can see “For development purposes only” water mark on the event log map once you have configured with Google map, you must make sure that.
Billing has not been enabled on your account.
The provided billing method is invalid (for example an expired credit card).
API access daily limit has been reached
To remove the watermark, you need to log in to Google cloud services console (https://console.cloud.google.com/project/_/billing/enable) and check the status of particular project created for Map API access.
If the API key is correctly provided, you should see Google maps loaded properly. If it’s still showing some error on top as follows, you need to check whether the API key is correct.
Figure 251 Eventlog map view for invalid google map API key
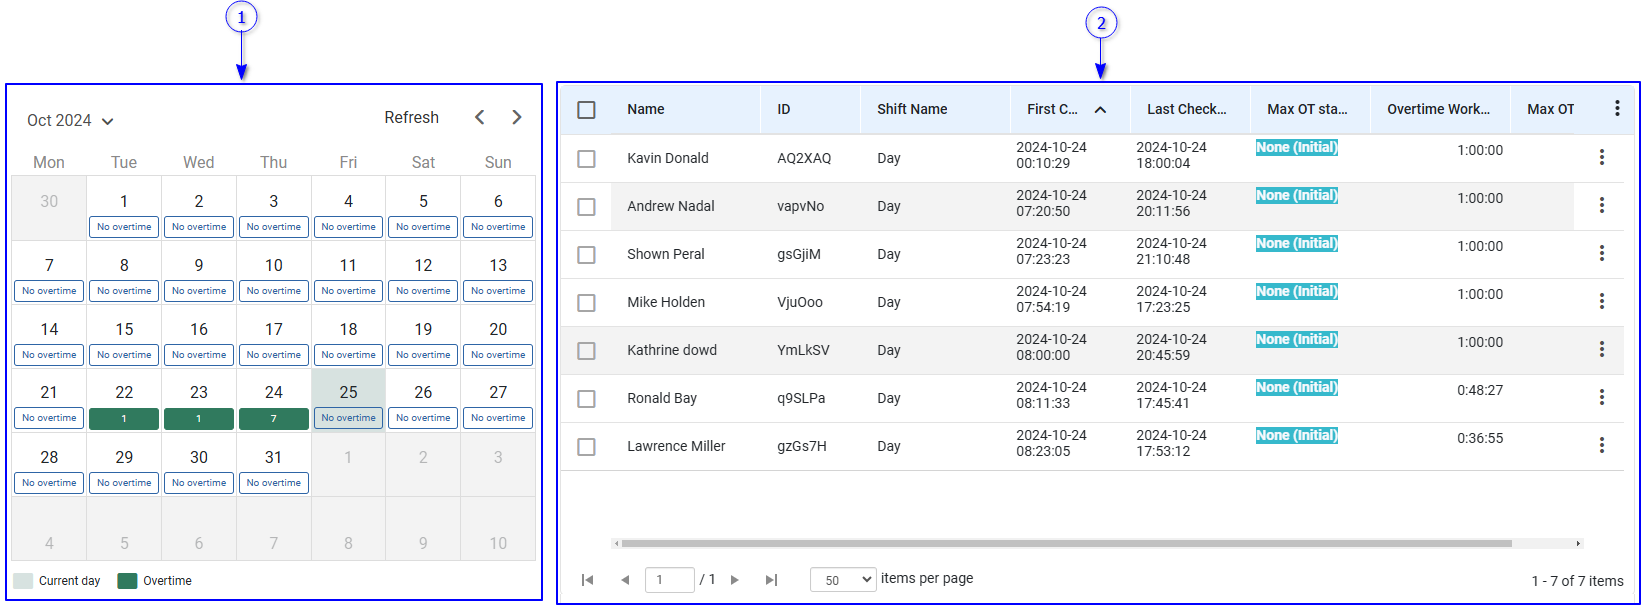
A Data table represent list of overtime logs from employee for selected date. The employee/visitor event log Quick access menu is showing following options
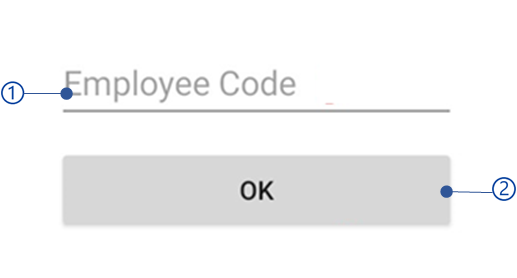
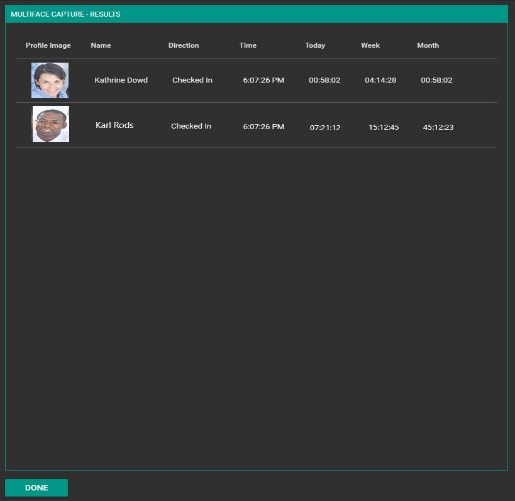
Event image view is showing event image (face, iris or finger) with employee name, event type (check-in, check-out or access) and event time. To edit an employee or visitor event, click on the event image view. For more details about edit employee/visitor events,
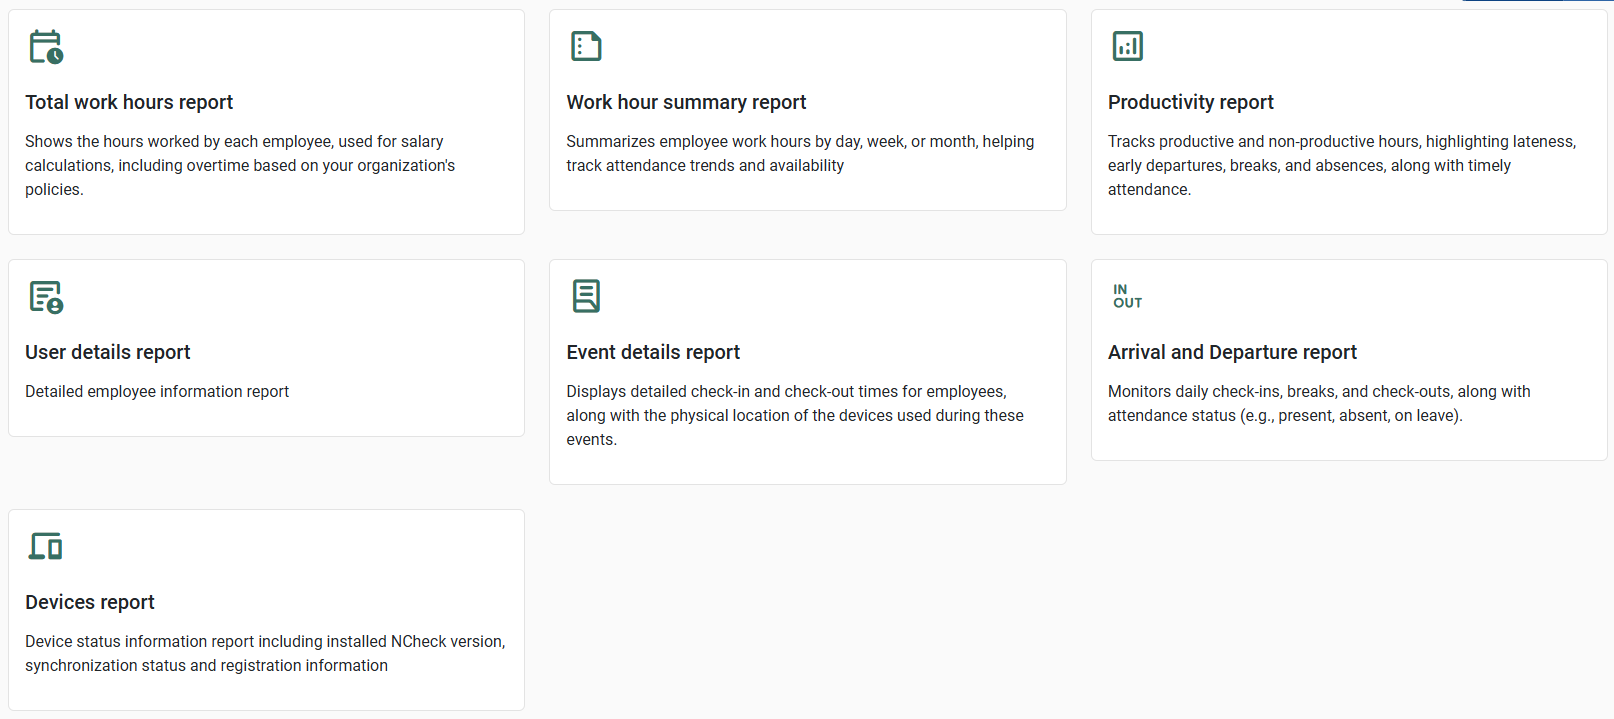
The reports section includes a set of reports for employees and visitors. The report view can be switched to either employee reports or visitor reports as mentioned in Bio attendance and visitor mode selection section
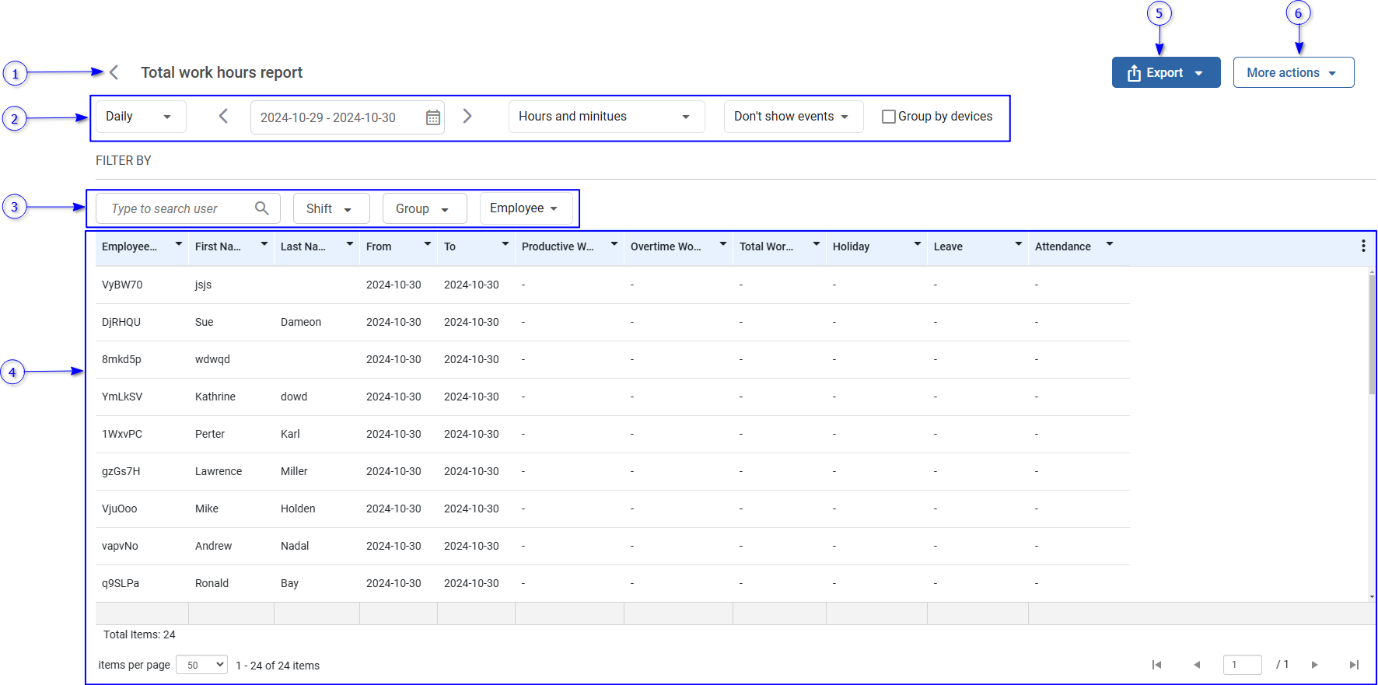
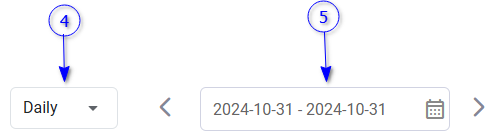
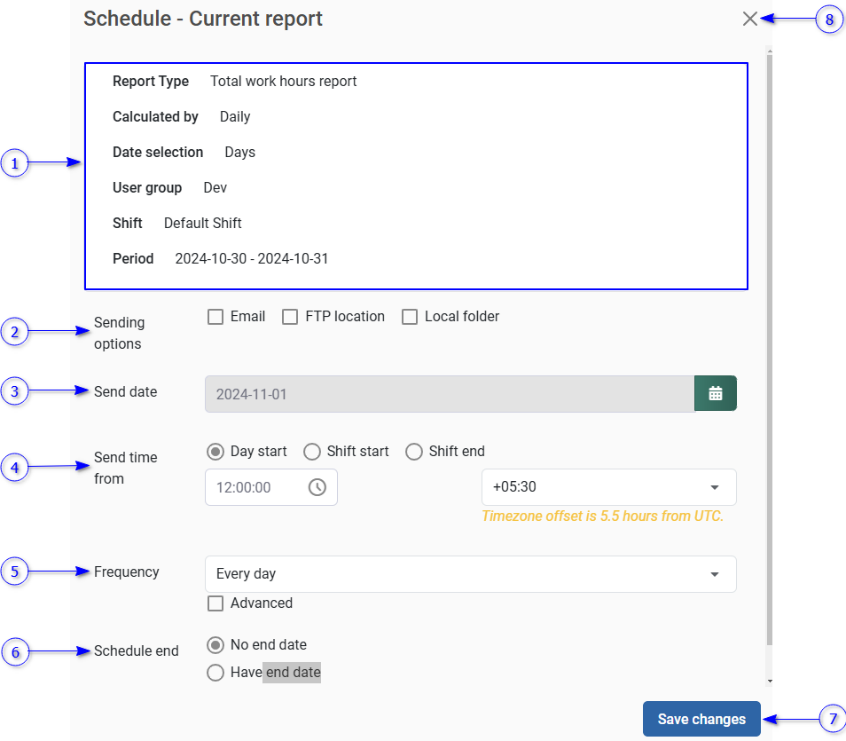
The Total work hours report provides work hours details for a selected date range. Those details can be calculated on a daily, weekly, and monthly basis. The important parameters are
Admin clients can be configured to capture data from the sensor available with the devices. For example, the devices have sensors that can capture a nearby person and can be used to capture the employee temperature with the event. Such data is available with this column.
Arrival and departure report contain all arrival, departure, and absentee data. It also includes information about Roster items, Additional staff adding, Replacements, Holidays and Leaves for all employees. Using this report, you can track, • Shift details for the employee (Shift name, start and end time)
Employee code
First name
Last name
Date
Availability
Preset or absent
Shift name
Shift start
Start time of the shift as mentioned in Add/edit shift section
Shift end
End time of the shift as mentioned in Add/edit shift section
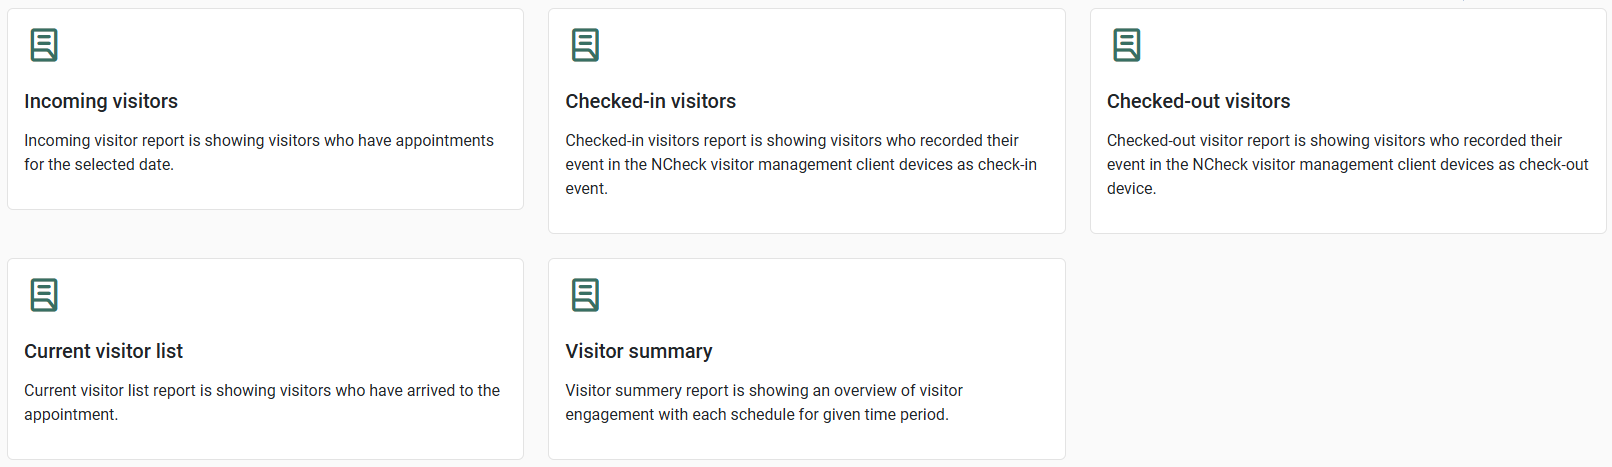
Checked-in visitors report is showing visitors who recorded their event in the NCheck client devices as check-in event. Following details available in the report
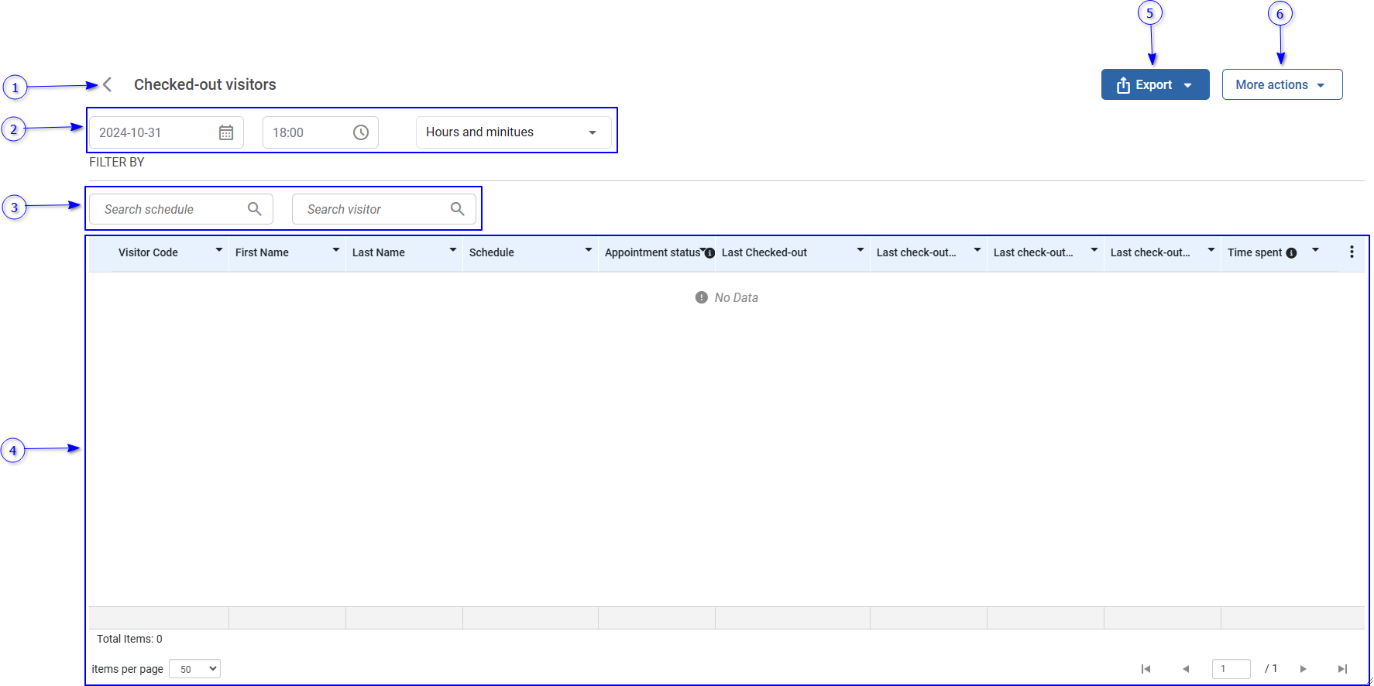
Checked-out visitor report is showing visitors who recorded their event in the NCheck client devices as check-out device. Following details available in the report
The visitor summery report shows an overview of visitor engagement with each schedule for given time period. The visitor summery report contains the following details.
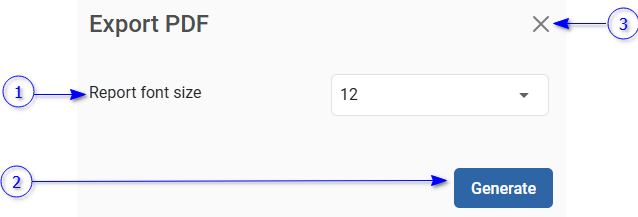
Before export report, make sure to hide columns from the report view those are not needed in the exported report. This can be done using the table menu as mentioned in Table menu section. Report can be exported as follows
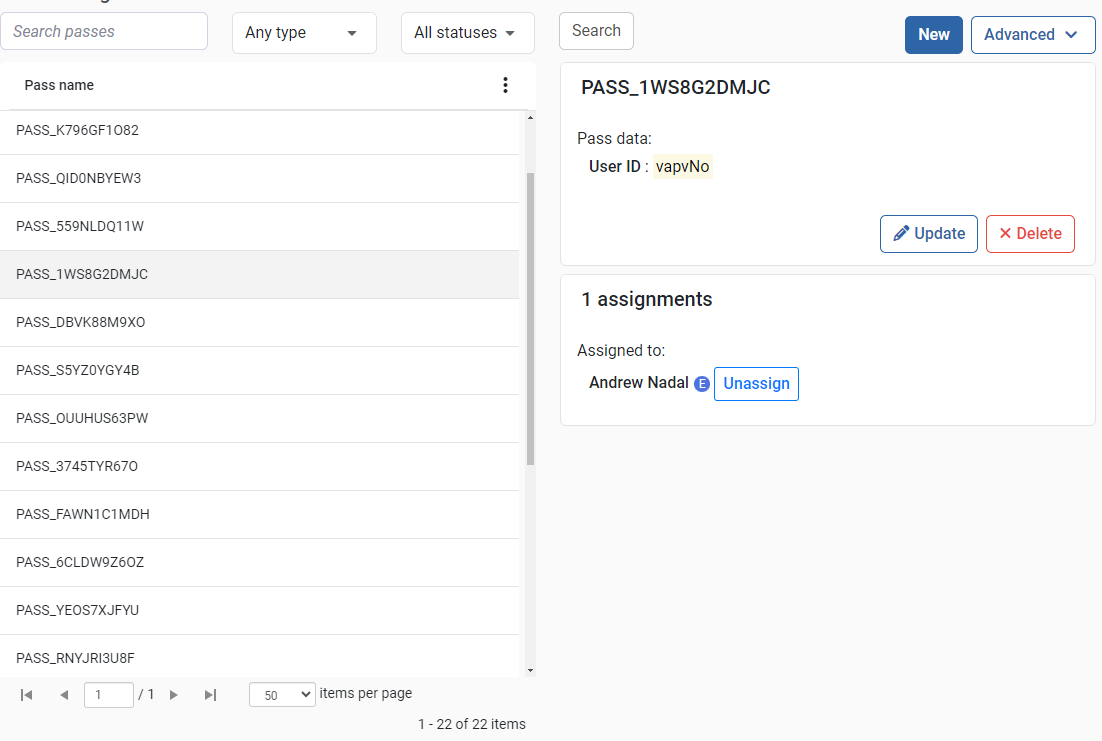
Pass is used to identify employees and visitors when biometric data is not required. Pass can be generated from either NCheck or imported from any 3rd part system. Once a pass is assigned for a employee/visitor, that can be used to record their attendance from the allowed period (If defined) or else forever.
Passes can be assigned to an employee/visitor in the following ways.
Assign a new pass to the employee/visitor
Generated pass either from NCheck or any 3rd party system.
Reuse existing pass
Once pass unassigned from employee/visitor, it is available for assign
Refer pass types section for more information about pass types NCheck support.
Passes in the setting section allows to manage all passes using the pass management view. The Pass management view is shown below.
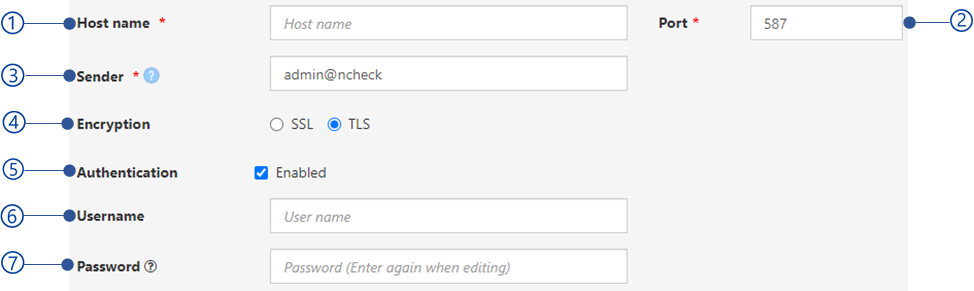
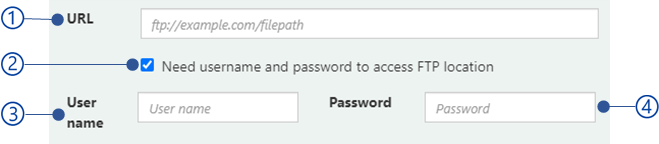
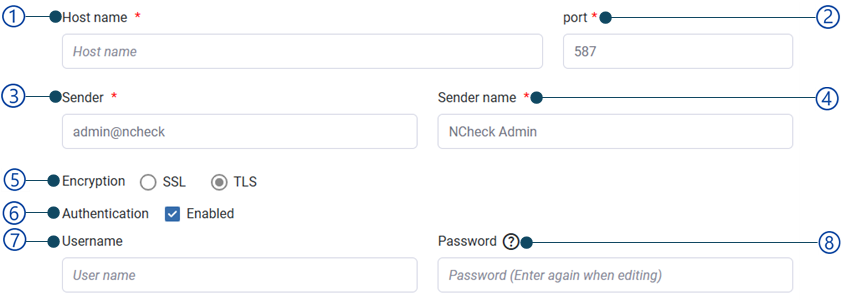
Email server can be configured with NCheck On-premises server to receive notifications such as change login details, share device registration token, schedule reports.
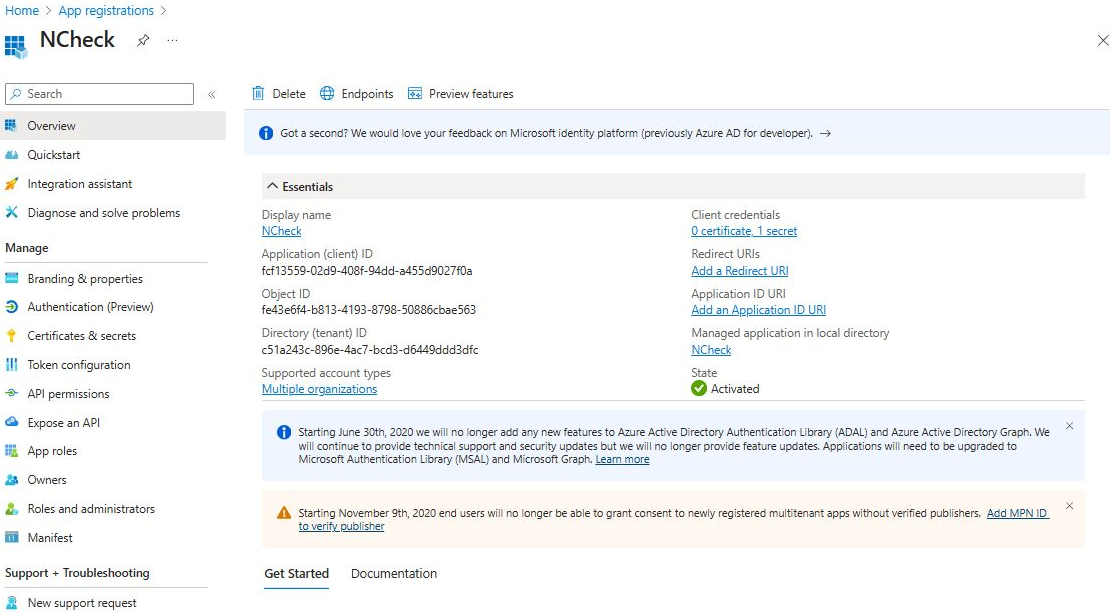
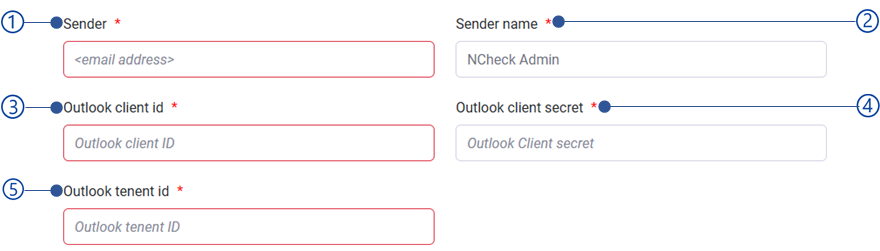
To configure outlook online as the email server on NCheck, first register NCheck application to get application credentials to send email using outlook email.
Navigate to Certificates & secrets > Client secrets > New secret, provide “NCheck secret” for description, select the secret validity period and create the secret.
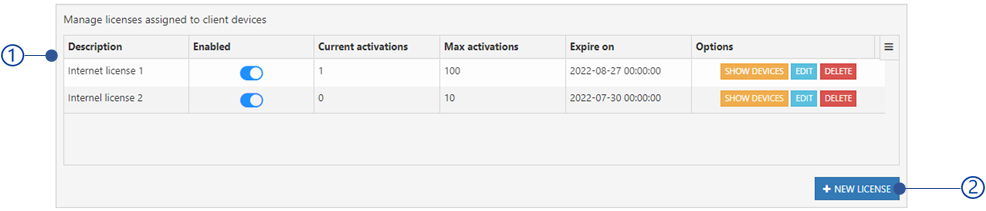
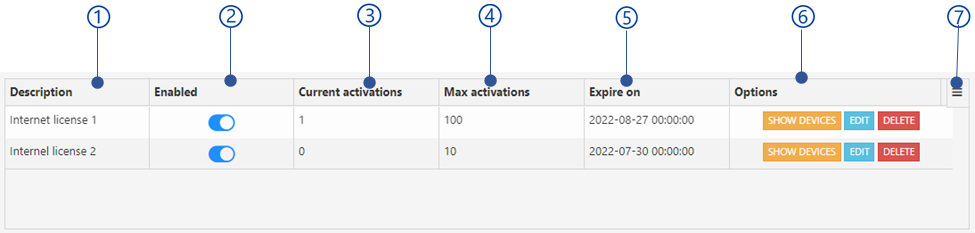
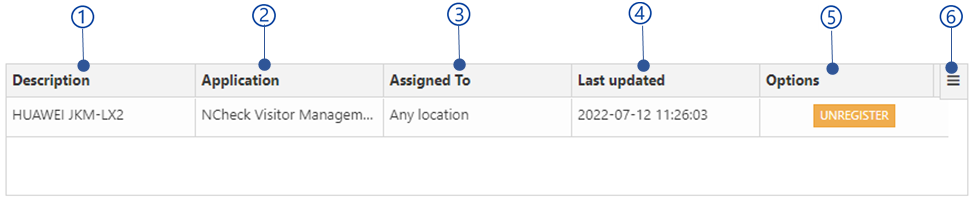
Figure 294 Assigned device table view for the license
Device description
Application type
Assigned to
Device location.
Last updated time
Options
Unregister button
Unregister device, so that the license will be released from the device.
Note
We strongly recommend deactivating serial license from the client device before unregistering from the server to make sure that the license is available for another client to activate.
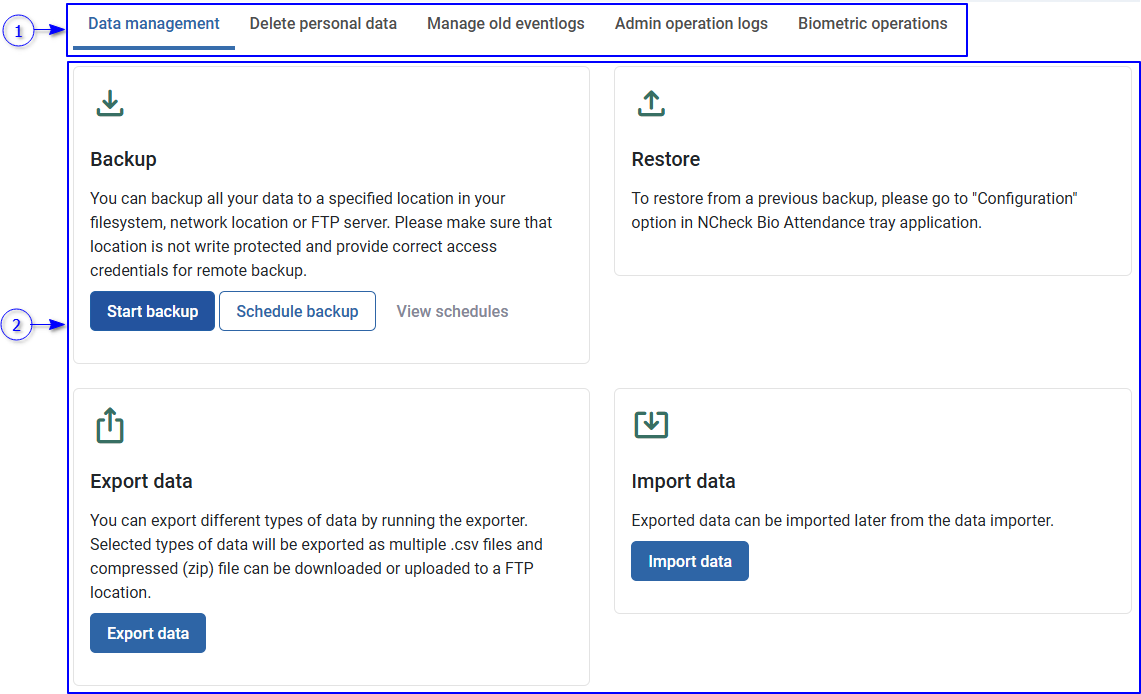
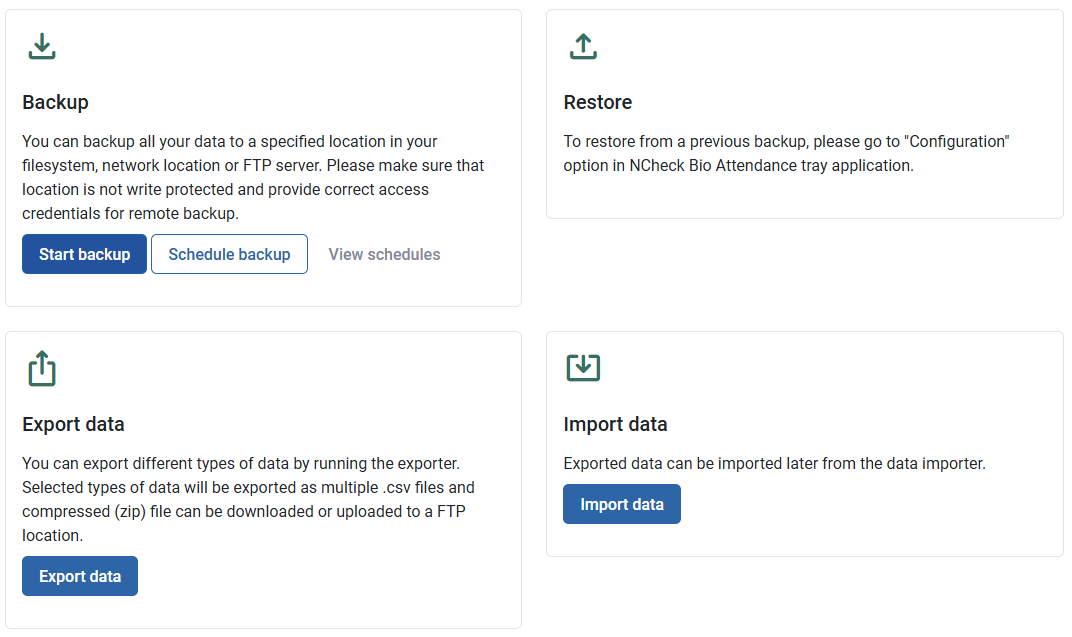
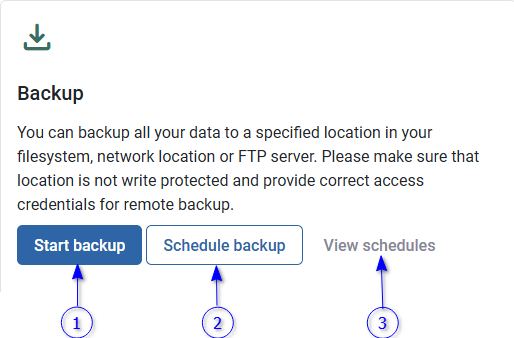
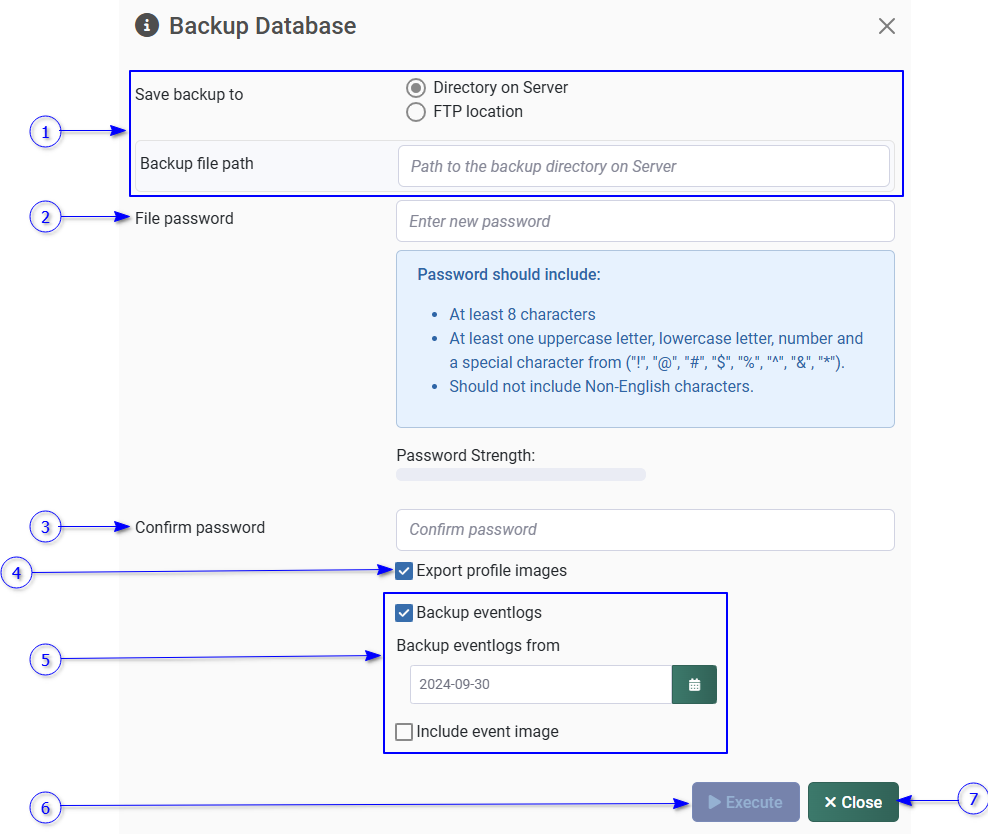
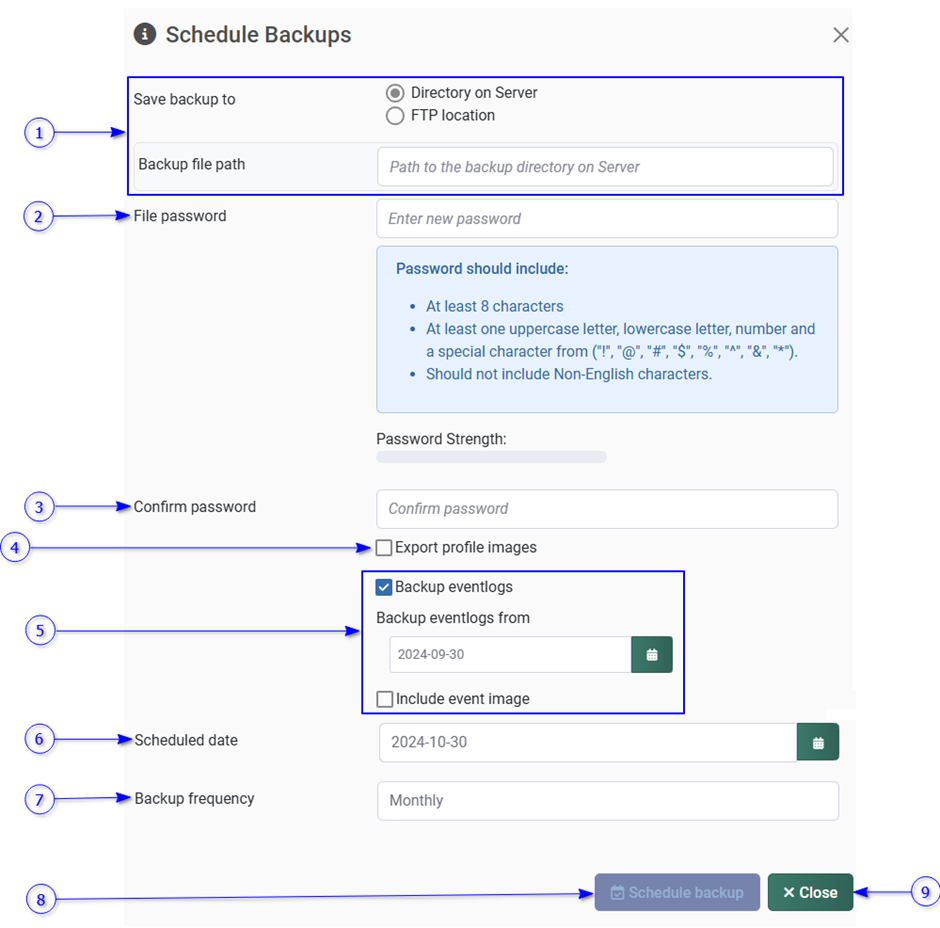
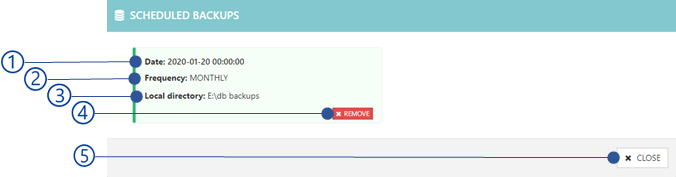
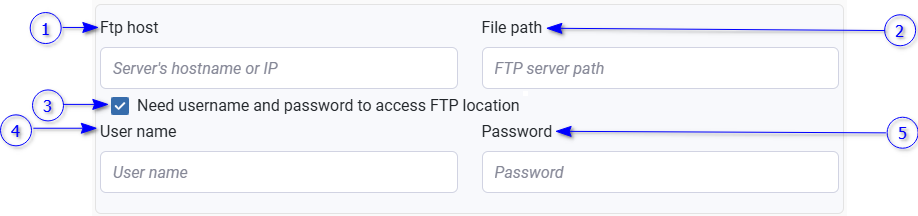
NCheck server allows the administrator to backup/schedule backup all data in the specified location securely in JSON format.
The backup file must contain following details
File name
details
AuthentcationData.json
Customer.json
Organization details as given in My Account section
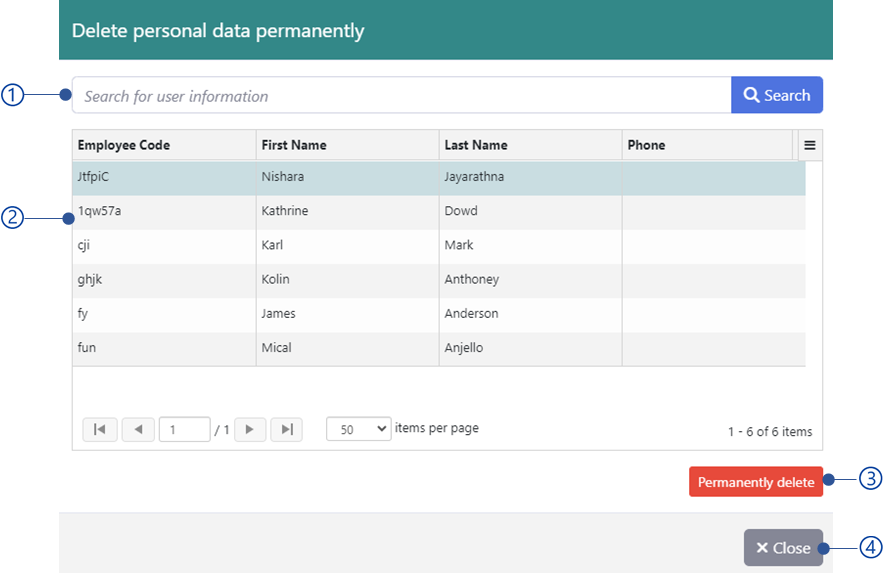
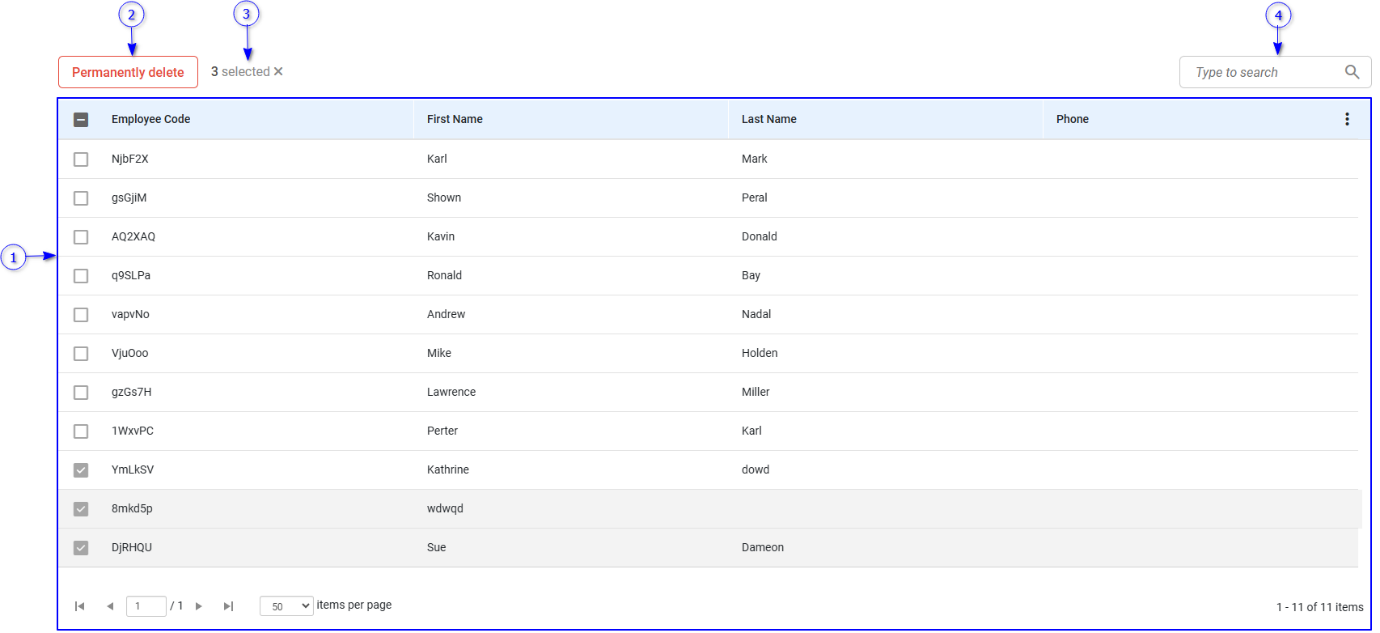
Delete a person with all related data from the system. Before deleting, this will allow to export all user data as CSV files in a password protected zip file. This export data can be used to restore deleted person again.
Delete personal data view is shown below.
A Data table showing available employees. Select employee select checkbox (As mentioned in Table content area ) to select employees to permanently deleted.
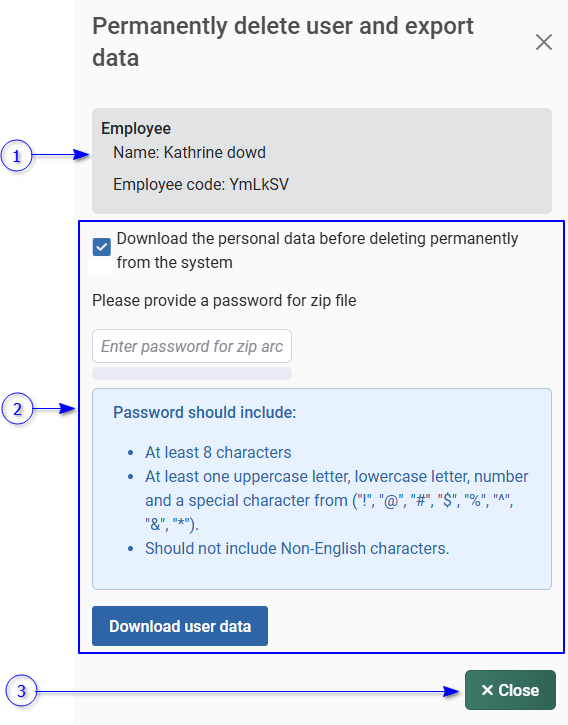
Permanently deleted user and export data dialog will be shown below if request permanently deleted for selected person.
Figure 310 Permanently delete user and export data dialog
Deleting person details
Check this option to download person details as csv files in password protected zip file. Once the data download is complete, it will ask to confirmation to delete person permanently. If data download is not required, uncheck this option and confirm to delete the person.
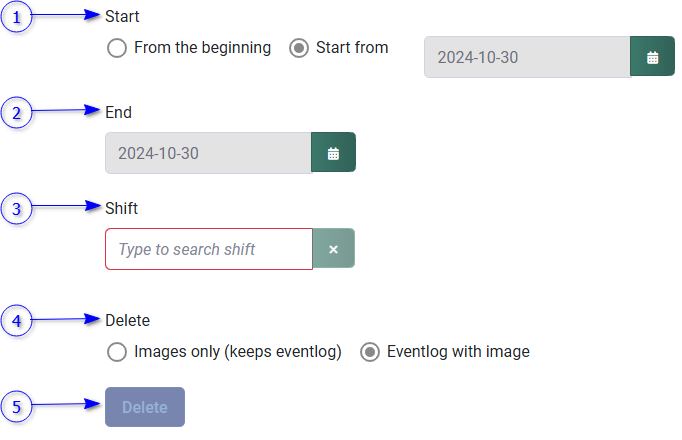
NCheck Server keeps daily event logs of each user in the database and causes the database to grow with time. The deleted old event logs feature can be used to manage unwanted event logs details in the database as follows.
Start date
The date when the event logs deletion starts. There are two options,
From the beginning
Delete event logs from the beginning of the events.
Start from
Specify the date when the event logs deletion start.
End date
The date when the event deletion stops.
Shift
Delete the event logs assigned to the specified shift.
Delete
Image only
Delete event images without deleting the event.
Event log with image
Delete both event and event image.
Delete button
Delete event logs which satisfies all filters specified.
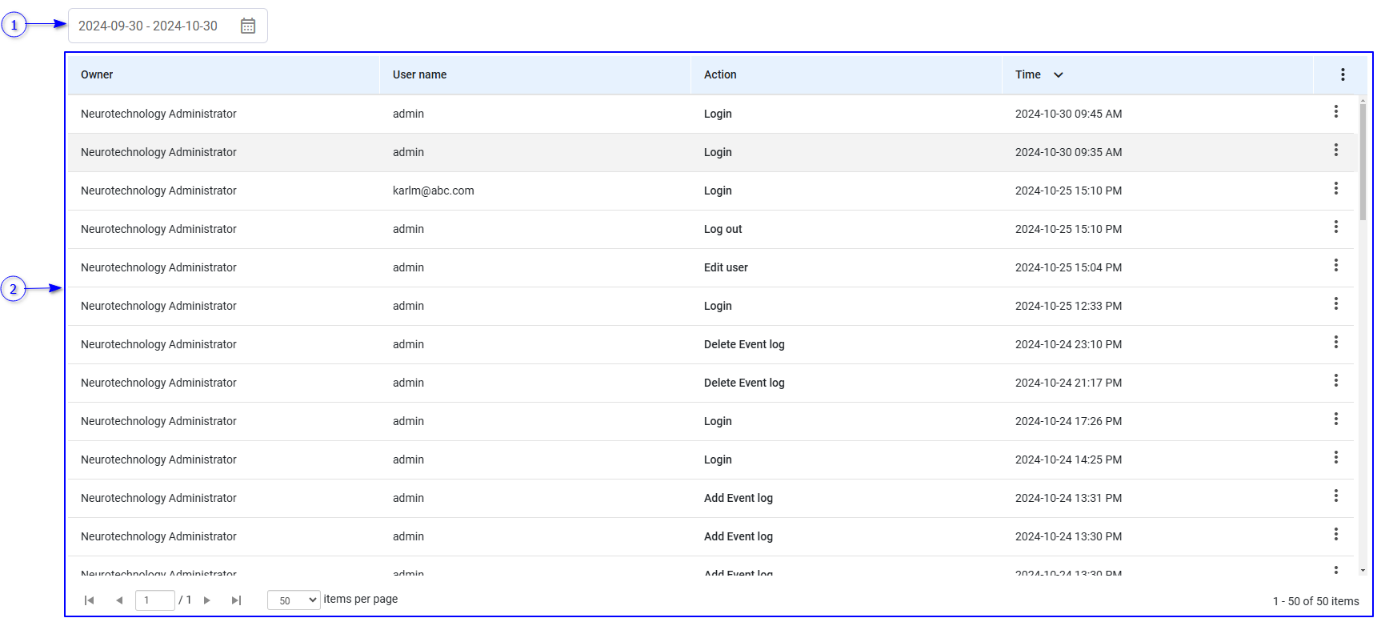
Administrator operation logs in the NCheck On-premises server control panel such as login, logout, add event logs, modify event logs, delete event logs, add person, modify person, delete person can be seen from this feature.
Admin operation logs are shown below.
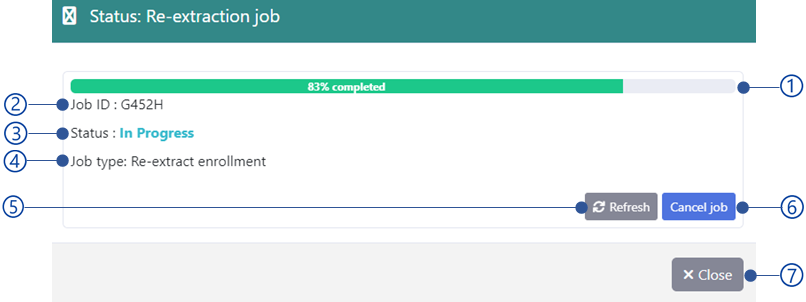
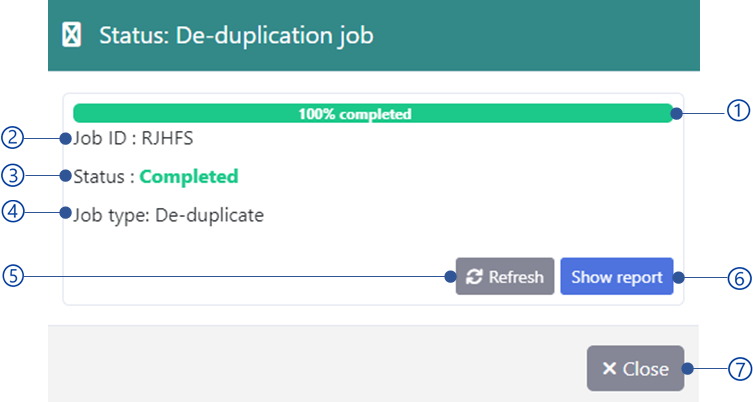
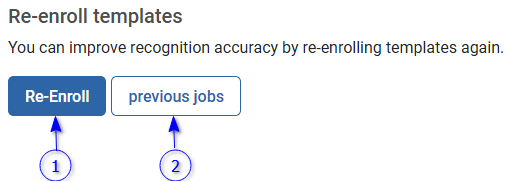
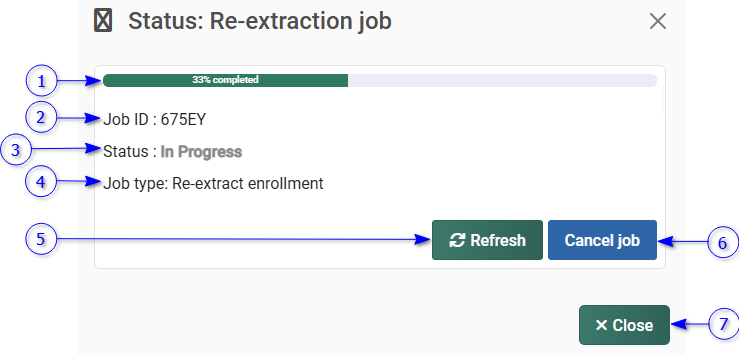
Re-extract user’s biometric templates from biometric engine and re-enroll. When installing new version of NCheck server, it may require re-enroll templates to the system. In such case NCheck team will notify to use this feature to re-enrollment. Re-enroll template view is shown below.
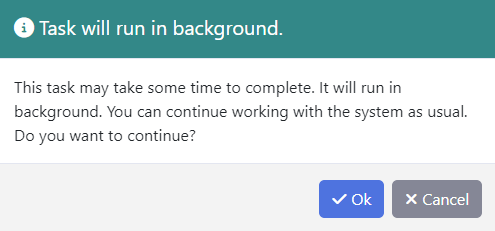
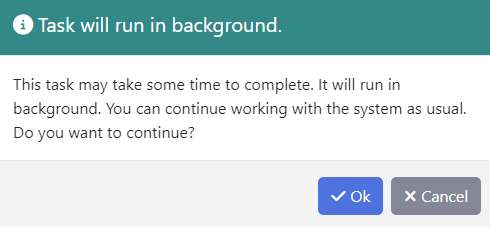
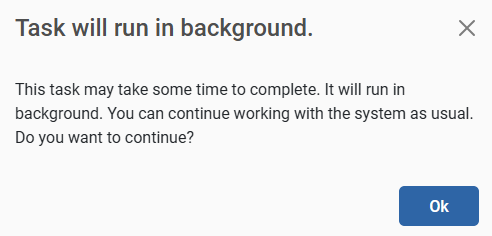
Re-enorll template is a long running task depending on the number of biometric templates templates to re-enroll. But your are allowed to work as it runs on the backround. You will be asked a confirmation dialog before proceed as shown in the Figure.
Re-enrollment job stats as in-progress, completed, failed, or cancelled.
Job type
Refresh
Cancel jobs/Show report button
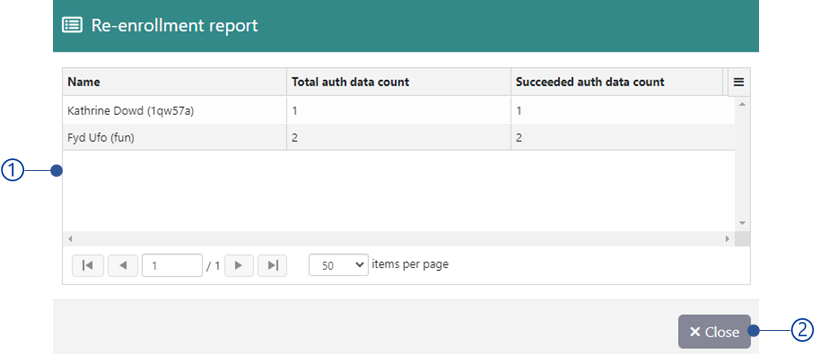
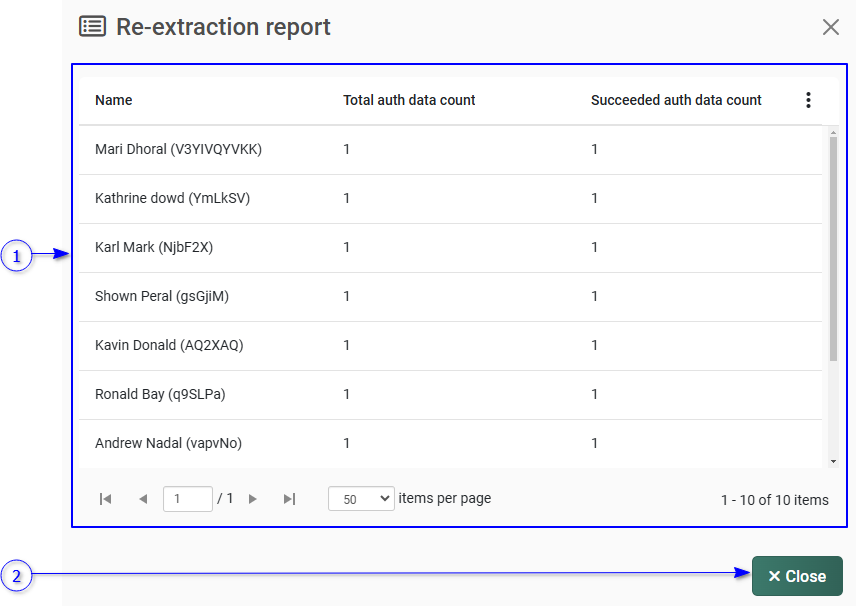
Cancel job button appears to cancel the job is in-progress. The show report button appears for a job failed, completed, or cancelled. Refer Re-enrollment report section for more details.
In large organizations, people may have similar biometric images due to the similar face, finger and iris issues in the enrolling templates such as similar biometrics for twins, lighting issues in face images, blurry images etc. This will be caused to match with the wrong person when recording attendance. This is known as false matching.
NCheck is considered a person as identified if identification score for a biometric image and person biometric data is equal or greater than Recognition threshold . If there are multiple people matching, it will show as false matching. When enrolling template, if it is finding a matching, it will report as duplicate matching. Refer Update employee/visitor biometrics for more information.
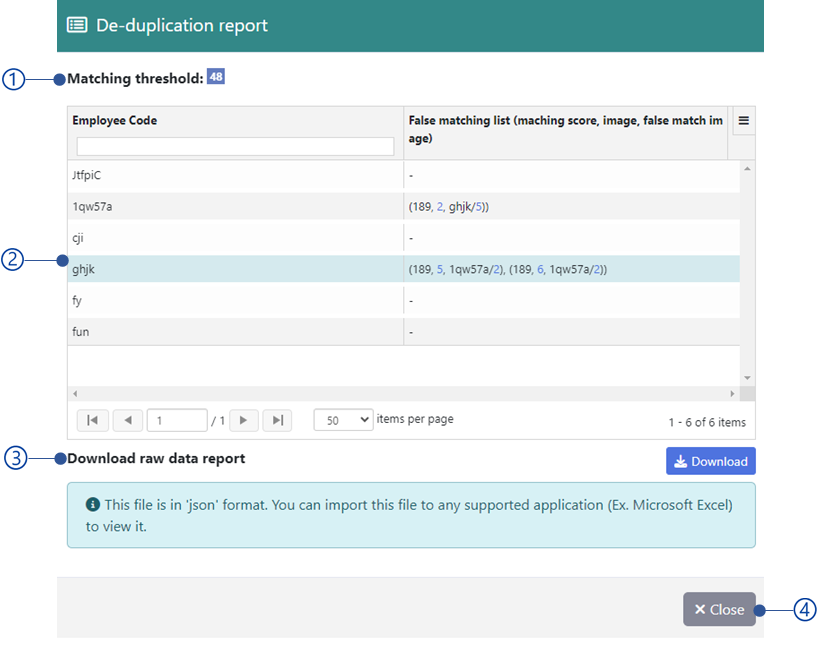
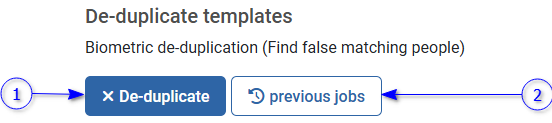
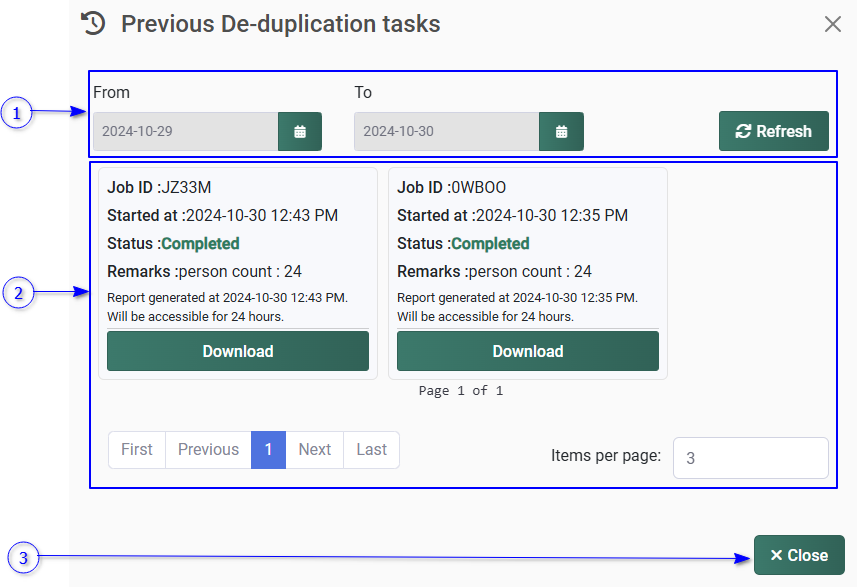
De-duplicate template option can be used to find false matching in case of someone change Recognition threshold setting from Biometric setting list . De-duplicate template view is shown below.
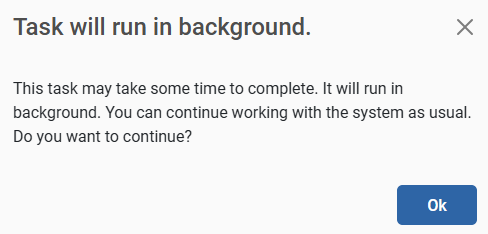
De-duplicate is a long running task depending on the number of biometric templates templates to re-enroll. But your are allowed to work as it runs on the backround. You will be asked a confirmation dialog before proceed as shown in ther figure.
Figure 323 Confirmation message prior to start de-duplicate job
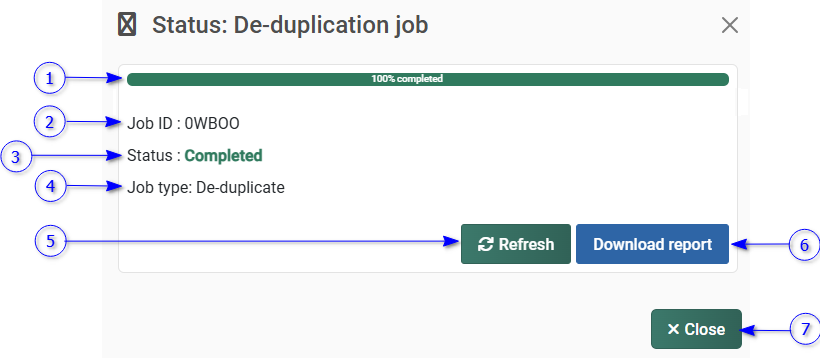
Once select the OK button from the confirmation dialog, it will show the current progress of the de-duplicate job as below.
Re-enrollment job stats as in-progress, completed, failed, or cancelled.
Job type
Refresh
Download report button
De-duplication report contains following details.
Person id
Employee code
Authentication data ID
Unique identification number for the biometric used to match.
Modality
Biometric type (face, finger, iris) of the image to be match
Matching person id
Person ID of the person that the biometric is matched with
Matching employee code
Employee code of the person that the biometric is matched with
Matching authentication data id
Authentication data id of the matching biometric
Matching modality
Matching score
The score given by the matching algorithm.
Matching threshold
The threshold should be satisfied when matching two biometric images. If the matching score is greater than the matching threshold, it is considered as matched. This threshold can be changed from Recognition threshold setting
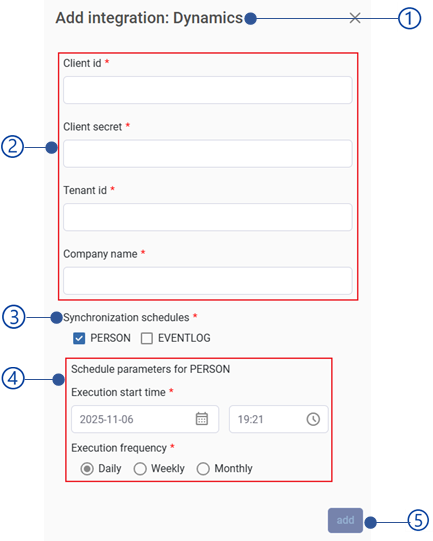
NCheck can be integrated with 3rd party systems such as payroll, ERP to synchronize employee details and attendance details. Because the employee and attendance details play major role when calculating employee workhours to calculate salaries.
Currently NCheck can be integrated with Microsoft Dynamics 365 Business Central. But other systems can also be integrated upon customer requests.
NCheck uses Apache Nifi to transform and synchronize employee and attendance data inbetweento 3rd party systems and NCheck. In Micorosft Windows OS, Apache Nifi automatically starts when the NCheck service is started and it will remain open Windows task bar as follows.
Figure 329 Apache Nifi service opening in Windows task bar
Apache Nifi service icon showing in Micorosft Windows Task bar
Note
Do not close Apache Nifi service if you require integration feature.
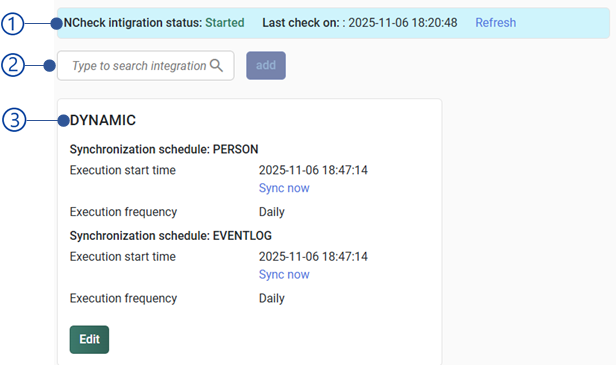
This indicates the NCheck and Apache Nifi connectivity status. If the status fails, integration will not successfully be completed.
Integration search
Type to search integration here and select add button to schedule integration to synchronize data. Refer more details about Add/edit integration schedules .
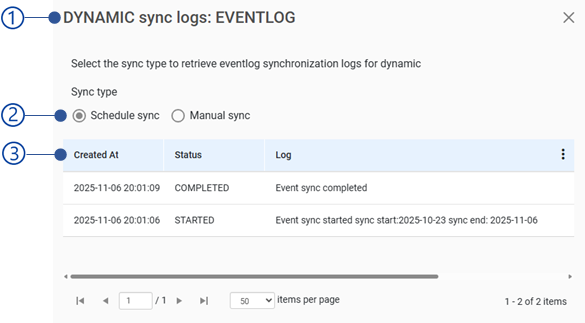
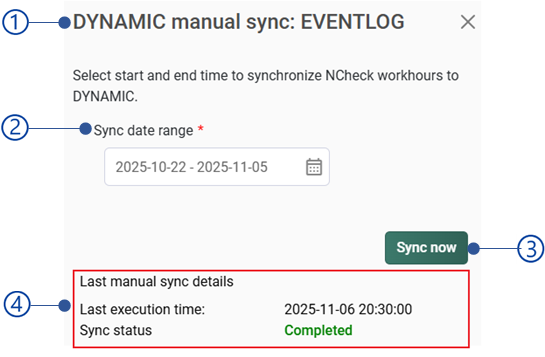
Manual synchronization features can be used to synchronize schedules whenever the synchronization is required within 14 days. Manual synchronization dialog is shown below.
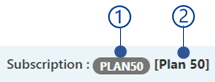
Subscription is not available on NCheck On-premises server.
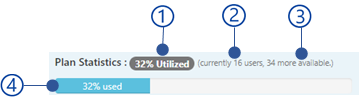
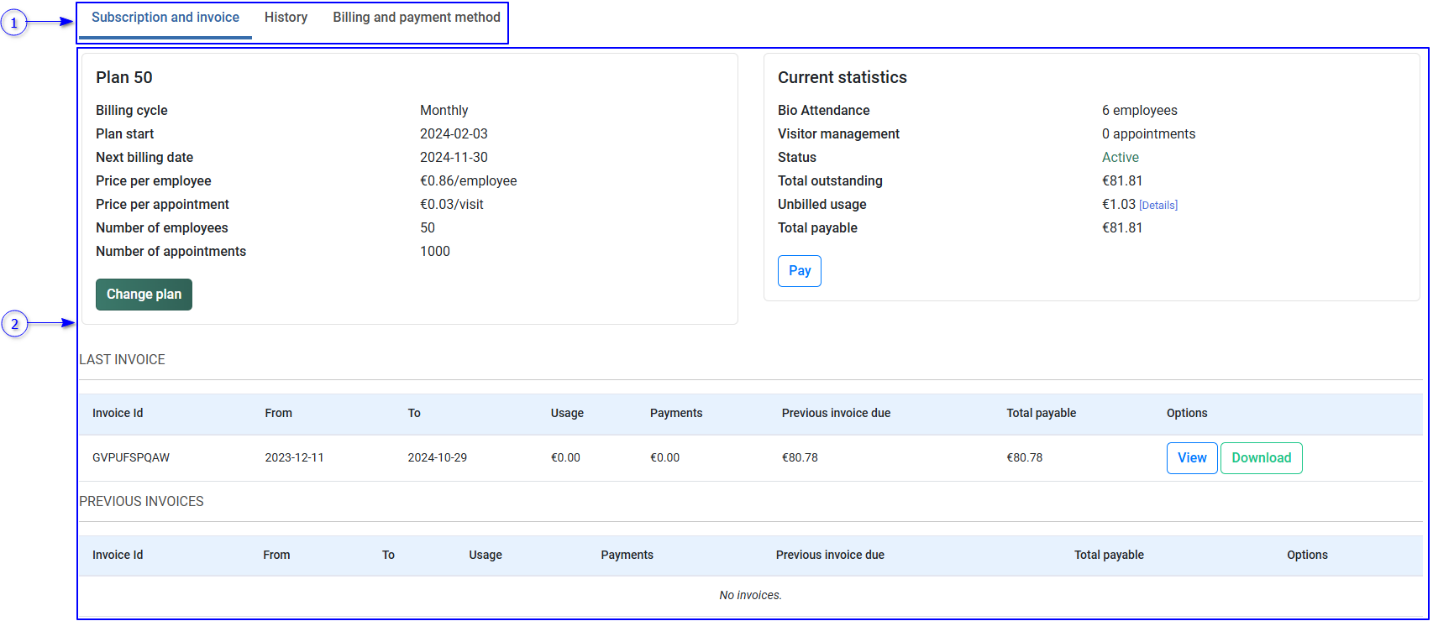
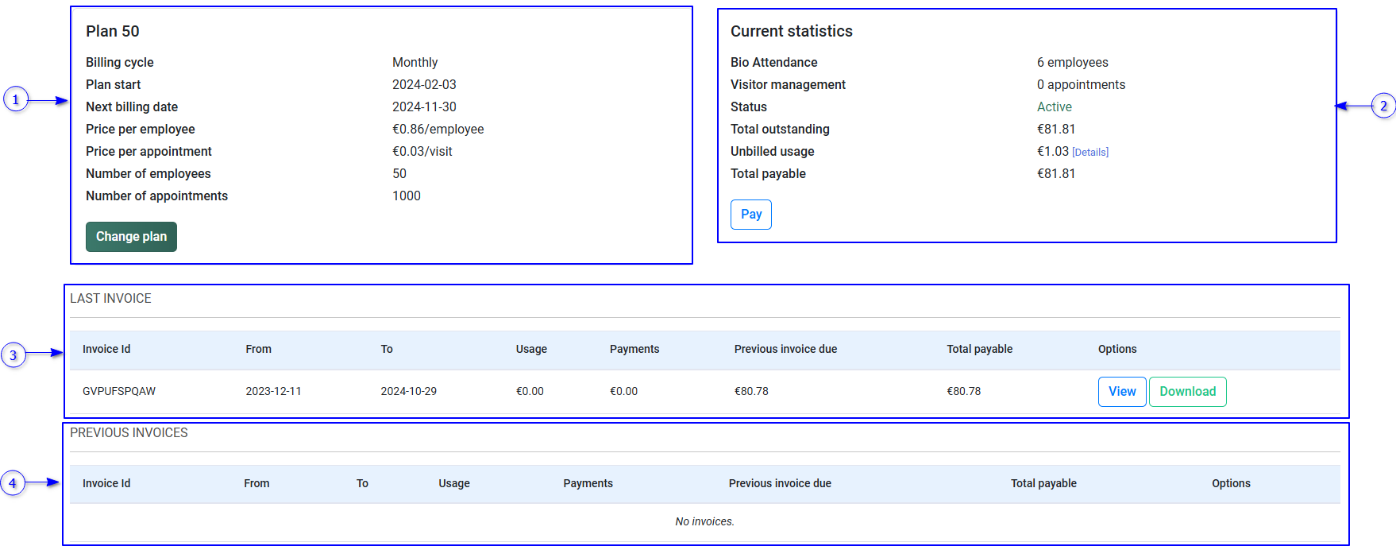
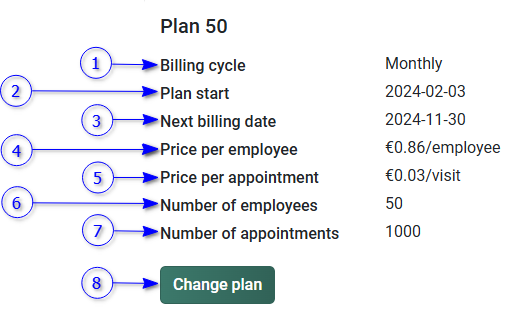
NCheck cloud subscription allows to manage account payments, plan and payment statistics. One a NCheck cloud account created; it will be assigned a free subscription plan automatically. According to the requirements, the plan can be changed to one of available as shown below.
Number of additional employees and appointments for the selected plan
Billing cycle
Billing cycle as monthly or yearly. Yeary billing cycle is offered 10% of price deduction compared to the monthly billing cycle.
Available plans
All available plans are showing in this view. There are 3 plans available. Refer Subscription plans section for more information about available plans. Refer Subscription Plan view section for more information about plan view.
If the outstanding amount is not paid before the bill date, there will be a 7-day grace period to settle the bill. If the bill is not paid before the end of the grace period, the account will be blocked.
Total outstanding
Unbilled usage
unbilled usage for the current bill cycle. Select details button to check more details as mentioned in Current usage section.
Total payable
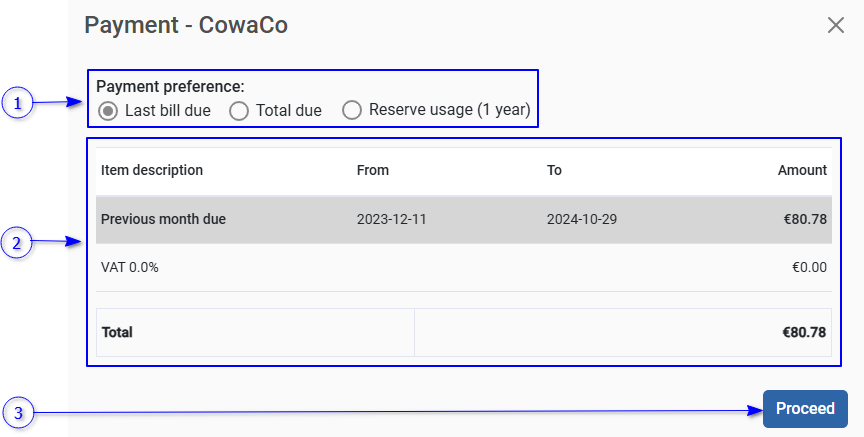
Pay button
Pay the outstanding amount. Refer Payment section for more information about payment.
Redirect to the payment gateway to complete the payment. It will redirect to the subscription page from the payment gateway once the payment is completed.
Note
Do not close the browser session after the payment completion. It will redirect back to the subscription page from the payment gateway once the payment is completed.
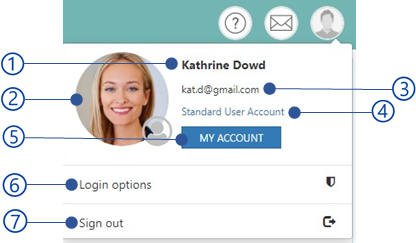
NCheck Cloud/On-premises server control panel for users allows reviewing user specific data for each user. The following operations are available for users
Update button will be disabled if the mandatory fields are empty or Validation errors exist. Table 28 is showing error messages that could be occurred on updating user details.
Leave with the leave type. The leave type, request note, and approval note will be displayed instead of the shist, start, end, worked hours and total columns.
The Total work hours report provides work hours details for a selected date range. Those details can be calculated on a daily, weekly, and monthly basis. The important parameters are,
Show time ranges in Hours format or Hours and minutes format or hours, minutes and seconds format. Report calculation strategy is not available for Event detail report of user service portal .
NCheck Admin and Attend Clients for Windows, Android and IOS can be registered to an employee, employe group or location. To register the application the registration token can be generated for the selected registration mode. Once the registration token is generated, the token will be display as follows.
The calendar view is used to represent data for dates. In either NCheck this calendar view is shown in larger screens only.
The calendar view is shown below.
Figure 387 Calendar view in event logs management
Year selection menu
Refresh button
Refresh calendar by retrieving data.
Button to navigate to previous month
Button to navigate to next month
Selected month
The selected month is showing all available dates of the month. And each date view may show specific data depending on the use case. For example, according to the figure, each date view represents number of events as well as error/valid events with colors.
Legend
Based on the data represents, this view may appear.
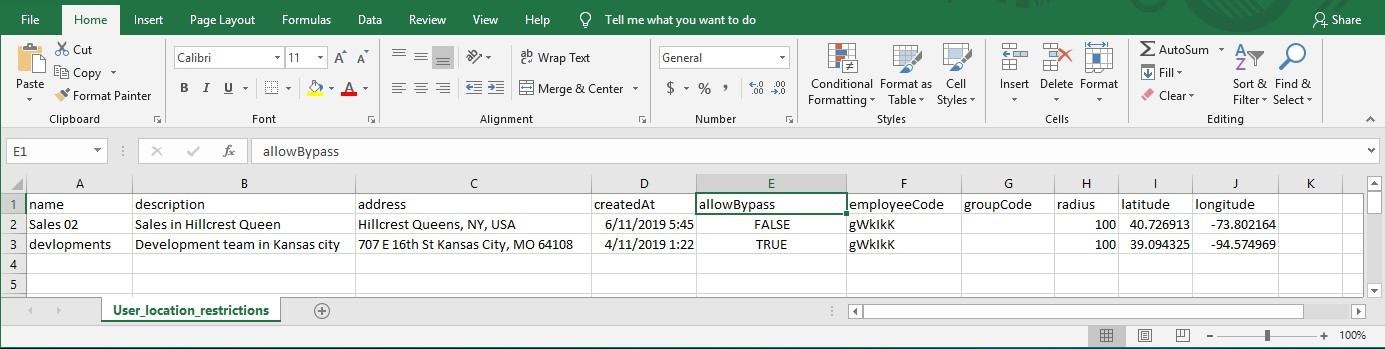
Location restrictions can be applied for selected employee/employee group in order to bound check-in/checkout events to the area.
Location restrictions view as follows,
Location restrictions table
Add new location button
Add location restriction. Refer section for more details.
Check this option to allow user to bypass the location restriction as mentioned in section
Update button
Update button will be disabled if the mandatory fields are empty or Validation errors exit. Table 30 showing error messages could be appeared when updating location restrictions.
Cancel button
Table 30 Error messages of add new location restrictions
Error code
Error message
3011
Only 5 decimal places are allowed in latitude and longitude values.
New location restrictions can be added as follows.
Add from previously added restrictions
Deleted or applied location restrictions can be chosen in this view. Selected location restriction is allowed to edit in the location restriction form.
Add from location history
Users event locations can be selected as location restriction in this view. Selected location restriction is allowed to edit in the location restriction form.
Pick location from map view. You must configure map from Location map provider setting first.
radius
Allow bypass
Check this option to allow user to bypass the location restriction as mentioned in section
Add button
Update button will be disabled if the mandatory fields are empty or Validation errors exit. Table 31 shows error messages could appear when updating location restriction
Table 31 Error messages of add new location restriction
Error code
Error message
3011
Only 5 decimal places are allowed in latitude and longitude values.
Pass is used to identify employees and visitors when biometric data is not required. Pass can be generated from either NCheck or imported from any 3rd part system. Once a pass is assigned for employee/visitor, that can be used to record their attendance from the allowed period (If defined) or else forever.
Passes can be assigned to an employee/visitor in the following ways.
Assign a new pass to the employee/visitor
Generated pass either from NCheck or any 3rd party system.
Reuse existing pass
Once pass unassigned from employee/visitor, it is available for assign.
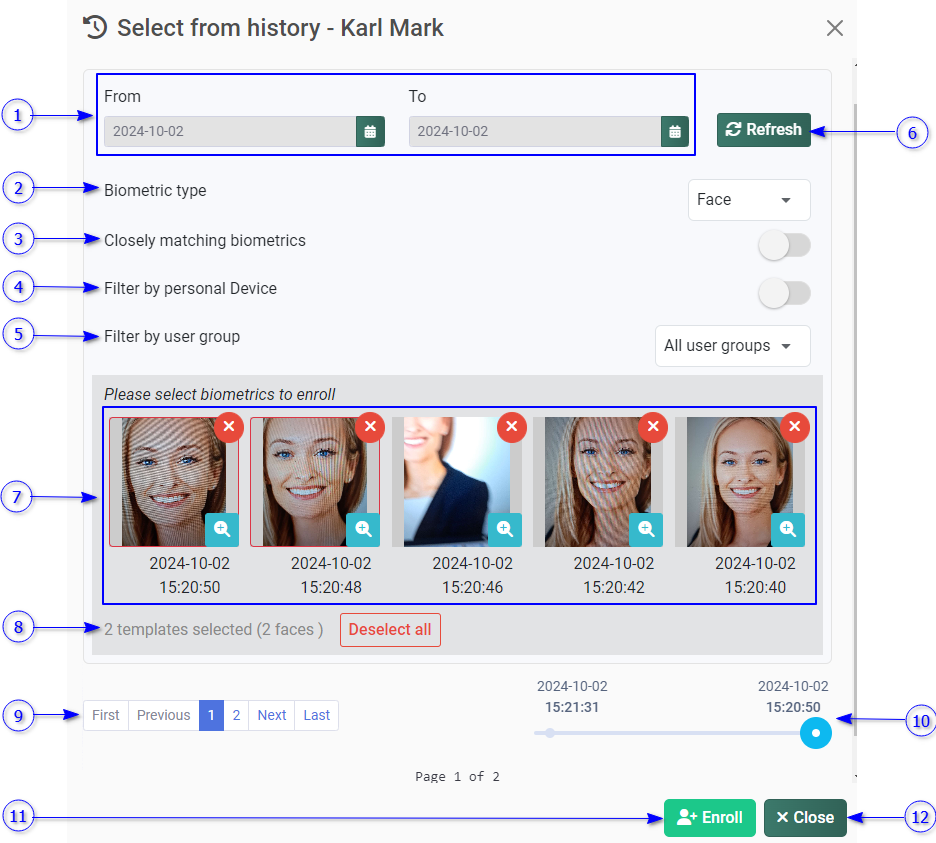
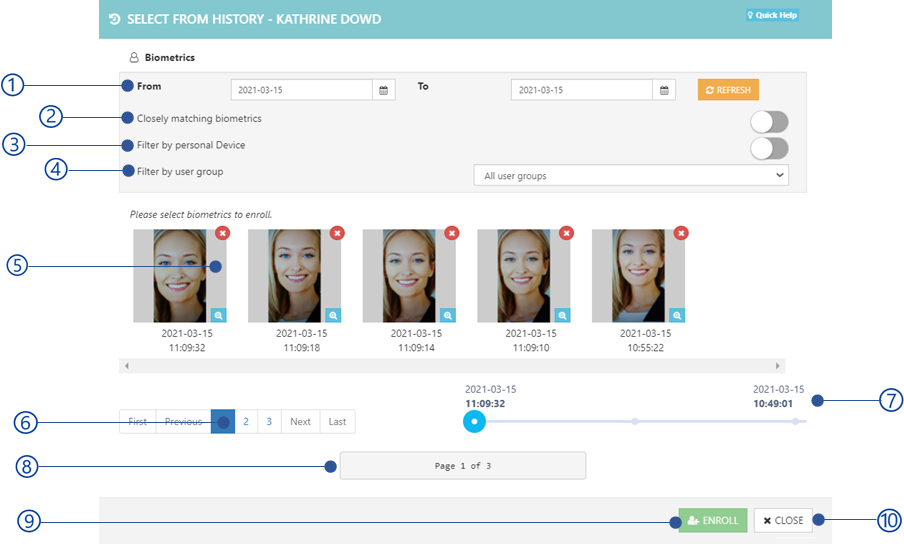
NCheck server keeps employee and visitor unidentified event data including biometrics data and id data. Unidentified biometric data can be used to enroll employees and visitors as mentioned in Enroll from history section. Unidentified id data can be used to create passes.
Assign pass data from history dialog is shown below.
Figure 393 dialog to select an unidentified event data
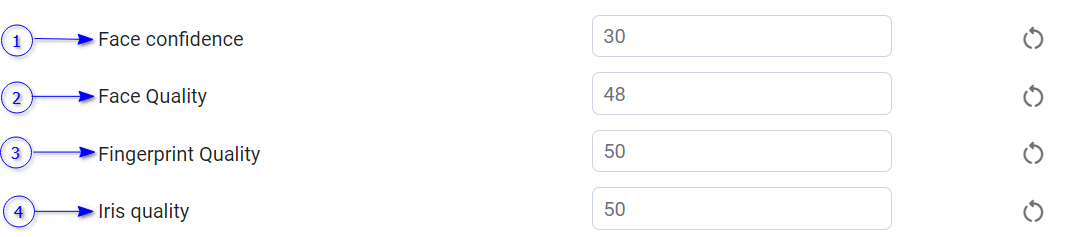
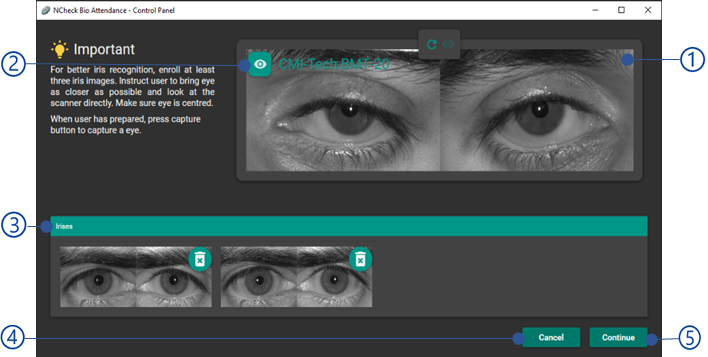
Biometric data is used to identify users when recording attendance from client applications. At least once biometric should be enrolled to identify employee or visitor from client applications. Biometric data dialog is using to manage employee and visitor biometric data,
The face, fingerprint, and iris images, unable to identify the employee/visitor while recording attendances, are kept in NCheck server. These biometric images can be used to enroll users.
In the Select from history window,
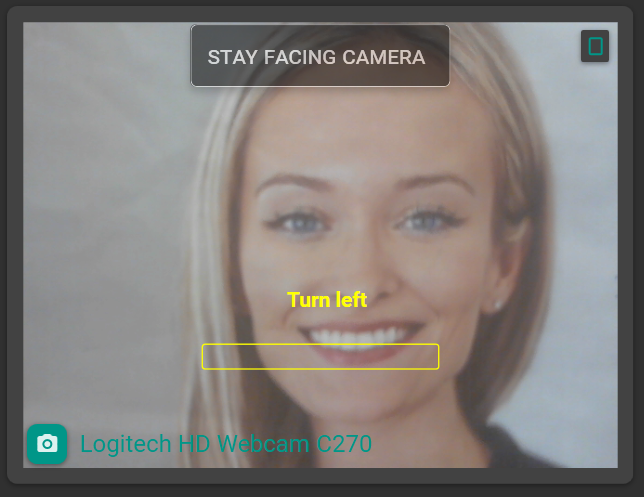
Biometrics can be enrolled through the NCheck client applications such as NCheck Attend for Windows and Android and NCheck Admin for Windows and Android. To capture
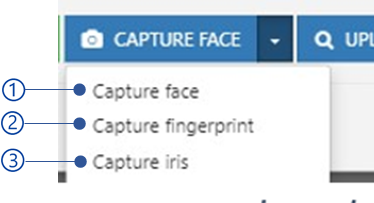
Figure 410 Menu for capture biometrics from client applications
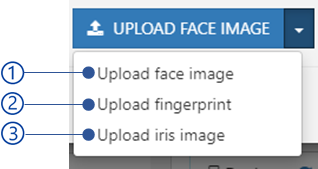
Select biometric capture type from the list
Capture face
Capture fingerprint
Capture iris
Capture the selected biometric when the capture view is appeared as mentioned in
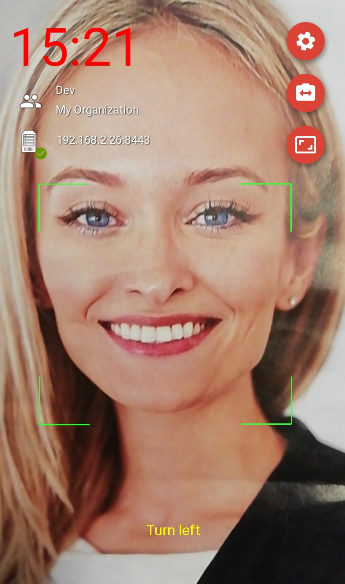
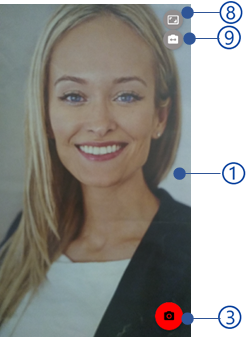
Figure 411 Windows Attend client face capture view
Android Attend client
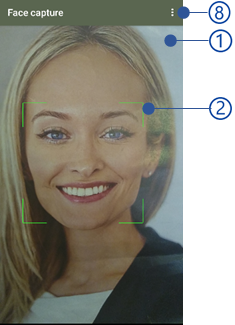
Figure 412 Android Attend client face capture view
Camera preview
Face rectangle (Admin client only)
Capture button
Select capture button to capture face image in Attend client. In Windows Admin, select the capture button when the user has prepared to capture the face.
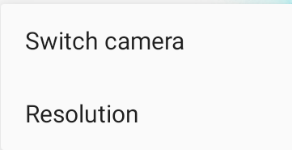
Camera name
Captured face list
Windows clients allows to capture multiple face images before upload. Android clients allow them to capture a single image before uploading.
Cancel button (Windows clients only)
Continue button
In windows clients, select continue button to upload captured face list to the server. In Android client captured image will automatically upload to the server.
Figure 413 Windows Admin client face capture view
Android Admin client
Figure 414 Menu of Android Admin client face capture view
Figure 415 Android Admin client face capture view
Camera preview
Face rectangle (Admin client only)
Capture button
Select capture button to capture face image in Attend client. In Windows Admin, select the capture button when the user has prepared to capture the face.
Camera name
Captured face list
Windows clients allows to capture multiple face images before upload. Android clients are allowed to capture a single image before uploading.
Cancel button (Windows clients only)
Continue button
In windows clients, select continue button to upload captured face list to the server. In Android client captured image will automatically upload to the server.
Menu of Android Admin client face capture view as shown in Figure 414 .
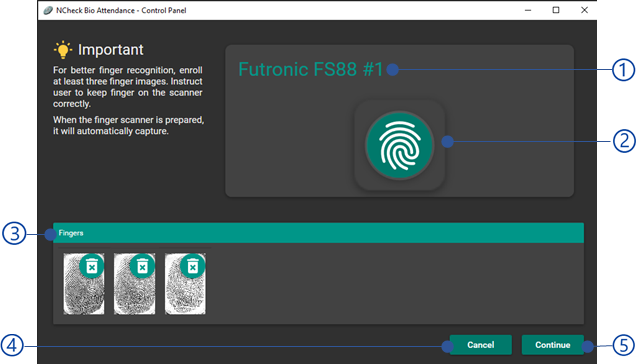
Fingerprint scanner name (Windows Admin client only)
Fingerprint scanner status
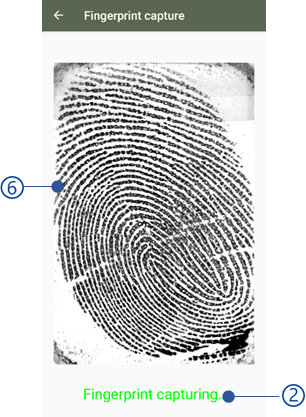
Android Admin client is Showing “Fingerprint capturing” message if the scanner is available. Otherwise “Fingerprint reader not available”
Windows Admin client is showing fingerprint icon as shown in Figure 416 if the fingerprint scanner is available. Otherwise “Unable to detect the fingerprint scanner. Please verify the finger scanner is connected and functioning correctly.”.
Captured fingerprint images list
Windows Admin client allows to capture multiple fingerprint images. Android Admin client allows to capture only single fingerprint image before uploading.
Cancel button (Windows client only)
Continue button
In Windows Admin client, select continue button to upload captured fingerprint images. Android Admin client will upload the fingerprint image automatically once it captured successfully.
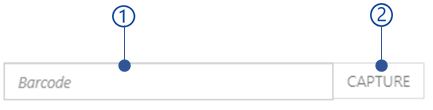
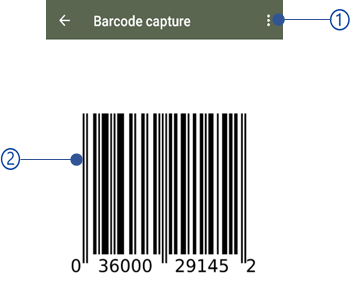
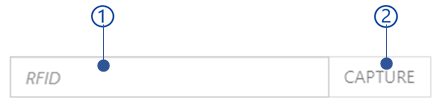
NCheck control panel provides a feature to capture id data such as barcode and RFID when launching control panel from the client application.
Client application provides the following capturing methods.
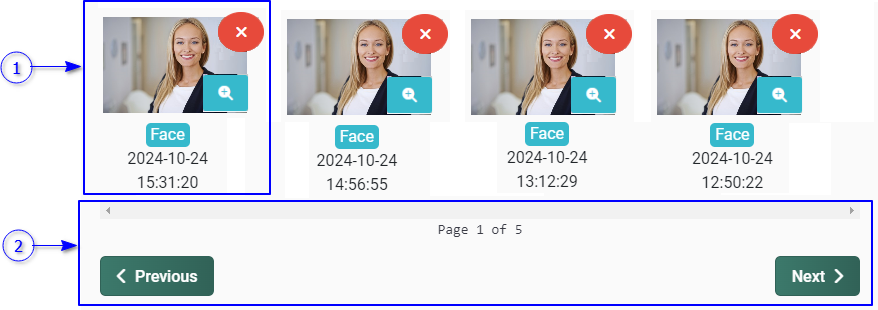
Face images failed to identify users when recording the attendances are known as unidentified images. Users can select the user profile image from these unidentified images.
Figure 426 Select profile picture form unidentified image view
Date filter
Retrieve unidentified images between selected date range
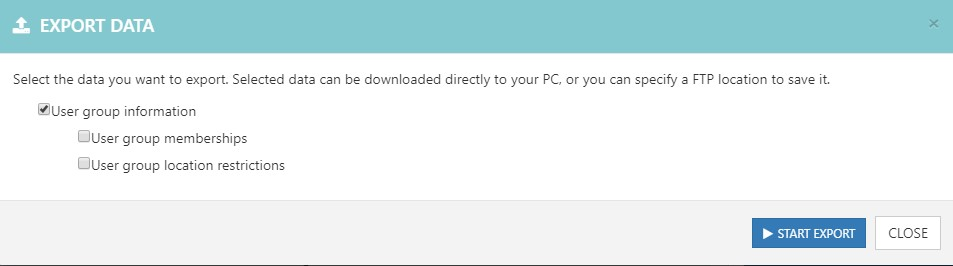
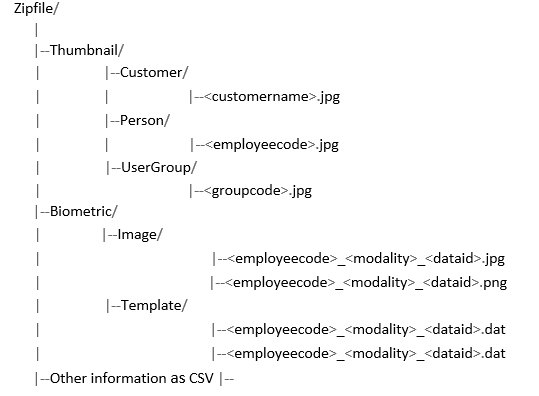
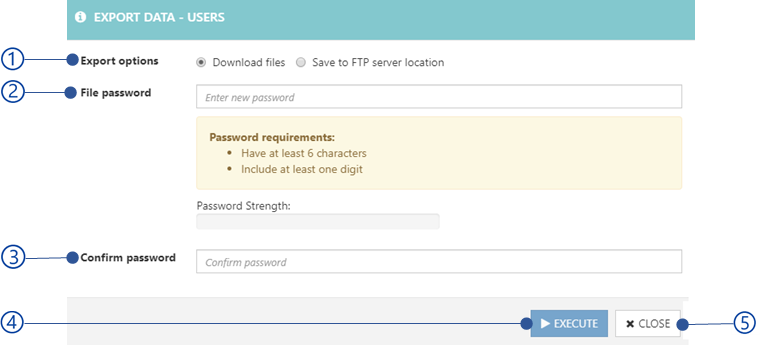
NCheck user information can be exported as a zip file with selected information. The zip file hierarchy as showing in Figure 427 . User biometric data is not allowed to export
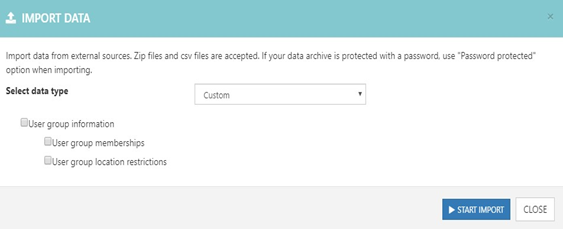
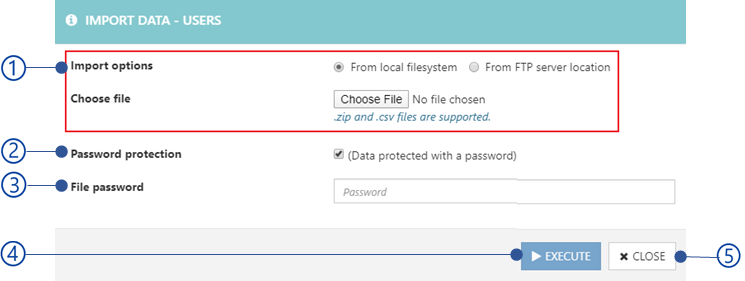
NCheck allows to import all user information as zip file in the hierarchy as shown in Figure 427 . In addition to that it can import user information in CSV files.
Note
All exporting information is encrypted using AES 256 encryption method with given password to enhance the security of the exported information. Windows default zip extractor is not supporting to extract exported zip file. You must use third party tool which supports AES 256 encryption method to extract exported zip file.
Figure 427 Import/Export zip file folder hierarchy
Note
Thumbnail and biometric cannot be exported.
Modality
Face
Finger
Iris
Data-id
Unique ID to add multiple biometric data in single modality
The following restrictions/limitations have been applied to import export data
Folders and images should follow the exact naming convention.
There can be only one image for customer profile in path ‘Thumbnail/Customer/’.
For each person, there can be only one profile image in path ‘Thumbnail/Person/’.
For each user group, there can be only one profile image in path ‘Thumbnail/UserGroup/’.
Customer profile image should contain the customer’s name, and each person or group profile image should contain the relevant employee code or group code.
Biometric images should be included in the path ‘Biometric/Image’ and templates should be included in the path ‘Biometric/Template’.
Biometric image/template file name should be in ‘<employeecode>_<modality>_<dataid>’ format.
Images can be in jpg or png format. Providing the extension is not mandatory.
Other import data files (CSV files) can also be included in the same zip file. All date time should be MM/dd/yyyy h:mm: ss a format and date format should be MM/dd/yyyy format.
File naming conventions is mandatory when importing files.
User thumbnails can be imported as jpg, png format in a zip file according to the file structure as shown in Import and Export information section. Unlike other information administrators feel free to import all user thumbnails with any other file import.
Select this check box to enter the password if the file is encrypted.
File password
Enter the encrypted password
Execute button
Execute button will be disabled if the mandatory fields are empty or Validation errors exist. Table 43 is showing error messages that could appear when import files.
Encrypted files cannot be opened via Microsoft Windows default extractor. You may use any third-party software which supports encrypted files extraction.
The password must have at least 6 character and one digit/
Confirm password
Execute button
Execute button will be disabled if the mandatory fields are empty or Validation errors exist. Table 44 is showing the error message that could appear on import files.
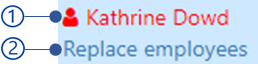
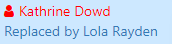
Depending on the organization requirement such as handling the work load manage absentees, additional employee(s) can be added to a specific roster item as mentioned in Add/edit schedule item section. This parameter shows the number of additional user(s)/employee(s) replaced for the user/employee in such cases.
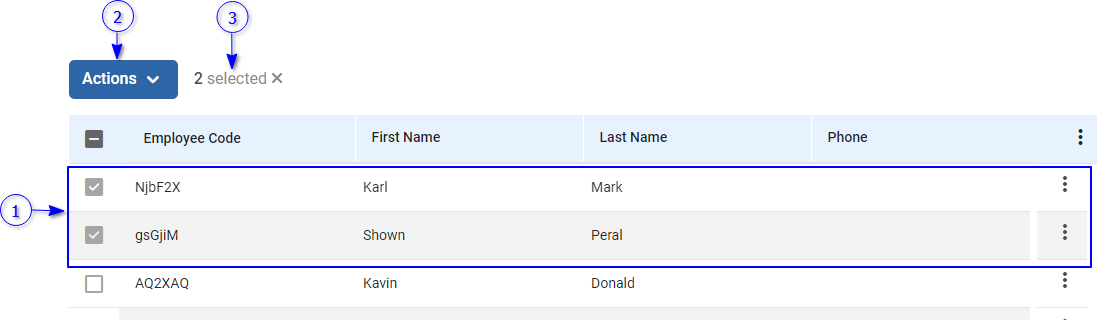
Check/uncheck to select/deselect all data rows in the content area.
Sorting icon
Click on each column name to sort column data. The sorting icon appears next to the column name according to the currently applied sorting as shown in Table 45 .
Checkbox to select/de select record.
This allows to select multiple rows from the table and perform available actions for selected rows as mentioned in Actions view section.
The main advantage of using a data table is retrieving data page by page to reduce the data retrieval time when there is large amount of data. Table paging options allow you to navigate between pages.
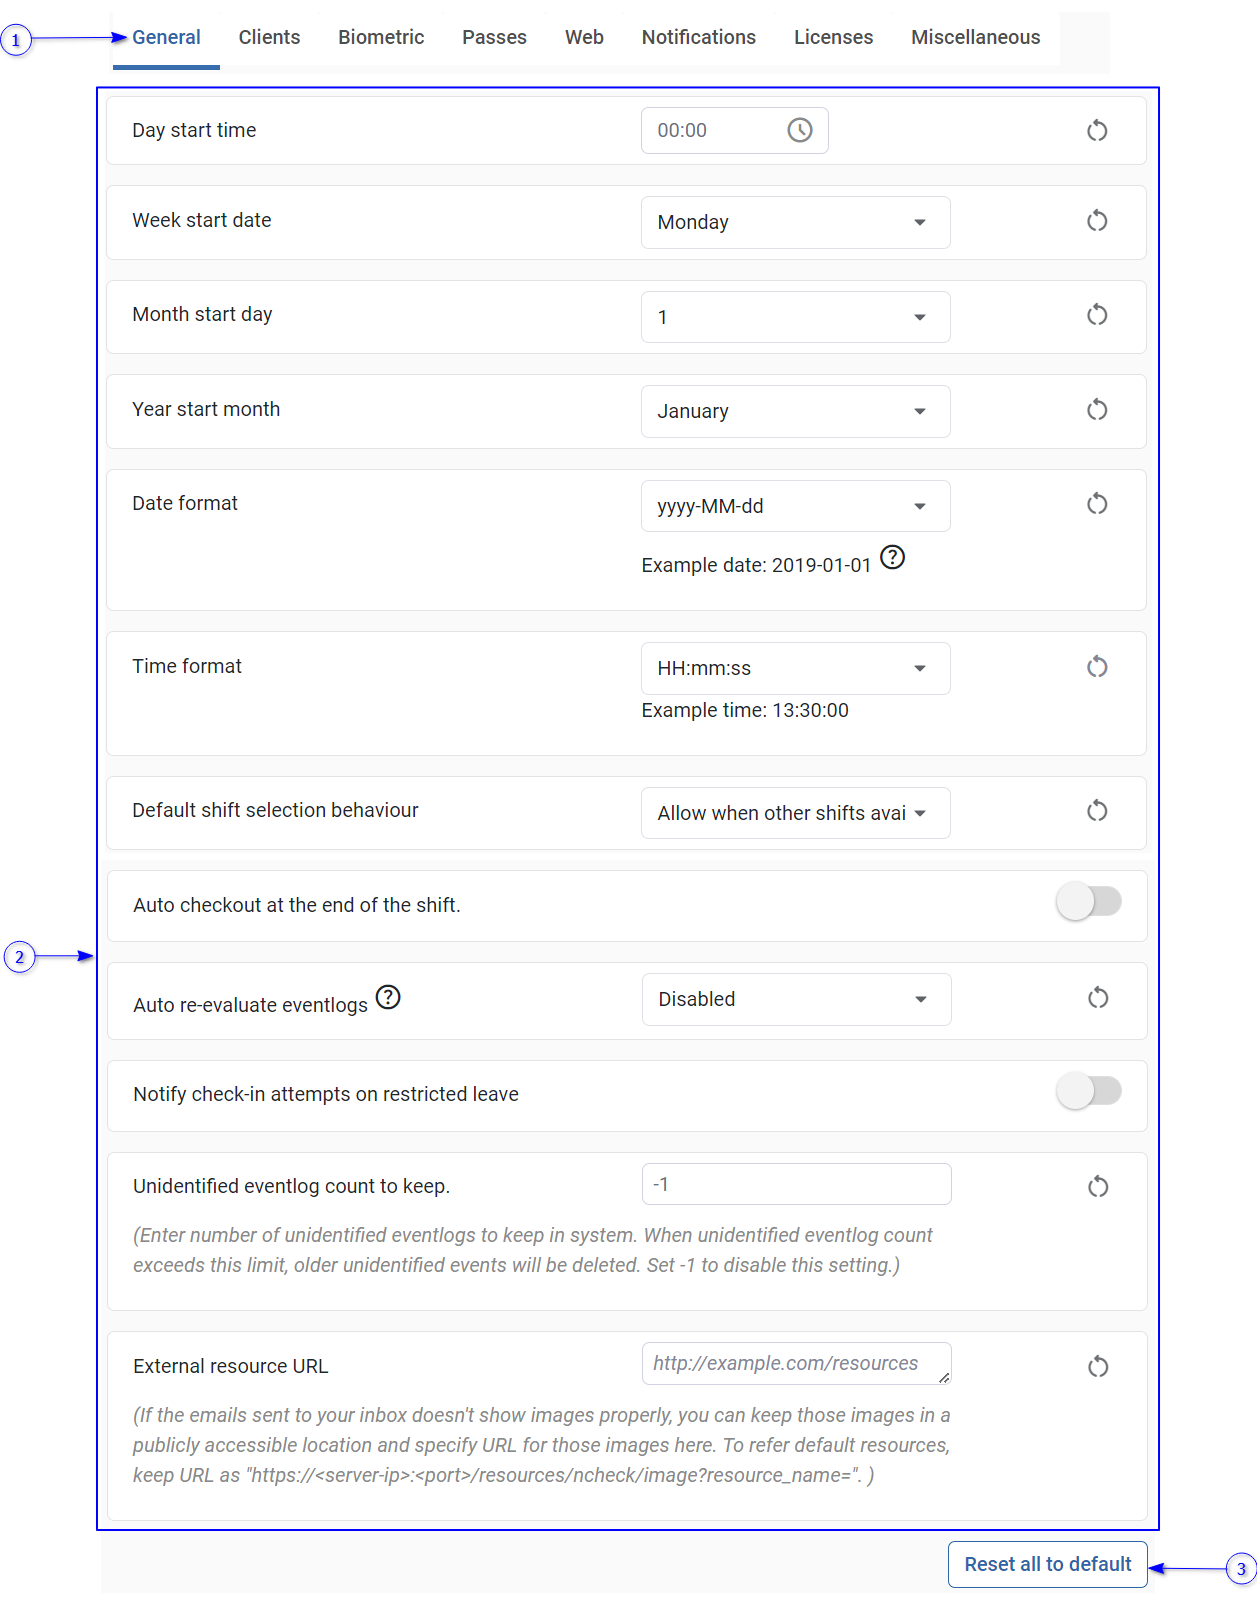
Number of hours restrict check-ins before shift start. The default value is Minimum (Default shift end -24 hours, Default shift starts). Check-in start hours could be between shift start and (Default shift start -24 hours).
Check-in end
Number of hours restrict check-in after default shift start. The default value is default shift end. Check-in end could be between the default shift end and 7 days.
Number of hours restrict check-out before the shift end. The default value equals to shift start. Check-out start restriction could be a value between (shift start. - 24 hours) and 7 days.
Check-out end
Number of hours restrict check-out after the shift end. The default value is minimum (shift start + 24 hours, shift end). The check-out end restriction could be a value between 0 hours and 7 days.
The order of the checkin checkout events for people is very important because it has significant impact on reporting. The order might be changed due to several reasons.
User record check-in but forget to record checkout
User record check-in and check out several client devices at the same time. when clients synchronize eventlogs, the order might be changed
To prevent this problem, auto evaluate eventlogs will automatically check eventlogs for each person add events at the end of the checkout, end of the current shift as following options.
Disabled
The existing event will be kept as it is.
Re-order check-in check-out pairs
Add check-out event for each check-in event at the checkout end of the current shift.
First check-in and last check-out
Change first event as check-in and last event as check-out in the current shift. The rest of the event in between first check-in and last check-out will be access events.
When this setting is applied, the administrator gets email or control panel notification if a user who is on restricted (leave policy) leave tries to check-in.
The number of maximum unidentified events logs to keep in the system. Older event logs will be deleted if the maximum event log count is exceeded. Set -1 to disable this setting.
NCheck server keeps event log image (The face, finger or iris biometric image that captured from the client devices to record user attendance events) with the event log and this may require space when the number of event logs increases with the time. To overcome this issue, you can delete old event log images and keep only the event thumbnail specifying the number of months.
In NCheck on-premises server, If the email sent to your inbox does not show images properly. You can keep those images in a publicly accessible location and specify URL for those images here. To refer default resource as “https://<server ip>:<port>/resources/ncheck.image?resource_name”.
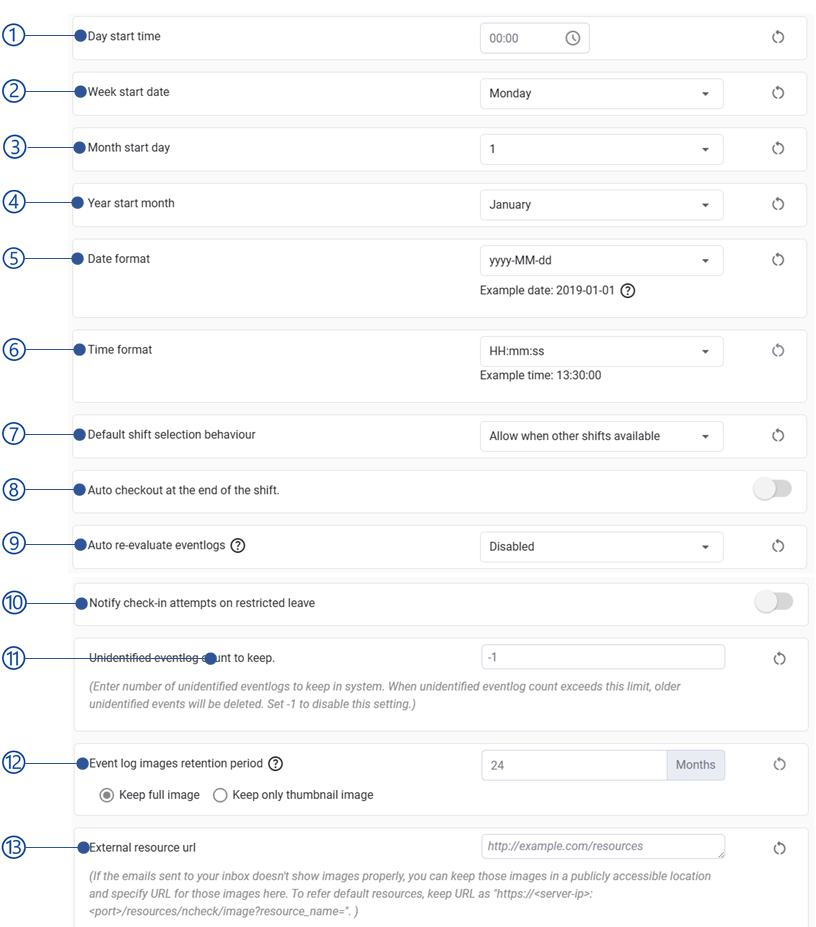
In NCheck cloud, enable this setting to activate Admin clients with the cloud subscription if there are available licenses as mentioned in License statics section of the Subscription.
Enabling this setting, user able to manually record the event (Admin clients) or record the event as either check-in or check-out.
Following capture start modes can be selected once the manual capture start enabled.
Check-in check-out selection
Once this setting has selected, user able to manually select the event type as check-in or check-out.
Select start button
Admin clients capture face automatically once the face is detected. Enable this setting to capture button to capture manually.
Synchronize the offline data automatically with the NCheck server when enable offline mode setting is enabled. This setting has been enabled by default.
Size of the biometric image when recording attendance. The biometric image is sent to the NCheck server for user identification. Time took to record attendance can be dependent on the size of the image. According to the selected size, image will be compressed without changing the aspect ratio. Default image size is Medium.
The available image sizes are
Attend and Admin clients registered to employee groups are used by the employees/visitors to record their attendances. It’s better to hide options because any employee/visitor can take control. In this case, if the device is in Kiosk mode, it hides a lot of features from the device to prevent ordinary employees and visitors success from it.
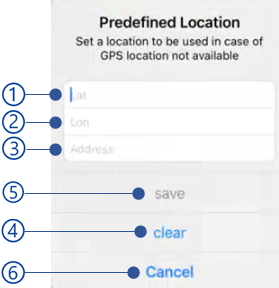
This setting is used to configure the location source for the Android and IOS Attend clients that need to be used when recording attendance events.
The available location options are.
Always use GPS
The location coordinate will be retrieved from the GPS facility available with the device.
Prefer GPS over predefined
If the GPS facility available, GPS coordinates will be used. Otherwise, predefined location will be used as preference of Android and IOS Attend clients.
Always use predefined
The location coordinates will be taken from the predefined location.
The predefined location view will appear as follows either prefer GPS over predefined or always use predefined is selected.
If this setting is enabled, NCheck Attend for Android registered for a user allows to enroll face template during attendance recording if no template has enrolled for a user. Refer Enroll biometrics section for more details.
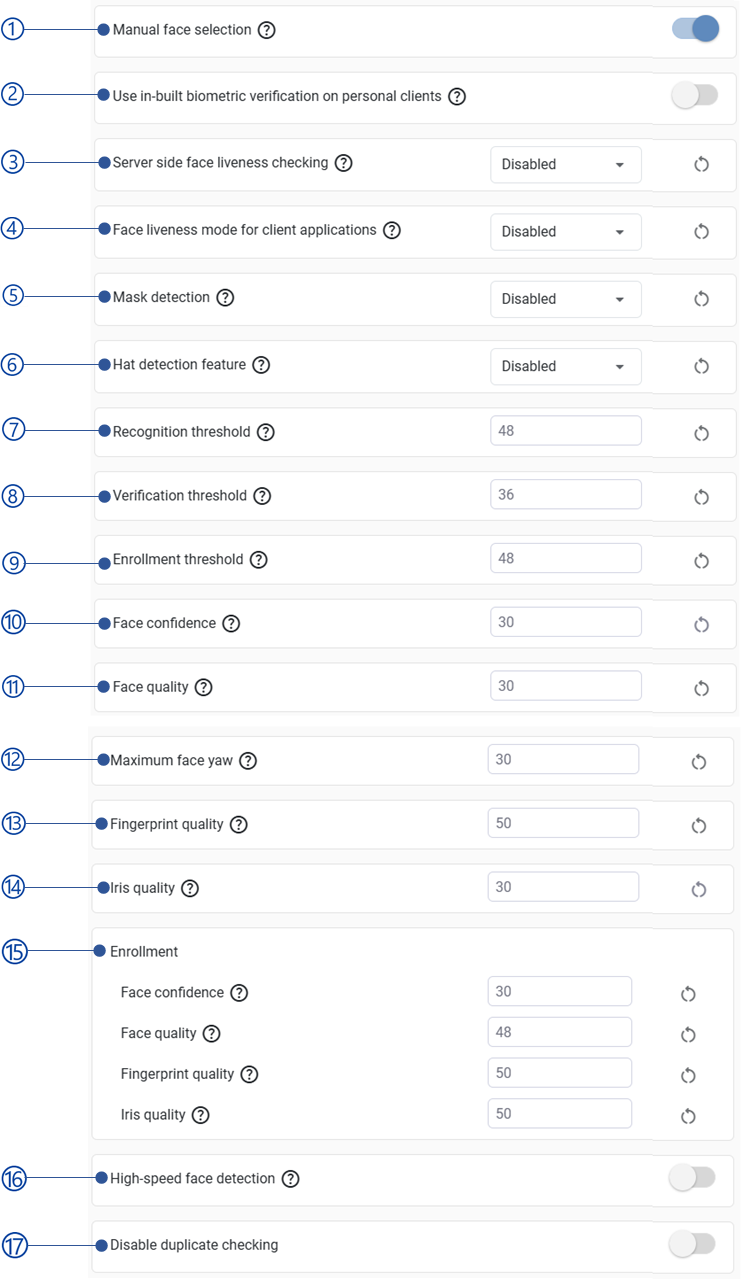
Use in-built biometric verification on personal clients
If this setting is enabled, attendance events can be recorded in Android and IOS Attend clients using the authentication utilities available with the device.
Available verification features are as follows for the devices.
Android
Either Finger or face authentication must be available with the Android device.
IOS
Finger ID or Touch ID features must be available with the IOS device.
To enable guard application support, this setting must be enabled first. Otherwise, Guard application registration and other functionalities will be restricted.
The cancel button in the client feedback view allows to cancel the event after recording. If this setting is disabled, cancel button will not be visible in the clients.
This feature allows user attendance from NCheck Attend clients simply selecting a button as mentioned in Main view for non-biometrics capture section. This setting has been disabled by default.
This allows users to select check-in/checkout when the multi-face capturing mode (Refer Attend client section for more details about multi face mode) is enabled in the NCheck Attend client devices. This setting has been enabled by default.
Server-side face liveness setting can be used to check live faces of the captured face images from NCheck client applications from the server.
The available server-side face liveness options are
Disabled
The server-side face liveness is disabled.
Detect
The attendance will be recorded if the face image is captured from a live face.
Required
The attendance event will be recorded if it is recorded with the live face and the liveness score giving from the algorithm is greater than the Server face liveness confidence threshold .
The value which controls the requirements for server-side face liveness. The greater this value is the stricter rules are applied when deciding if the face is live. Default face liveness threshold value is 50.
This feature available for NCheck Admin clients to prevent recording attendance with non-live faces such as photos and videos. When the client-side face liveness is enabled, the user face must be placed in the face oval in the camera preview and keep still until the liveness checks are completed by the client application. This may take 2-3 seconds when the face is clearly visible to the camera.
The available options are
Disabled
The face liveness is disabled.
Detect
The attendance will be recorded if face image is captured from a live face.
Required
The attendance event will be recorded if it is recorded with the live face and the liveness score giving from the algorithm is greater than the Face liveness threshold for client application .
The value which controls the requirements for client-side face liveness. The greater this value is the stricter rules are applied when deciding if the face is live. Default face liveness threshold value is 50.
Increase the value if same user identified differently time to time during identification. Note that good image quality is required for a higher recognition accuracy during face identification. Default recognition threshold value is 48.
Increase the value if higher verification accuracy is required. Note that good image quality is required for higher accuracy during face verification. Default verification threshold value is 36.
Increase the value if the same user identified differently from time to time. By increasing the value, the system is forced to ignore low quality face images. The default face quality value is 40. Face quality will be 0, if the “Mask detection” setting is set to detect or required.
Neurotechnology Biometric algorithms can recognize faces even the person wearing a mask. In an environment where most people wear face masks (e.g.: Hospitals) this setting will easily identify employees. This feature is available for NCheck Admin clients only.
There are 3 mask detection options available.
Disable
Select this option to identify face without face mask.
Detect
Select this option to identify face with face mask. The detection will be indicated in the clients as follows.
Table 46 Indicators for Detect mask detection option
Indicator of Windows Admin client
Indicator of Android Admin client
Mask detection score >= Mask detection threshold
Mask detection score < Mask detection threshold
Required
To record the event successfully, user must wear a mask. If the mask detection score is greater than the “Mask detection threshold”, attendance will be recorded successfully. The detection will be indicated in the clients as below.
Table 47 Indicators for Required mask detection option
Due to some safety measures, in some use cases such as construction, moto mechanics employees must wear face covering such as safety helmets. The setting can be used to restrict the face covering when employees record attendance in such use cases. This feature is available for NCheck Admin clients only.
There are 2 available options for face covering detection
Disabled
No face covering is required to record attendance.
Detect
Attendance event can be recorded without a face covering. But there will be a hat indication with orange color in the face preview if employee is not wearing a safety helmet.
Required
Attendance event will not be recorded if the face covering score giving by the algorithm is less than the Safety helmet detection threshold . In this case there will be red color hat indication on the face preview.
Increase the value if the enrolling face image duplicates with enrolled face image of another user. By increasing this value, the system is forced to ignore low quality face images. Default value is 48.
Increase the value if the enrolling finger image is duplicated with enrolled finger image of another user. By increasing the value, the system is forced to ignore low quality finger scans. Default fingerprint quality is 40.
Increase the value if the enrolling iris image duplicates with the iris image of another user. By increasing the value, the system is forced to ignore low quality iris scans. Default fingerprint quality value is 50.
Increase the value if the same user identified differently from time to time. By increasing the value, the system is forced to ignore low quality finger scans. Default fingerprint quality is 40.
Increase the value if the same user identified differently from time to time. By increasing the value, the system is forced to ignore low quality iris scans. Default fingerprint quality value is 50.
The Dashboard refresh interval can be set in minutes to refresh the Dashboard to display recent attendance overview. The default refreshing interval is 2 minutes.
Users must select appropriate font from this setting to export report successfully according to the selected control panel language.
The available fonts are
Roboto (Latin)
Default font to export pdf report. Select this language to export report in any western European language.
Simsun (Chinese, Latin)
Select this font to export report in Chinese language.
Ek Mukta (Hindi, Latin
Select this font to export report in Hindi language.
Slot time divides schedule time into appointment booking time slots and visitor appointments can be booked in a selected time slot. Default slot time is 0 and then it takes the whole schedule period as a single slot.
Enable this setting to approve visitor appointments automatically created from online or kiosk pages. Otherwise NCheck administrator must approve the appointments before visit.
Selected booking on hold time to prevent booking anyone else in online and registration device booking pages. This period is known as reservation time out.
Defines the pass type used to read when existing pass is used or issue when generated pass is used from Kiosk or in online appointment booking. RFID passes can be issued only from registration Kiosk devices.
Default Feedback view of NCheck client application when Visitor is identified can be changed with custom visitor feedback view. Custom visitor feedback views can be available for some visit types and can also be added to the system as an extension on request.
Enable, disable changing appointment start time on visitor appointment booking online or from registration Kiosk devices. The default appointment start time is booking shift/time slot start.
Enable, disable changing appointment end time on visitor appointment booking online or from registration Kiosk devices. Default appointment end time is booking shift/time slot end.